Mixing With Pink Noise! | Mix Tips
GET A GREAT STARTING POINT FOR A BALANCED MIX

Before I begin, I'd like to say Thank You to my friend, a "partner in crime", @synchrfz.fhe for getting me curious about this technique. I ended up finding a great way to get a balanced starting point to a balanced mix.
Who Is This For?
To an experienced audio engineer, who have their hearing and skills trained for years, this may just be an extra tool under their belt. But for those who's fresh, those who needs an extra hand and especially for those who uses headphones to mix. This will definitely get you a sweet starting point. Bear in mind that this is NOT a fixed rule for getting a perfect mix. There is no perfect technique in mixing. This will however, get you a perfect starting point to build on the mix with less hassle as far as gain staging and leveling goes.
Why Pink Noise?
Well, to keep it simple and less complicated, Pink Noise has the same frequency distribution of a human's hearing or technically, same as our hearing frequency range and energy distribution of it. Why not White Noise? White Noise, has the same/equal energy distribution per frequency throughout the spectrum which is better for equipment calibration while Pink Noise, has equal energy distribution per octave. Humans' hearing is based on octaves' bands. Whatever we hear and perceive as sound are in octaves. For the highly trained and experienced ears, they can hear the pitch changes within these octaves' bands, but for a normal listener in general, we hear sounds in octaves. So, making Pink Noise, the tool for this trick. For more of a technical details behind this, click Here (External reference).
For short, both White Noise and Pink Noise deal with energy distribution of frequencies.
White Noise : Has equal/same amount of energy per frequency. Best for equipment testing.
Pink Noise : Has all the frequency range of human hearing (20Hz - 20kHz). Equal amounts of energy per octave. (with the power decrease of 3dB per octave). Can be used for testing of perceived sound for human hearing.
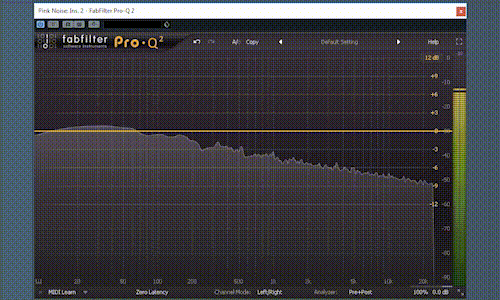
How is this related to mixing? Well, if you play a Pink Noise through a frequency analyzer (Image above), you will see that it looks like how a good commercial mix would be. With a sweet/slight bump on the low, and smooth roll off/flat as it goes up the frequency spectrum. Leveling your mix based to this, will help your tracks sit where they should. Or at least get a good enough starting point which you can adjust after.
How To Use It?
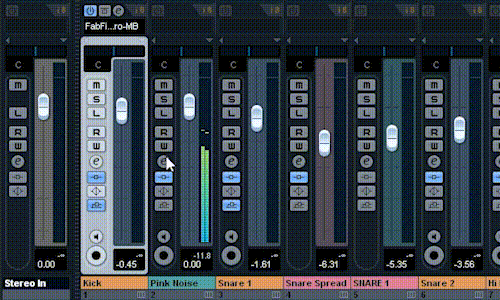
The idea is to set the levels of all the tracks in your session (one by one in solo) so that they are nicely ducked under the Pink Noise until you can barely hear them. Essentially what this does is, all your tracks will sit at the loudness where they should according to the energy of their frequencies which we perceive as their loudness in reference to the Pink Noise as the base point of your mixes overall loudness level.
Preparation.
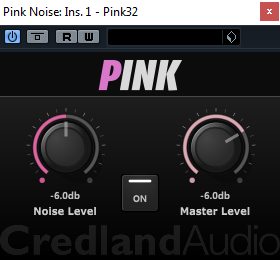
- Get a Pink Noise Audio File or Pink Noise VST. (Obviously...Download for FREE)
- Calibrate your mix session to have a healthy headroom before you begin. Meaning, get your Pink Noise level at the RMS level of a good mix loudness. (I usually have my RMS at -20dB. You may go as far as -15dB but not recommended). This part is really important to get the right balance!
- Fold your mix to Mono. You will yield better results doing this in Mono.
- Make sure your clips/audio files in the mix are not clipping to begin with.
- Arrange your session. Calibrate the Pink Noise with multiple meters possible. (VU, and True Peak). And get a frequency analyzer to visually see what you're doing as well.
Application.
- Again, as mentioned above, make sure your Pink Noise is at the level of where you want your mix to be. The noise is what that's going to set the average level for your mix. So get this right first. (Reduce the speakers/headphones volume. Do this at a low, acceptional hearing volume to get best results)
- Mute all the tracks, let the Pink Noise play and go track by track in Solo. (If there are layered instrument tracks, Solo both layers and adjust to get equal results).
- Solo the 1st track, the "Kick" drum as an example. Increase/decrease the level of the "Kick" drum so that you can barely hear it over the Pink Noise. (Not louder than the Pink Noise, not too low, but duck it under the Pink Noise where you hardly hear the "Kick" drum).
- Repeat the steps for all the tracks in your session.
- Once you're done, turn off the Pink Noise, switch back to Stereo for checking. And voilà! You have a sweet, balanced mix that sounds good enough to get you started with your mix.
Quick tip: Use the "Clip Gain" to adjust the levels of the audio clips itself when adjusting the tracks to the Pink Noise rather than reducing them with the fader which only reduces the Post-Fader volume but not the audio clip itself. However, this is optional but it's the best way to get a good mix level at the end with all your fader at Unity/Nominal position which allows you to have more fader movement to fine tune later.
It's that simple! This not an idea I, or my friend invented, this has been around for decades. But especially for the current days where more and more people getting into audio and learning to mix themselves, this is a great technique to know to help you get started in the right way. Practice yourself to learn the conventions of a balanced mix. Don't always buy into the modern days', "Everything loud" mentality. The more you embrace balance, the better you get. Just like Life. Balance is key.
Thank you for reading, I hope this helped you with your music in producing better quality productions. I was taught by the "Old School" people of the industry so I treasure and embrace the value of quality. I will do my best to share as much as I can to help the community get in the same page and make music that are pleasing to be heard. Until my next post, have fun mixing #Steemians!
Follow me on other social media!
YouTube
Feel free to contact me if you wish for me to work (mix/master) on any of your future projects be it songs or audio for visuals.

We learnt this trick a while back and it definitely made a big difference :-)
True. I heard of it but never really took interest in it until my friend got me curious of it. I loved the result so thought could make a post about it. Definitely worth it. Thank You for reading. Appreciate it!