Compression / Comp | Mixing Essentials | Master The Basics
Getting back on track from where we left off before in the mix essentials. Previously we talked about Equalizers (EQ). If you haven't read that post yet, you can do it Here. Today, I'll be covering the next most essential and important tool to learn to master proper mixing. Compression/Compressors. If you have understood the basics of what an EQ is and are already in the process of mastering it, you're on the right track. Pay attention to Compression as it is quite complicating to master but once you get a hold of it, you can do wonders with it.
It's been a while since my last post. A lot have recently came in my way that I had to deal with. So I apologize for delayed posts and I believe there will be more delays in between my posts. Thank you for bearing with me and supporting.
What Is Compression?
I'll try to be less technical about this. This is something I have seen a few engineers say. Imagine Compression like an "Automated Volume Control". Like a robot continuously riding the volume up and down to keep the audio signal nice and even. That's the practical way of saying it. In general, Compression is the process of:
- Controlling the dynamic range of an audio signal. (From the softest to the loudest.) It brings up the soft parts and brings down the loudest parts of an audio signal. (Even result right?)
- Control the average loudness perceived to give an even, dynamic performance. (More RMS.)
- Wraps a track with a coat of sugar, giving it the life it needs and make it sound natural.
- Adding colors, tone and texture to a track. (With some analog hardware and analog modelled plugins.)
- Polish a track. Give it the character it needs. (Punch, smooth, dynamic, big, soft etc.)
Common Parameters Of A Compressor
Different Compressors come with more and less parameters for the engineer to tweak and control. But for the most part, there are a set of parameters that are very basic and commonly found on basic Compressors. Let's walk through them. Keep in mind that some Compressor hardware/plugin may have all of the basic parameters and some may only have a few of them. These are dependent on the manufacturers but learning the basics will give you the understanding you need to use a Compressor.
1. Threshold
As the name suggests, it's basically the control that allows you to set a particular level to tell the Compressor when it should begin the Compression process over your signal. For example, if you set the Threshold at -9dB, the signal peaks that go above this Threshold limits are the only ones will be Compressed. If the signal does not touch the Threshold level, the Compressor wont be engaged and the signal obviously wont be Compressed.

2. Ratio
The name might be weird but it's just merely a control that allows you to set how much Compression is going to take place or how much Gain Reduction/Level Attenuation is going to happen to your signal. You will find common Ratios that varies from:
1:1 (Unity Gain/No Gain Reduction)
2:1 and 3:1 (Moderate Compression)
4:1 up until 7:1 (Medium Compression)
8:1 and above (Strong Compression)
20:1, all the way up to ∞:1 (Hard Limiting. No signal that goes above the Threshold will pass through.)
Don't be confused. Ratio is conveyed in dB. What do I mean by that? Allow me to pick an example. If you set your Compression Ratios at 2:1, for every 2dB that goes above the set Threshold, that signal will be reduced down to 1dB. If it's set to 5:1, every time the signal exceeds the Threshold by 5dB, that signal will be reduced down to 1dB. If it's set to 8:1, when the signal goes above the Threshold by 8dB, that signal will be reduced down to 1dB. See the pattern? Higher the Ratio, higher the Compression/Gain Reduction that happens for every dB the signal that goes above the Threshold.
I usually think of Ratio like putting pressure on a wound. When we put a finger on a wound, no pressure given, we hardly feel any pain (1:1 Ratio). The more we apply pressure, the more pain we feel. Similar to increasing the Ratio and making the Compressor to be more aggressive and reduce the signal more. Simple ay?
3. Knee
No, not your knee. It's called a "Knee" because it represents the Compression Curve that looks like a "Knee". This is very straight forward, no need for crazy technical explanations. You will find 2 Knee types in most common Compressors. "Soft" and "Hard". Soft Knee has a smooth bending curve at the Compression point while a Hard Knee is like a wall. The difference is how the Compression behaves between the Compressed and Uncompressed state. Soft Knee transitions smoothly from Uncompressed to Compressed state. Hard Knee pretty much gets into Compressing state the moment the Signal reaches above the Threshold and according to the set Ratio. That's it. Yeah. That's all.
4. Attack
This pretty much determines when the Compressor "Attacks" the signal after it goes above the Threshold. A Fast Attack Time instantly clamps and grabs the signal the moment it goes above the Threshold while a Slow Attack Time allows some parts of the signal peaks to go through before it grabs it. Attack Times are usually expressed in Milliseconds and Microseconds while some also express it in dB per seconds. It all depends on the Compressor unit and its' design. Usually, 0ms to 9ms is a Fast Attack Time, 10ms to 100ms and above steps into Medium to Slow Attack Time.
Slow Attack Time can create "Punch", commonly on Percussive instruments (Kick, Snare, etc) because the Compressor allows some of the initial peaks of the signal to go through before it starts to Compress. A Fast Attack Time usually cuts off the initial peaks resulting in a more "Blunt" signal.
5. Release
If the Attack determines when the Compressor decides to start Compressing, the Release decides when to let go of the signal after grabbing and allowing it to return to its' original or Uncompressed state. A Fast Release Time releases the signal fast while a Slow Release Time holds on to the signal for a longer period of time, resulting in a continuous Compression over the signal. Release Times usually have longer time settings as options. From 20ms all the way up to even 2 seconds.
Slow Release Times can reduce the tail of a signal if it's a single instrument and if applied to the entire track, it can help to "Massage" the track giving it the character you as it to give. A Fast Release Time can bring up the tail of a single instrument and on a whole track, it might cause "Pumping" or "Breathing" effect. (Some Compressors have Auto option for the Release.)
6. Output Gain/Makeup Gain
This is the part where you add back the lost/reduced levels from your signal in result of the Compression. To keep it simple, let's say you're reducing around 3db to 5dB by Compressing a signal, you will realize your signal get low in volume after the Compression due to the level attenuation. You add back this lost/reduced levels by increasing the Output/Makeup gain knob/slider. (Some Compressors have Auto option for the Gain Makeup.)
This is also how you bring up and bring down parts of a signal. Example, A Slow Attack Time and Slow Release Time on a Snare can increase the initial hit/peak of the Snare and reduces the tail leaving more of the initial snap of the Snare loud. If done the opposite, Fast Attack Time with Fast Release Time, will reduce the initial peak of the Snare, taking away the snap and leaving the tail Uncompressed. When Output/Makeup Gain is added, it brings up the tail of the Snare, make the room sound of the Snare loud, it also adds density to it.
As you can see, all the parameters are intercommunicating. One determines the behavior of the other. To fully get a hold of Compression, don't be afraid to tweak and test them. Use extreme setting and observe how they react to the signal and what they to do the signal.
The way I learned to understand these parameters was by doing exactly that. So start with a Medium Ratio, pull down the Threshold so that the signal is being Compressed quite a lot. Then play with the Attack and Release times (Attack and Release determines most part on how the Compressor behaves). And slowly set extreme and aggressive setting like higher Ratios, much slower and faster Attack and Release times. You will eventually understand what the Compressor is doing. Spend more time with Compression than all the other processing. Once you master Compression, you will find yourself creating your way of using them because they are very versatile. (Depending on the Compressor unit/plugin.)
4 Types of Compressors
Besides a basic and standard Compressor, there are 4 main types of Compressors that are used for their sonic character, color, texture and behavior in the industry for decades. These compressors have their own history behind them and they hold a special place in the industry for their own reasons. These Compressors are initially designed and built in hardware form which then with technology, evolved into the digital era in the form of plugins. They are Tube Compressors, Optical Compressors, F.E.T Compressors and V.C.A Compressors. I will briefly go through each of them.
1. Tube Compressor
Tube Compressors are one of the oldest type of compression. They are not the fastest reacting compressor. They usually come with Slow Attack and Release Times and Soft Knee by its' nature of design. Tube Compressors usually do not include the Ratio feature for the engineer to control. However, the Ratio of this Compressor gets higher as the Compressor is pushed harder as it is "programmed" internally through its' analog circuits. This is also one of the Compressors that requires the engineer to tune it using the Input and Output gain to control the Compression rather than using the Threshold.
One example of a Tube Compressor is the all famous Variable-MU by Manley and the vintage Fairchild 670. They achieve Compression by re-biasing a vacuum tube within the unit. What this basically means is the Compressor is dependent on the tube itself. Tube Compressors are commonly used as Mastering Compressor to add a smooth, fine coating over a track to "Massage" it and control it in a smooth and colorful way adding the Tube texture to it bringing out the life of a track. They are sweet sounding but they are not suitable for aggressive dynamics control or to serious add punch since they are slow reactive.
2. Optical/Opto Compressor
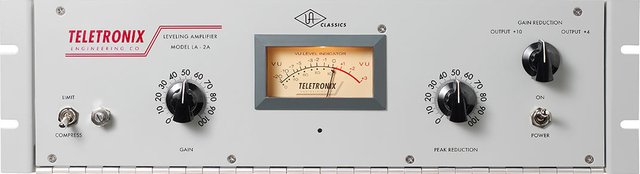
As the name says, Optical Compressors uses a Light Bulb or an LED to receive the input signal. This bulb/LED glows brighter or gets darker in relative response to the input signal that it's receiving. This changes of light in the bulb/LED is then read by a photocell which controls the Gain Reduction of the Compressor. In a simple form. The brighter the bulb/LED gets, the more the Compression is applied.
An important note to understand is since the the Compression is dependent on the intensity of the light that glows brighter or softer, the light itself is increasing/decreasing in result of the temperature rising/dropping on the filament. What does this mean? If you noticed any old light bulbs, they increase in light and temperature slowly and not instantly like a normal light bulb does after flipping a switch these days. So to put this into perspective, the light increases within the Optical Compressor depending on the Average Loudness of the signal that is being fed into it. This is because the light is not primarily reacting to the initial and momentary peaks that is hitting the bulb as much but instead, it's reacting to the average loudness (RMS) of the signal. This results a slower attack time and allows it to reach much higher ratio without any obvious artifacts. In short, they are highly material dependent.
Optical Compressors usually do not come with Threshold, Attack, Release, Knee and Ratios settings. They usually come with only 2 knobs. Gain and Peak Reduction. The gain is how much of the signal is being fed into the Compressor and Peak Reduction is how much Compression is being applied. An industry staple example of this Compressor is the classic Teletronix LA-2A Levelling Amplifier which is still used to this day on countless records. They are said to add density to tracks and tend to "warm" them up. I can vouch for that as well.
3. VCA Compressor
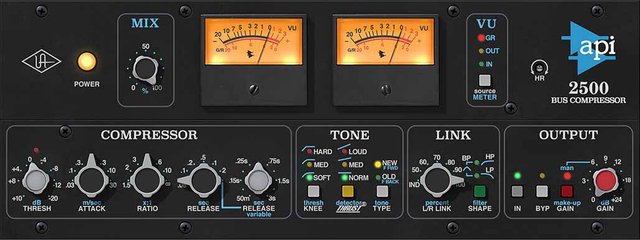
VCA or "Voltage Controlled Amplifier" is a Compressor that reacts highly to Peaks. Their Gain Reductions is controlled, as the name suggests, by the "Voltage Controlled Amplifier" within the unit. VCA Compressors uses solid state or integrated circuits. They come with the usual parameters such as Threshold, Attack, Release, Ratio and Makeup Gain. Even though they are analog, they tend to have less coloration compared to the Tube and Optical Compressors.
VCA Compressors are one of the evolution in Compressors that gave the engineers the versatility they needed. VCA Compressors can be used to have smooth Gain Reduction or get aggressive and slam down on the peaks of a track. They are mostly used to "Glue" tracks together and often time to give an overall punch to a track. VCA Compressors are known to be cheaper than the other Compressor types. The most commonly seen VCA Compressors are the dbx 160 that are known to be used on drums, especially Snare and the SSL Master Buss Compressor that is very famously used to "Glue" tracks and add "Punch" to a track as mentioned above.
4. FET Compressor (Personal Favorite)

FET Compressors use "Field Effect Transistors" as the gain control. The idea was to create a Compressor that emulates the Tube Compressor using transistors. They are designed with the vision of making a more responsive, snappier and punchier version of a Tube Compressor but without Tube in the unit. They come with Input (used to push the Compressor), Output, Attack, Release and Ratio.
FET Compressors are extremely fast and responsive to peaks. It is said that the Slowest Attack Time on an FET Compressor is actually Faster than the Fastest Attack Time on a Variable-MU Compressor. FET Compressors are famous and famed for their signature aggressiveness and in-your-face sound. They are also said to be extremely colored, more than the other types of colored Compressors. They are commonly used to create aggressive, big and punchy sound. Usually in parallel processing. An example of a FET Compressor is none other than the world famous 1176 by Urei. They are pretty much found in almost every studio in the world that utilizes hardware processing. They are famous for the extreme color and sound it produces. Some engineers use it to just run the audio through the unit without any Compression applied just for the color.
It's safe to say that FET Compressors are one of the most widely used Compressor in the world alongside with the Optical Compressor and followed by the VCA Compressor. It's best to have some knowledge of these Compressor types as you progress further, you will find the proper use for these more specific types of Compressors after you've mastered the basic use of a basic Compressor.
Common Types of Compression (Techniques)
Since we are learning about Compressors and Compression. I will add in some short details on some of the Compression techniques that are commonly used by engineers including myself when mixing. This is an extra I am including. You will find better and more creative use of these techniques once you've mastered Compression and its foundation.
1. Sidechain Compression
I can say this is one of the most used technique especially with the ease of digital technology now. The initial idea of Sidechain Compression came from the situation of finding a way to handle the Low End conflict between the Kick and Bass track. Both and Kick and Bass carries Low Frequencies. And in some areas they share the same frequency range. Usually between 50Hz to 150Hz. When they compete for the same space, they tend to muffle up the low and and in most cases, the Kick struggles to cut through. What engineers do is, add a Compressor on the Bass track and send the Kick track to the Compressor as the "Trigger". What this does is, the Kick triggers the Compression that is applied on the Bass track. Every time the Kick plays, the Bass will be Compressed and Reduced to make space for the Kick. This is really helpful as I do it all the time as well.
But it doesn't have to stop there. You can get really creative and creative movement to your song with Sidechain Compression. Try on Hi Hats along with the Kick and Snare. Reducing the Hi Hats every time the Kick and Snare hits. Creating a dynamic motion to the Drums. You can also add Compression on the non-percussive instruments' buss on your song and sidechain the signal from drums and vocals to it. making space for each other. The possibilities are endless. Experiment and you might find some crazy and creative outcomes.
2. Parallel Compression
Also known as New York Compression. The idea is to have to versions of the same signal/track but heavily Compress one of them and blending it to the Uncompressed version. But why? Well, lets take a drum loop for example. It can sounds okay but you want to make it more exciting. You can use EQ and Compressors to add punch, snap and more clarity. But at one point you would realize you're overdoing things that it's totally changing the way the drum loops originally sounded. So, you make another copy of the track, and add extremely heavy Compression to the copied version. Fast Attack Times, taking off the Peaks because we already have it on the original version. We are interested in smashing the copied drum loop to bring up the soft details like the room sound, tail of the in between hits, and make it more dense. Now add this Compressed and smashed drum loop to the original clean version of the drum loop. You have a more dense, bigger and stronger sounding drum loop.
This is the idea behind Parallel Compression. This is also a technique that don't stop there. You can have more punch but removing the tail and bringing up the peak of a signal and blend it with the original version. You can squash vocals, make distort and bright and blend it with the original version to get more grit and character. It goes on. But be careful when doing this excessively and on a whole track because you might get phase issues.
3. Multiband Compression

This is both a Compressor and a Compression type. With the ease of technology, Multiband Compression was created to allow engineers to control different ranges on a frequency spectrum. You can Compress the signal separately according to the frequency range splits, Low, Mid and High. This will allow you to control the different ranges independently giving you more control over them.
It expands further when you combine this with the other techniques. Imagine using the Kick to sidechain only with the Low End of a Bass track rather than the whole Bass track. Using vocals to sidechain with the instruments' buss but only on the Mid and High frequency ranges rather than the whole track. Or heavily Compressing the different ranges each differently and then blending with the original track. You get the idea. So, get creative.
There are differences between a Multiband Compression and a Dynamic EQ even though both function in similar fashion. If you need more explanation, do ask in the comments and I will do a post for it.
Tips and Pointers
- Start with Medium Attack and Release Times. Medium Ratio (2:1 to 5:1). And listen to the way the Compressor behave. Then try some extreme settings. You will learn the way the Compressor is working.
- Never over compress anything unless it's an intentional effect or parallel processing.
- Beware of Low Frequency Compression. Low Frequencies longer waveform cycle. For example, 100Hz spans for 10ms. So if the Attack Time of your Compressor is 3ms, it will alter the waveform causing audible distortion.
- Stack your Compression. Never make one Compressor to do all the heavy lifting. Split the job. One to control the peak. Another to handle the overall levels.
- Don't always buy into the hype of analog modelled Compressors. Learn the basic, master it and go for what you need to do to get the sound you want.
We have completed the essentials. As I've mentioned before. EQ and Compression is the 2 main tool you need to master in order to produce proper mixes. I would highly suggest for you to master one before moving to another because once you have mastered EQ, you can use that knowledge in combination with Compression and get much better results and get even more creative with your art.
Compression is a little tricky. It may seem easy at a glance but it's very easy to get it wrong. I thought I understood Compression but it actually took me more than a year to fully understand how to use it effectively. There's a difference in just knowing how to use it and knowing how to use it effectively. But it's very much doable with determination and high interest.
There's one thing I'd like to tell. Being an engineer myself, I look at audio as an art. I value it a lot. So my aim is to educate or at least spread the right knowledge and mindset you should have if you're new and trying your best to be a great engineer. Respect mixing as an art, create your own art. Have your own style. Be brave and try new things with it. But always stay true to the basics. If there's going to be more knowledgeable engineers, that would mean more quality music. If I can make a difference in one of you, that's still a huge achievement for me.
Thank You for reading. If you're reading this now, you have my highest appreciation for spending your time in appreciating what I've written. If you're a new engineer in the making, keep learning, learning never stops, even for me or anyone on this planet. Never give up. You will be a great engineer soon! Until next time, happy mixing #steemians!
Follow me on other social media!
YouTube
Feel free to contact me if you wish for me to work (mix/master) on any of your future projects be it songs or audio for visuals.

Thank you for sharing your posts with us. This post was curated by TeamMalaysia as part of our community support. Looking forward for more posts from you.
To support the growth of TeamMalaysia Follow our upvotes by using steemauto.com and follow trail of @myach
Vote TeamMalaysia witness bitrocker2020 using this link vote bitrocker2020 witness