Shader Programming: Massively parallel art [Episode 5: Rotozoomer]
PART 5: Textures
Today we'll look at how we can access textures from within our shader, and build the classic "rotozoom" demo effect.
Intro
As we've already seen, we can generate pretty effects without using textures at all; in our Plasma project last episode, we defined all the colours ourselves and didn't need to access any external pixel data.
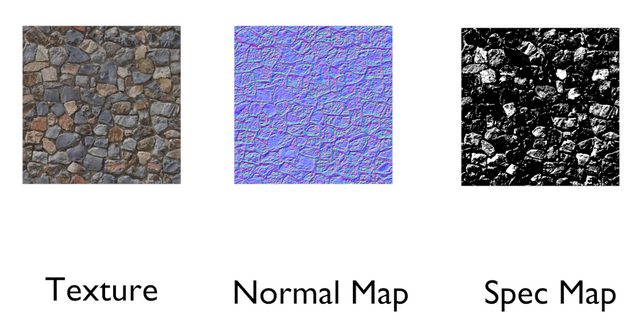
However, remember that the intended use for shaders is to define how materials should be rendered in a 3D scene. For example, if we were writing a "rock" material shader to use in a 3D scene, we might want to use a diffuse texture to give the main colours for the material, a normal map to control bumpiness, and a specular map to control shininess.
Here's an example:
Of course, we're just using a simple single fullscreen quad rather than a full 3D scene, and probably don't need all those different types of map. But we still might want to access textures -- and can make some cool effects by doing so!
Accessing texture data
Shadertoy provides us with 4 separate texture channels. We can load a different texture into each. Sadly, we can't specify our own textures, and instead have to choose between ~20 that Shadertoy provides for us. But no probs, there are quite a few useful textures in there.
GLSL provides a simple function, texture(), that accepts a texture ID and a uv parameter and returns an RGBA colour.
Just like our screenspace uv coordinate, texture coordinates vary from 0.0 to 1.0 in each axis, irrespective of the actual size in pixels of the texture image.
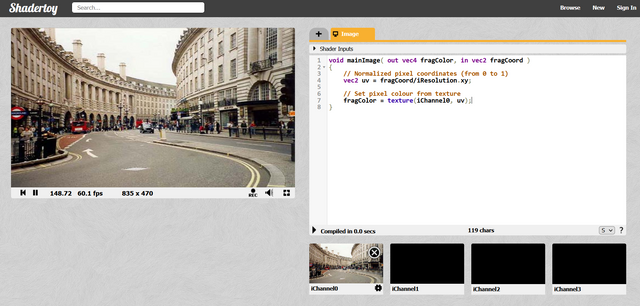
Let's first just directly output a texture to the screen. Head to Shadertoy and make a new shader.
The 4 black boxes underneath the code editor are the texture channels. Click on iChannel0, the one on the far left.
You'll see a dialogue box pop up. Change to the Textures tab, and select a texture you like. I've gone for the picture of London on the 2nd page :)
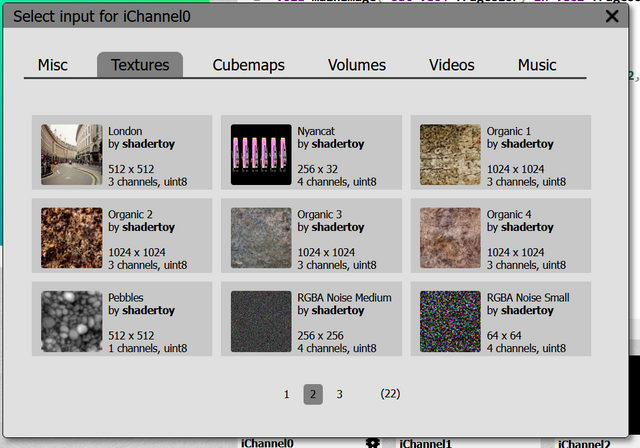
Once you've chosen a texture, click it and then close the dialogue box. You should now see a thumbnail of the texture in iChannel0.
Paste in the following, and hit rebuild:
void mainImage(out vec4 fragColor, in vec2 fragCoord)
{
    // Normalized pixel coordinates (from 0 to 1)
    vec2 uv = fragCoord/iResolution.xy;

    // Set pixel colour from texture
    fragColor = texture(iChannel0, uv);
}
You should see the texture outputted to the render panel.
OK, that illustrates the point, but it's not very interesting to just display the texture statically like that.
Fun time!
We can easily implement scrolling by varying the uv coordinates. For example, try adding these lines before the line that sets fragColor from the texture:
    uv.x += iTime * .3;
    uv.y += sin(iTime);
Alternatively, we can get an interesting effect if we force one of the uv components to remain constant over the image (uv.y = .5;). If we animate this constant with time, we get a lovely "Netflix bars" type animated effect. Try it:
void mainImage(out vec4 fragColor, in vec2 fragCoord)
{
    vec2 uv = fragCoord/iResolution.xy;
    uv.y = sin(iTime * .2);
    fragColor = texture(iChannel0, uv);
}
Well worth pasting into Shadertoy and watching :)

It looks even better if you choose the "Abstract 1" texture in Shadertoy.
Zooming and scrolling
A very useful thing we can do is change the uv coordinate before sampling the texture image.
A multiplication or division to the uv coordinate gives a scaling effect, while an addition/subtraction gives an offset or scroll effect.
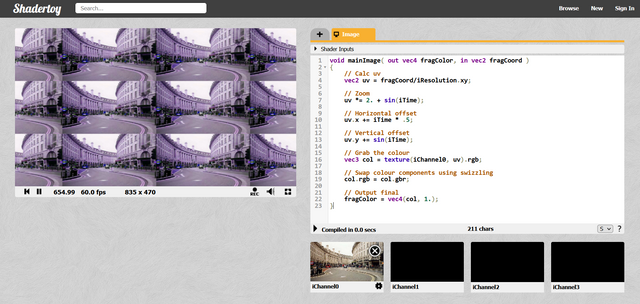
We can combine these together to get a nice animated scrolling zoom:
void mainImage(out vec4 fragColor, in vec2 fragCoord)
{
    // Calc uv
    vec2 uv = fragCoord/iResolution.xy;

    // Zoom
    uv *= 2. + sin(iTime);

    // Horizontal offset
    uv.x += iTime * .5;

    // Vertical offset
    uv.y += sin(iTime);

    // Grab the colour
    vec3 col = texture(iChannel0, uv).rgb;

    // Swap colour components using swizzling
    col.rgb = col.gbr;

    // Output final
    fragColor = vec4(col, 1.);
}
Note that I also use component swizzling to very easily rearrange the colour components of the image.
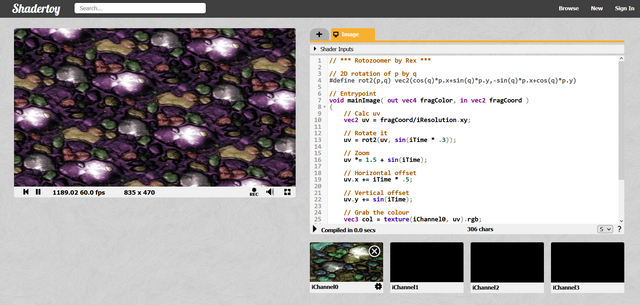
Rotating
Just as we're able to scale and offset the uv coordinates, we can also rotate them before sampling the texture.
Here's a very useful macro that I use in a lot of my shaders. It accepts a vec2, and rotates it by the given amount (in radians).
// 2D rotation of p by q
#define rot2(p,q) vec2(cos(q)*p.x+sin(q)*p.y,-sin(q)*p.x+cos(q)*p.y)
It's defined as a C-style macro, but could equally well be written as a function.
If we add this into our shader, we've achieved the classic rotozoom effect!
// *** Rotozoomer by Rex ***

// 2D rotation of p by q
#define rot2(p,q) vec2(cos(q)*p.x+sin(q)*p.y,-sin(q)*p.x+cos(q)*p.y)

// Entrypoint
void mainImage(out vec4 fragColor, in vec2 fragCoord)
{
    // Calc uv
    vec2 uv = fragCoord/iResolution.xy;

    // Rotate it
    uv = rot2(uv, sin(iTime * .3));

    // Zoom
    uv *= 1.5 + sin(iTime);

    // Horizontal offset
    uv.x += iTime * .5;

    // Vertical offset
    uv.y += sin(iTime);

    // Grab the colour
    vec3 col = texture(iChannel0, uv).rgb;

    // Swap colour components using swizzling
    col.rgb = col.gbr;

    // Output final
    fragColor = vec4(col, 1.);
}
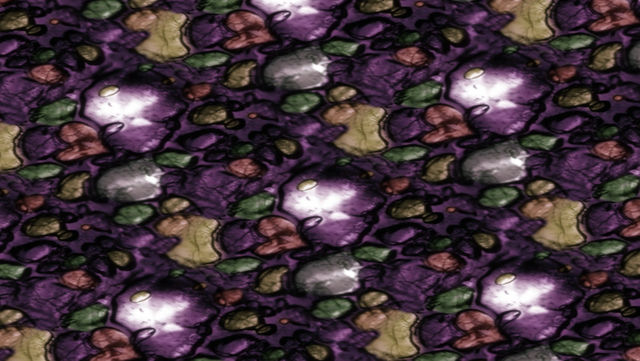
Choosing one of the textures which seamlessly tiles is a good idea for this; here it is with "Abstract 1".
Please do drop a comment if you're following along with the series, or have any questions.
See you next time!
View the shaders online
Now that we're past the trivial stuff, I'm uploading the final versions of our shaders to Shadertoy so that you can see them running with a single click. I'll keep this list updated each episode.
I invite you to start with the achievements of the newcomer community to have a better chance of receiving rewards in the future.
https://steemit.com/trending/hive-172186