SingularityDAO Launchpad — How To
SingularityDAO Launchpad — How To

Today, in preparation for the NuNet token launch on the 17th of November, 13:00 UTC+0, we are proud to unveil the SingularityDAO Launchpad for the first time. It has been a race against the clock to have this current version ready in time for this week’s event, but thanks to the hard work of our development team we have made it!
As with all of SingularityDAO this should be considered a V1 of how we envisage the final form and at the end of the year will undergo a huge facelift when we launch V2 of the SDAO Platform. Currently the launchpad will operate on a whitelisted, first come, first served basis. As a team we have been undertaking a competitive analysis of other launchpads in the crypto ecosystem and while FCFS is certainly not ideal, we feel that none of the current implementations adequately solve the problem of fair and equal opportunity token distribution.
With this in mind we are hard at work brainstorming a new and highly interactive alternative to correctly handle community member allocations at launch time. Whatever new system we create will be done so with the goal of removing the current bias of, “The rich get richer” and/or “random chance” and will endeavour to give everyone a fair shot at earning allocations based on a range of factors. For the time being however, it’s first come first serve, so please be ready at 13:00 UTC+0 on November the 17th!
Below we include a brief walkthrough of how to participate in the first launch event on the SingularityDAO Launchpad. (It’s brief because it’s super easy!)
Guide on how to interact with launchpad:
Participating in the Nunet token launch is very easy when using the SingularityDAO Launchpad.
Step 1: Connect your wallet.
Our launchpad on launchpad.singularitydao.ai supports any wallet compatible with either MetaMask or WalletConnect. You’ll have to connect the address that you supplied to us when doing the KYC, as that’s the whitelisted address. Please make sure your software and or hardware wallet is up-to-date. For ledgers specifically, make sure you have enabled “Blind signing”, this is the newer version of “Enable contract data”.
Step 2: View the pool you have been whitelisted for.
This guide is relevant for both WETH and USDT pools — The steps are the same although of course USDT does not need to be wrapped!

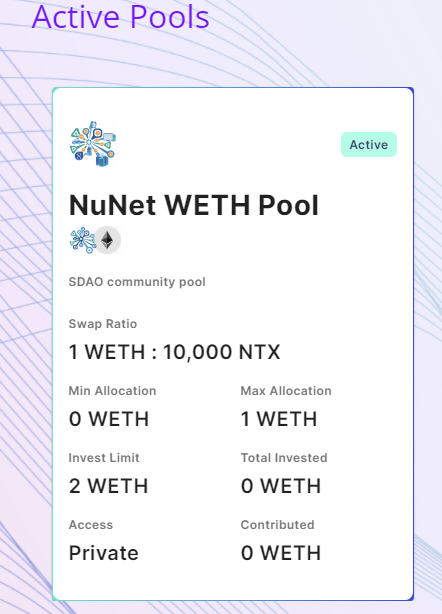
When your address is whitelisted for a pool it shows that pool under ‘Active pools’ and it has a green ‘active’ label next to it. All other pools that are currently live, but that are not available to you are listed under ‘live pools’.
If you are whitelisted for a WETH pool, please note that you need to wrap ETH. You can do so here.
Sending ETH won’t work and can result in losing the ETH!
You must send WETH.
Here’s a quick YouTube tutorial on how to wrap ETH.
Click on the pool to interact when you are all set.
Step 3: Approve interacting with the smart contract.

Before you can interact with our smart contract, you will need to approve our smart contract to allow it to interact with your wallet. This is something we can’t change and it’s just how the ethereum blockchain works. Please keep in mind that approving is not the same as swapping tokens and does not guarantee you any tokens.

After you press the approve button, sign the transaction in your wallet and wait for the transaction to be processed. There will be a gas fee associated with this.
Step 4: Swap your tokens.

After the smart contract is approved you can proceed to swap your WETH or USDT tokens for NTX tokens.
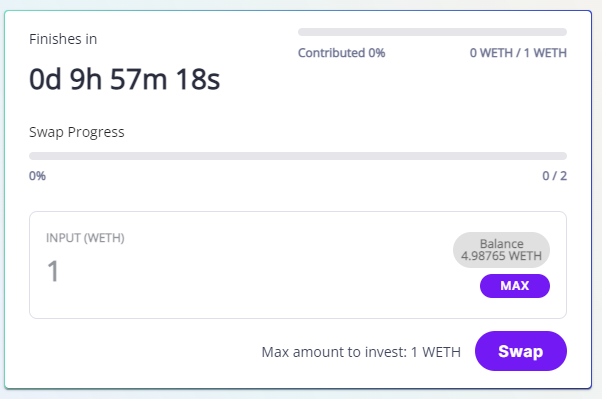
This panels shows you:
How long the pool is still open.
Swap progress — How many tokens are already swapped. When the progress bar is at 100% we won’t accept any more tokens and the pool will be closed.
Contributed — How many tokens you have contributed and how many you are still able to contribute.
Balance — The amount of tokens you have. When you are ready, you can enter the amount of WETH or USDT you would like to swap, press the swap button and sign the transaction. When successful, the contributed % will go up. There will be a larger gas fee for this transaction.
If the pool fills before your transaction is complete, the tokens you want will be returned to you, although you may lose some of that gas fee.
Step 5: Claim your tokens
10% of your tokens will be available on November 26th, the rest will unlock in monthly tranches of 7.5%. You can claim the tokens from the allocations page which you can reach by clicking the ‘Allocations’ link at the top right of the launchpad.
To claim, simply press claim and sign the transaction. There will be a gas fee for this transaction.
You can choose to claim each month, or allow your tokens to accumulate and claim them all in one go to save gas fees.
Goodluck at the launch event!