[머신러닝] 학습 정확도 올리기 (Neural Network, Xavier Initialization)
Enhancing Learning Accuracy
몇가지 기술적인 방법을 사용해 학습의 정확도를 높여보자. 90%와 91%는 확연히 다른 정확도다. 단 1%의 정확도를 높이기 위해서 여러 방법을 사용할 필요성은 충분하다.
Softmax Classifier for MNIST

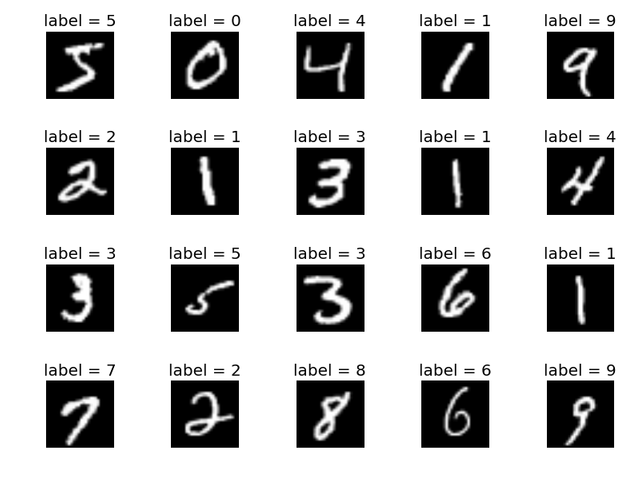
0 ~ 9의 10가지 숫자 이미지를 학습한 후 새로운 숫자 이미지가 어떤 숫자인지 밝혀내는 MNIST 케이스를 학습해보자.
import tensorflow as tf
from tensorflow.examples.tutorials.mnist import input_data

# Check out https://www.tensorflow.org/get_started/minist/beginners
# for more information about the mnist dataset
mnist = input_data.read_data_sets('MNIST_data/', one_hot=True)

nb_classes = 10

# MNIST data image of shape 28 * 28 = 784
X = tf.placeholder(tf.float32, [None, 784])
# 0 ~ 9 digit recognition = 10 classes
Y = tf.placeholder(tf.float32, [None, nb_classes])
기본적으로 softmax classifier를 사용해 학습을 진행할 것이다. 이를 위해 데이터를 불러오고 X와 Y를 각각 784개와 10개 라는 데이터 셋 형태에 맞게 placeholder로 지정해둔다.
W = tf.Variable(tf.random_normal([784, nb_classes]))
b = tf.Variable(tf.random_normal([nb_classes]))

# Hypothesis (using softmax)
hypothesis = tf.matmul(X, W) + b

cost = tf.reduce_mean(tf.nn.softmax_cross_entropy_with_logits(logits=hypothesis, labels=Y))
optimizer = tf.train.AdamOptimizer(learning_rate=0.01).minimize(cost)

# initialize
sess = tf.Session()
sess.run(tf.global_variables_initializer())

# parameters
training_epochs = 15
batch_size = 100

# training model
for epoch in range(training_epochs):
    avg_cost = 0
    total_batch = int(mnist.train.num_examples / batch_size)

    for i in range(total_batch):
        batch_xs, batch_ys = mnist.train.next_batch(batch_size)
        c, _ = sess.run([cost, optimizer], feed_dict={X: batch_xs, Y: batch_ys})
        avg_cost += c / total_batch

    print('Epoch: ', '%04d' % (epoch + 1), 'Cost: ', '{:.9f}'.format(avg_cost))

print('Learning Finished!')

# Test model and check accuracy
correct_prediction = tf.equal(tf.argmax(hypothesis, 1), tf.argmax(Y, 1))
accuracy = tf.reduce_mean(tf.cast(correct_prediction, tf.float32))

print('Accuracy: ', accuracy.eval(session=sess, feed_dict={X: mnist.test.images, Y: mnist.test.labels}))
tf.nn.softmax_cross_entropy_with_logits로 cost를 정의하고 100개의 batch size에 맞게 분할해 학습을 진행했다. 결과를 살펴보자.
Epoch:  0001 Cost:  1.306495600
Epoch:  0002 Cost:  0.505620208
Epoch:  0003 Cost:  0.417359715
Epoch:  0004 Cost:  0.374500989
Epoch:  0005 Cost:  0.348085245
Epoch:  0006 Cost:  0.327339614
Epoch:  0007 Cost:  0.317517065
Epoch:  0008 Cost:  0.306453589
Epoch:  0009 Cost:  0.299355134
Epoch:  0010 Cost:  0.296514720
Epoch:  0011 Cost:  0.293013301
Epoch:  0012 Cost:  0.287140377
Epoch:  0013 Cost:  0.283342587
Epoch:  0014 Cost:  0.279234193
Epoch:  0015 Cost:  0.278442867
Learning Finished!
Accuracy:  0.9179
cost가 계속해서 줄어드는 것은 물론이고 정확도도 91%에 달한다. 꽤 괜찮은 학습 진행도다. 하지만 뭔가 아쉽다. 나머지 9%를 채울 수 있는 방법이 없을까.
Neural Net for MNIST
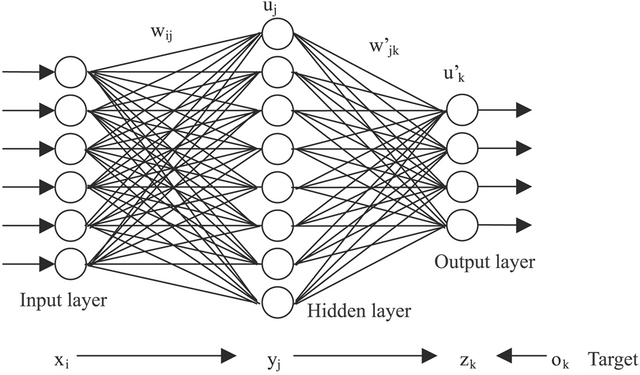
Neural Net을 사용해 더 정확도 높은 학습을 진행할 수 있다. 우리 뇌의 신경망과 같이 수많은 단계를 상정해 학습 정확도를 높이는 방법이다. TensorFlow를 사용하면 몇 줄의 코드로 간단하게 수행할 수 있다.

...
# with Hidden layers
W1 = tf.Variable(tf.random_normal([784, 256]))
b1 = tf.Variable(tf.random_normal([256]))
L1 = tf.nn.relu(tf.matmul(X, W1) + b1)

W2 = tf.Variable(tf.random_normal([256, 256]))
b2 = tf.Variable(tf.random_normal([256]))
L2 = tf.nn.relu(tf.matmul(L1, W2) + b2)

W3 = tf.Variable(tf.random_normal([256, 10]))
b3 = tf.Variable(tf.random_normal([10]))
hypothesis = tf.matmul(L2, W3) + b3

...
단 두단계 즉, input layer에서 output layer로 바로 결과를 도출해내지 않고 중간에 Hidden layer를 추가함으로써 더 깊은 학습이 이루어지도록 한다. 기존에는 W라는 가중치 하나와 b 절편 하나만 있었다면, NN에서는 여러개의 가중치와 절편을 추가한 후 각각 layer의 형태로 이어 최종적인 hypothesis를 정의한다.
Epoch:  0001 Cost:  50.990963163
Epoch:  0002 Cost:  9.531193339
Epoch:  0003 Cost:  5.002021551
Epoch:  0004 Cost:  3.506379556
Epoch:  0005 Cost:  2.635879475
Epoch:  0006 Cost:  2.170568756
Epoch:  0007 Cost:  2.112672888
Epoch:  0008 Cost:  1.893937673
Epoch:  0009 Cost:  1.560527597
Epoch:  0010 Cost:  1.381036658
Epoch:  0011 Cost:  1.096689540
Epoch:  0012 Cost:  1.311521387
Epoch:  0013 Cost:  0.962202391
Epoch:  0014 Cost:  0.869026920
Epoch:  0015 Cost:  0.783920336
Learning Finished!
Accuracy:  0.9598
결과를 보니 96% 정확도가 나왔다. 무려 5%p의 정확도가 상승했다. 이정도로도 훌륭한 결과이지만 그래도 뭔가 아쉽다. 더욱 학습 성능을 높여보자.
Xavier initializer for MNIST
더불어 우리의 입력값을 더 정확하게 맞출 수 있다. 자세한 설명은 논문 등을 통해 찾아보면 되지만 Xavier initializer를 통해 fan_in과 fan_out에 대한 fine tuning을 할 수 있다는 사실을 알면 된다.
input = fan_in과 output = fan_out 사이에 서로 미분과 적분의 관계가 있다. 따라서 정확한 결과값이 나오기 위해서는 전 단계에서 미분을 하거나 다음 단계에서 적분을 할 경우 서로의 값이 나와야 한다는 의미다. 이 사이에서 정확한 값을 맞춰주는 변수를 찾기 위해 Xavier initializer가 역할을 해준다. 역시 TensorFlow로 손쉽게 구현할 수 있다.
...
# with Hidden layers
w1 = tf.get_variable("w1", shape=[784, 256],
                    initializer=tf.contrib.layers.xavier_initializer())

b1 = tf.Variable(tf.random_normal([256]))
L1 = tf.nn.relu(tf.matmul(X, w1) + b1)

w2 = tf.get_variable("w2", shape=[256, 256],
                    initializer=tf.contrib.layers.xavier_initializer())

b2 = tf.Variable(tf.random_normal([256]))
L2 = tf.nn.relu(tf.matmul(L1, w2) + b2)

w3 = tf.get_variable("w3", shape=[256, 10],
                    initializer=tf.contrib.layers.xavier_initializer())

b3 = tf.Variable(tf.random_normal([10]))
hypothesis = tf.matmul(L2, w3) + b3
...
tf.contrib.layers.xavier_initializer()라는 메소드를 사용하면 구현할 수 있다. 기존의 학습 방식과 크게 달라진 것이 없지만 Xavier initializer를 사용했을 경우 결과를 살펴보자.
Epoch:  0001 Cost:  0.285708523
Epoch:  0002 Cost:  0.141454960
Epoch:  0003 Cost:  0.120987149
Epoch:  0004 Cost:  0.100687814
Epoch:  0005 Cost:  0.098011315
Epoch:  0006 Cost:  0.092047083
Epoch:  0007 Cost:  0.091857228
Epoch:  0008 Cost:  0.087578903
Epoch:  0009 Cost:  0.091057251
Epoch:  0010 Cost:  0.076424831
Epoch:  0011 Cost:  0.075217371
Epoch:  0012 Cost:  0.072169291
Epoch:  0013 Cost:  0.070781935
Epoch:  0014 Cost:  0.064019086
Epoch:  0015 Cost:  0.065360429
Learning Finished!
Accuracy:  0.9656
실제로 정확도가 더 높아졌다. 정확도가 100%에 가까워질 수록 단 1%p의 정확도를 높이는 것도 어렵다는 사실을 감안하면 훌륭한 결과다. 그럼 여기서 더 높일 수 있는 방법은 없을까.
짱짱맨 호출에 출동했습니다!!