Javascript Programming: Building an automatic Image slideshow with Html, CSS, and Javascript
Hello and Welcome.
I will take you through the process of creating a slideshow. I will make the tutorial very simple and understandable for everyone. There will be no framework or Library used. It will be pure HTML, CSS, and Javascript.
I will be using Sublime Text in this tutorial and it can be downloaded here.
Creating an automatic image slideshow means you need the images somewhere and a way to show each image in a pre-determined second. This means once the first image displays, the other image will show after a pre-determined seconds, and the third image and so on. You can check out my past tutorial here to brush up on creating your first webpage.
I will start with creating the html page and inserting the pictures there.
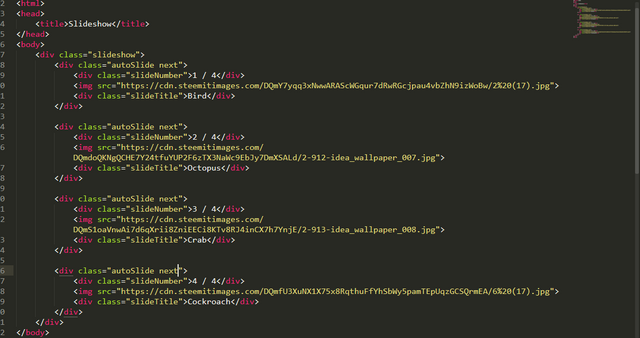
The above image is the HTML code. I have created a set of divs and you can see the image tag with the image link <img src="https://cdn.steemitimages.com/DQmY7yqq3xNwwARAScWGqur7dRwRGcjpau4vbZhN9izWoBw/2%20(17).jpg">. I needed somewhere to host the images so that it will be available for use by anyone. I used the steemit generated pictures link and saved my stress of using hosting services like Cloudinary. You just need to upload your picture on steemit and copy the link starting from https to the image extension which is .jpg in this case. The other divs contain the Slide number and the slide caption.
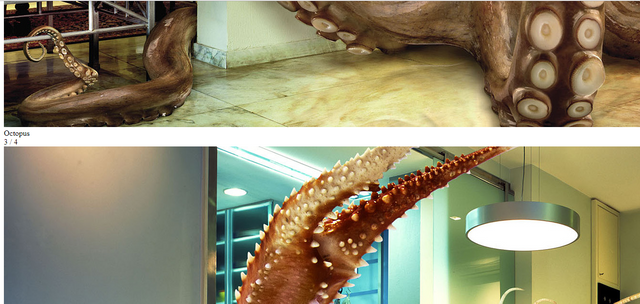
When you look at the output generated in the browser, the picture is too big and everything is looking ugly. That is the work of CSS and let us rectify that.
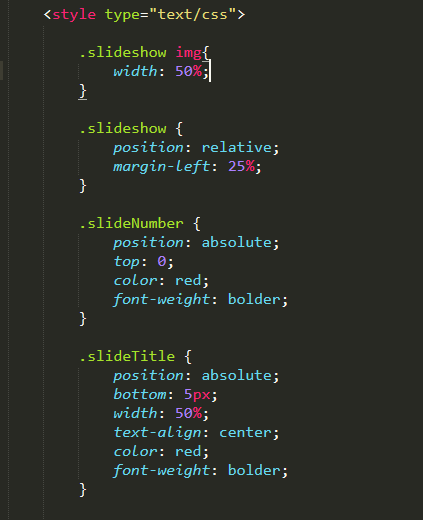
The image above showed the CSS properties and values applied to the html document. I placed the CSS codes in the head section so that all the codes will be in the same file.
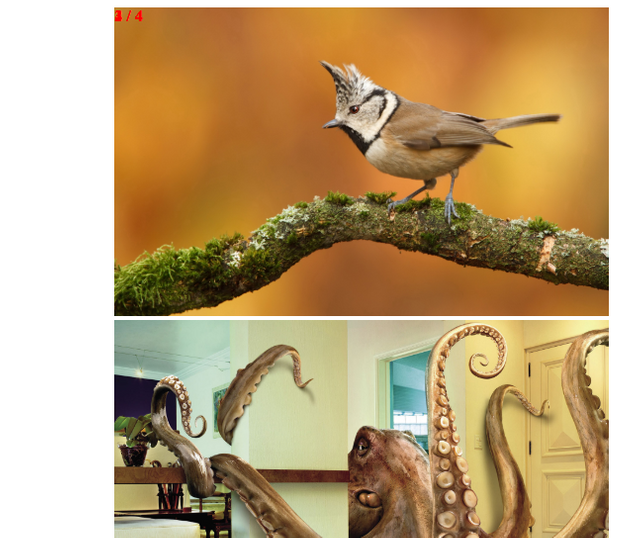
The first thing I did was to specify the images width and I set all the images width to 50% which is half the original value. Then I added some positioning properties to the slideshow container by moving it some percentage off the left. The next thing is specifying where the SlideNumber and slideTitle will be. The slideNumber will be at the left hand corner at the top and that’s why I specified top:0; and added a red color so that it will be visible. I also did the same for the slideTitle but with a bottom property.
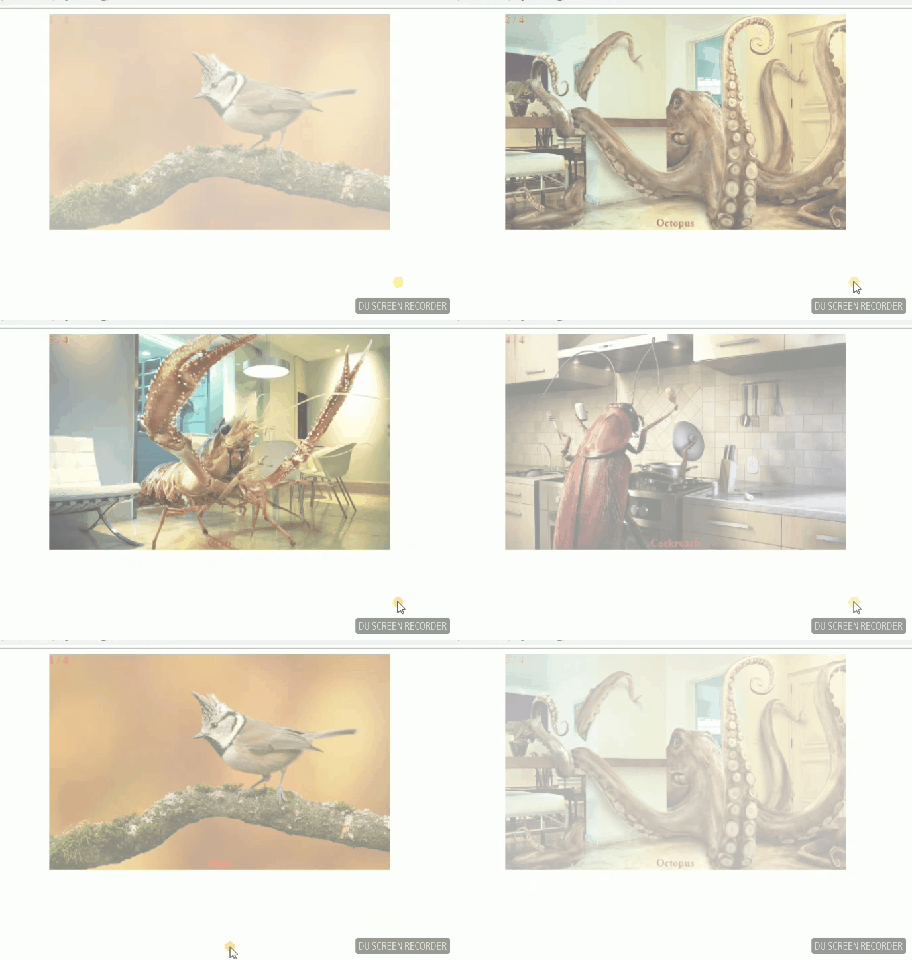
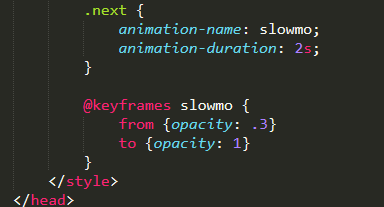
The next thing I did is to add some animation properties. We don’t just want our images to display once and move to the next image without some animation. That’s why I have added the animation name and animation duration. The animation name slowmo will then display from 0.3 opacity level to 1.0. You can see that the image is now displaying better in the browser but still far from what we want to achieve.
This is where Javascript comes in
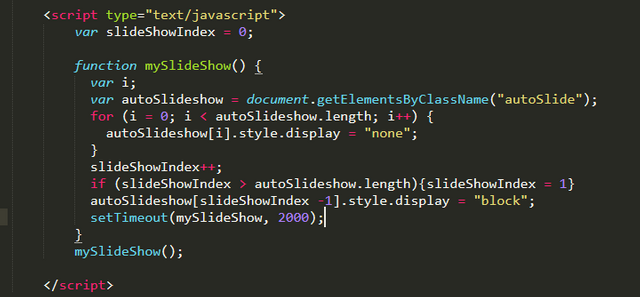
I know you are wondering what all those Javascript codes above are. I will explain everything now. The parts above can be divided into 3.
- The first part to hide the image
- The second part is just a counter
- The third part to display the images
I assigned the number 0 to a variable named slideShowIndex that will act as the counter. The next thing is creating a function for our slideshow and I created one named mySlideShow that will house other code blocks required for the slideshow to work.
The first thing in the function is for us to hide all the images and display them one after the other.
var i;
          var autoSlideshow = document.getElementsByClassName("autoSlide");
          for (i = 0; i < autoSlideshow.length; i++) {
            autoSlideshow[i].style.display = "none";
          }
I initialized a var i that will be used to iterate through the slideshow classes using a for loop. I need the slides classes and I accessed the DOM using var autoSlideshow = document.getElementsByClassName("autoSlide");. This will return a HTML collection in form of an array. This is where we need the forLoop to iterate through the HTML collection and hide the images.
The forLoop is saying take i as 0 and when i is less than the autoSlideshow length, change the display of autoSlideshow[i] to none, then add 1 to i i++ and repeat. It will continue until i is equal or greater than the autoSlideshow length. If you remember your array, you will know that accessing array values starts from arrayName[0] arrayName[1] arrayName[2] and so on.
Now, the autoSlideshow.length is 4 since there are 4 divs with the className of autoSlide. When the results are returned as HTML collection in form of array, we will have 0,1,2,3 which is total of 4 in length. Now, it is like for (i=0; 0 < 4; i++){ autoSlideshow[0].style.display = "none";}, (i=0; 1 < 4; i++){ autoSlideshow[1].style.display = "none";}, (i=0; 2 < 4; i++){ autoSlideshow[2].style.display = "none";}, (i=0; 3 < 4; i++){ autoSlideshow[3].style.display = "none";}. The program stops immediately i is no longer lesser than 4.
The above explanation shows how the divs/images are hidden.
The second part of the Javascript code is just a counter slideShowIndex++; and it adds 1 to the slideShowIndex every time the code runs. Remember I said thisvar slideShowIndex = 0;` before.
The third part will now display the images and the slideNumber plus caption one after the other.
if (slideShowIndex > autoSlideshow.length){slideShowIndex = 1}
          autoSlideshow[slideShowIndex -1].style.display = "block";
          setTimeout(mySlideShow, 2000);
This is a straightforward code and it’s readable. Let’s discard the first one and move to the other part.
autoSlideshow[slideShowIndex -1].style.display = "block"; Remember I already hide the images, now we need to make them visible again. Since our autoSlideshow returns a HTML collection in form of an array, we can just say autoSlideshow[slideShowIndex -1] and whatever comes out should be displayed. Then we set the timeout to run the mySlideShow every 2 seconds.
Now the full explanation.
Remember the slideShowIndex++; up there. It now means autoSlideshow[1 -1] = autoSlideshow[0], then after 2 seconds when the code runs again which slideShowIndex++ runs and becomes 2, autoSlideshow[2 -1] = autoSlideshow[1], then after 2 seconds when the code runs again which slideShowIndex++ runs and becomes 3, autoSlideshow[3 -1] = autoSlideshow[2], then after 2 seconds when the code runs again which slideShowIndex++ runs and becomes 4, autoSlideshow[4 -1] = autoSlideshow[3].
It continues on like that and there will be a time when the slideShowIndex value will exceed the autoSlideshow length of 4. In order to avoid this, we say if (slideShowIndex > autoSlideshow.length){slideShowIndex = 1}. This means if the slideShowIndex is greater than the autoSlideshow.length(4), turn slideShowIndex to 1. When it turns to 1 back, it restarts the cycle again and again till infinity.
The next thing is calling the function by mySlideShow(); and there you have your automatic slideshow.
You can see it is simple as ABC. You can add more images and it will function well as the Javascript code is dynamic.
You can view the full working code here on Codepen and modify as you like. You can also copy the code there for use.
References
Arrays-MDN | forLoop | setTimeout-w3schools
Posted from my blog with SteemPress : https://mysteemblog.000webhostapp.com/2019/12/javascript-programming-building-an-automatic-image-slideshow-with-html-css-and-javascript
So if I want to post say 50 images in one post , how can I use this ?
It will be great to probably create an app even, which would allow uploading images, to steem blockchain, and then use the library, and them make one post.
That is the code you need to replicate. You can add as much as you like. You just make sure they are all in the parent container i.e the container with the slideshow className.
You add whatever figure you want and caption it. You can also add whatever image you want.
That will be great. I am still improving on my backend skills. I hope to build something great with the Steem blockchain too.
I tried to put in a post, but not getting the same effect. WE need someone with better front end skills to make this happen.
I will be interested. Maybe I can help with a few stuffs.
So first thing to try out would be how we can embed this in a post , to show the slideshow of several photos.
Once that is done, then the second step would be to have a mobile app, that would allow one to select multiple photos from his phone and upload. The app would first upload the images one by one, keep the URLs and then finally make a post by using the image links.
There will be lot of other changes needed, but this may be the basic idea for SteemBook may be ?
Thanks for sharing these information!
Steem on!
Thank you. I am glad you find it useful.
Hello very good material. It would be important that you leave some references, that would help you receive better support from steemstem.
Thank you. I will endeavour to add some references where users can get more information on some of the core concepts used.
Adjustments made now
Congratulations @zoneboy! You have completed the following achievement on the Steem blockchain and have been rewarded with new badge(s) :
You can view your badges on your Steem Board and compare to others on the Steem Ranking
If you no longer want to receive notifications, reply to this comment with the word
STOPVote for @Steemitboard as a witness to get one more award and increased upvotes!
This post has been voted on by the SteemSTEM curation team and voting trail. It is elligible for support from @curie and @minnowbooster.
If you appreciate the work we are doing, then consider supporting our witness @stem.witness. Additional witness support to the curie witness would be appreciated as well.
For additional information please join us on the SteemSTEM discord and to get to know the rest of the community!
Please consider using the steemstem.io app and/or including @steemstem in the list of beneficiaries of this post. This could yield a stronger support from SteemSTEM.