How to run a IOST Servi-Node
Introduction
The following tutorial will guide you step by step trough the process of running a servi-node on the IOST Blockchain. For more information regarding IOST and their Block Production Algorithm please go to iost.io.
At the time of writing this tutorial the IOST Mainnet has not been launched, so we will create a Servi-Node for the Everest Testnet version 2.5.0, however the process should be the same for the Mainnet once its launched.
On this guide we will assume that you have some basic Linux knowledge and that you understand how to ssh into a remote server.
Prerequisites
Please install this packages before you start the tutorial:
- Curl (any version you like)
- Python (any version you like)
- Docker 1.13/Docker CE 17.03 or newer
- Docker Compose
Step by Step Tutorial
1.- Get a Server from one of your preferred platform.
A 8gb Ram VPS or dedicated server is required, you must also make sure you have enough disk to store the blockchain. This guide is intended for Ubuntu 16.04 or 18.04, but you can also select other operating systems as long as they support Docker.
If you don't have a server provider, I recommend Vultr.io because they have Bitcoin payments and you can also scale up very quickly, you can use this referral code to get $25 of free credit on your first buy: https://www.vultr.com/?ref=7825074-4F.
2- Once you have your IP address , log in to the server and do the routinary initial set up. Installing fail2ban and disabling password authentication to your server is also recommended for security reasons.
3- The first thing you need to do is create the server directory where your Data will be stored.
mkdir iserver
cd iserver
4- Inside the iserver folder, download the latest genesis and iserver.yml files.
curl "https://developers.iost.io/docs/assets/testnet/latest/genesis.tgz" | tar zxC .
curl "https://developers.iost.io/docs/assets/testnet/latest/iserver.yml" -o iserver.yml
5- Go back to your root folder and create the docker-compose.yml file
cd ..
sudo nano docker-compose.yml
6- Inside the text editor, paste this text:
version: "2"

services:
 iserver:
  image: iostio/iost-node:2.5.0
  container_name: iserver
  restart: on-failure
  ports:
   - "30000-30003:30000-30003"
  volumes:
   - YOURDATADIR:/var/lib/iserver:Z
Replace YOURDATADIR with the directory where your iserver is located, it should be /root/iserver if you followed this guide and are under the root user.
7- Exit the nano editor by tying ctr+x and run the docker container
docker-compose up -d
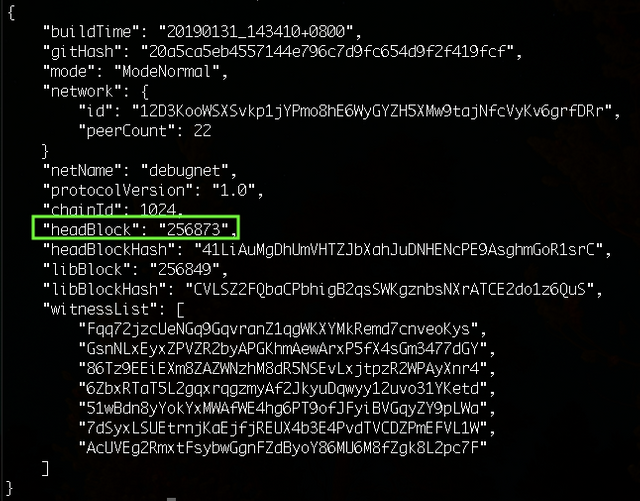
8- Check that the docker is running and the blockchain is syncing
docker-compose exec iserver ./iwallet state

9- Now you need to wait until you are fully synced, that is when your "headBlock" matched the head block of the IOST Explorer
10- While your node is syncing you can create your IOST account. First thing you will need is a key pair.
docker-compose exec iserver ./iwallet key

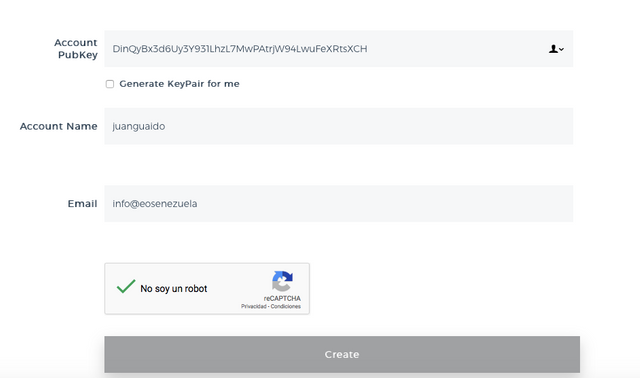
11- Head over to the IOST Explorer account creation page and use your Pubkey to create an account, remember that the name should be between 9 t 12 characters long.

12- Go back to the terminal and import your account using this command
docker-compose exec iserver ./iwallet account --import <THENAMEYOUPICKED> <YOUR PRIVATE KEY>
13- Add your private key to the server.yml file we downloaded at step 4. To do so, you must replace the generic key provided on the file and put your own private key after "seckey:". For the mainnet it is recommend we create a second set of keys that we will use only for signing blocks, but for testnet we can just add the one we just created.
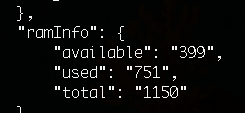
14- Now we have created our account we can go ahead and register as a servi-node, but first lets make sure we have enough RAM available by checking our balance.
docker-compose exec iserver ./iwallet balance <YOURACCOUNT>

15- If you don't have any RAM available you can buy some with this command
docker-compose exec iserver ./iwallet --account <YOURACCOUNT> call 'ram.iost' 'buy' '["<YOURACCOUNT>","<YOURACCOUNT>",1000]' --amount_limit '*:unlimited' --chain_id 1024
16- Lets now register the producer. Note that your Network ID can be obtained with the "iwallet state" command specified on step 8.
docker-compose exec iserver ./iwallet --account <YOURACCOUNT> call 'vote_producer.iost' 'applyRegister' '["<YOURACCOUNT>","<YOURPUBLIC KEY>","COUNTRY","WEBSITE","YOUR NETWORK ID",true]' --amount_limit '*:unlimited'
17- Now we start the producer
docker-compose exec iserver ./iwallet --account <YOURACCOUNT> call 'vote_producer.iost' 'logInProducer' '["<YOURACCOUNT>"]' --amount_limit '*:unlimited'
18- Your servi-node is now register and can be voted in by the community, you may also chose to vote for your own producer with this command.
docker-compose exec iserver ./iwallet --account <YOURACCOUNT> call "vote_producer.iost" "vote" '["<YOURACCOUNT>","<YOURACCOUNT>","<AMOUNT>"]
19- You can ask for testnet votes on the #development channel of [IOST Slack Channel](19- You can ask for testnet votes on the #development channel of IOST Slack Channel).
I hope this tutorial helps the IOST community build a lot of servi-nodes as we want to build the biggest decentralized and robust Blockchain in the world.

For additional help or command references please visit the [IOST Developer Portal](For additional help or command references please visit the IOST Developer Portal).
Congratulations @iostvenezuela! You have completed the following achievement on the Steem blockchain and have been rewarded with new badge(s) :
Click here to view your Board
If you no longer want to receive notifications, reply to this comment with the word
STOPAwesome Stuff Keep it up!
Hello @iostvenezuela! This is a friendly reminder that you have 3000 Partiko Points unclaimed in your Partiko account!
Partiko is a fast and beautiful mobile app for Steem, and it’s the most popular Steem mobile app out there! Download Partiko using the link below and login using SteemConnect to claim your 3000 Partiko points! You can easily convert them into Steem token!
https://partiko.app/referral/partiko