A Diary Of My First Eco-Build Of An Off-Grid Sustainable Earthship: Part 6 - We Start Building!
Hi Homesteaders!
I just discovered some of the homesteading community here on Steemit and Slack. It's great to see many like minded people from all over the world actually doing amazing things and sharing them here. There is so much to read and so many great nuggets of information that I find really interesting!
I have dedicated my life to sustainable building, and dreamed of making my own Earthship somewhere for over a decade. I'm happy to say, that after much soul searching, and life lessons, I managed to fulfill my dream of self building my own home in 2012. As I'm sure many of you will appreciate, this was one of the hardest and rewarding things we can ever do! I know that there are many people who also have the dream of living in harmony with nature, being self sufficient and secure in life. I have great passion to inspire people, and also to help people to succeed themselves!
So! I am writing this diary to be a great read for anyone considering building one day. It is full of stories, facts, some technical info, and plenty of dramas! I try to explain why we do things the way we do, what choices I made and why, and also what tips i learned along the way that can help you avoid making some of the mistakes I did!
This 6th part had a long run up, but in this part we finally actually start building! This is a re-post of the 6th part that I am doing on the homesteading tag since i never knew about it before, and I would especially like to reach out and connect with you all in this community. Lots of great people here!
Please also do let me know in the comments if you would like me to focus more on one thing or another. I am just starting to write the 7th part now, and it would be great to have your feedback so that I can give you more of the information that you want to see!
Please do enjoy! You can find the links to the previous parts at the end of this post if you get into it! It's quite a story!!!
I'm very happy you made it here to read how I self built an Earthship! Things are hotting up now as we start the build and the volunteers all arrive. The response to my advertising posters was mind blowing, and set the scene for a very lively and happy start to my life's dream of self building my own eco home.
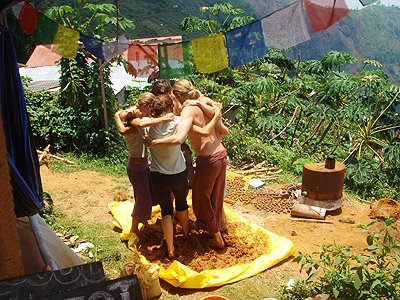
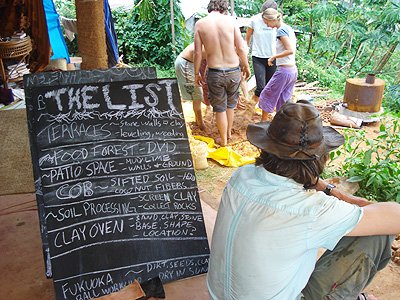
I don't think I really knew what to expect when I put the word out for help to build. I guess the location and timing were just right, and as we began setting the foundation course of tyres out there were around 25 people already here who had all come to help. Luckily the location where I am based is also an established guest house, and so everyone could rent a cottage and stay close by and work. In fact, pretty quickly we filled all the rooms up! Once that happened I decided to open up the veranda around my geodesic dome so around 5 people could stay there. I offered these spaces up to very special people who were really supportive and ready to work and learn as part of a small group and community. The vibe was fantastic and we had people from all over the world and of all ages. We would work all day on various things, not just building and at the end of the day I would somehow have the energy to cook for us all a lavish dinner and eat together at my home made table. These were good times of sharing, story telling, and just meeting and eating with lovely people from diverse backgrounds. Now I know how to make the best Russian Borscht!
One thing I found very interesting is that the majority of volunteers that came to help me were women. Women were turning up in droves to learn this, work hard, and with great passion and desire. I used to tell everyone that it is the women who will build our future, and maybe literally!
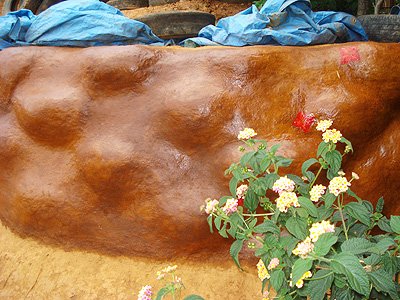
One of the very first little projects we did was a small test of the final plastering using mud and clay. As you probably know by now, an Earthship is made from earth rammed car tyres. When I tell people this they often imagine a house that looks black with a load of ugly tyres showing! That is not the case at all! The tyres are plastered over using any number of different options. I had decided to make the Earthship Brown! I did toy with the idea of making it white, but it felt way to stark for such a big building! If you are in a very hot climate that may be a good reason to lighten the colour up, but that also wasn't the case for me. The best choice for a white finish would be a mix containing limestone. This is very eco friendly and is the original cement that was used before gray cement was created. The main difference is that white cement cures MUCH more slowly.
So, having absolutely zero experience with mud plastering I did my Google research and decided upon a mix containing clay rich soil, some sand, and water. The bulk of the initial plastering is often mixed with chopped up hay to help bind it and reduce cracking. We didn't have any hay, but had coconut hair instead. This was tough and strong and I was sure it would work well. So the idea was to all make a mix and we all took turns learning how to apply it. It's actually not so hard but you need the mix to be just right, and you need to rub the application well so that the binding happens. The main issue is usually cracking, which happens when there is not enough sand, or too much clay, or too much water, or it dries too quickly! We don't mind some cracking on the first layers as the cracks help to make a surface for the binding of the next layer of mud. Its the final layer that I wanted a beautiful smooth finish. To achieve that we apply it very thinly and not too wet. We also sieved the mix before adding water for the final render. This gives the smoothest finish.
This was a really fun project, and I have to say it took days and days of messing around to get the finish right! We were not experienced and there is no comparison to how quickly an experienced plasterer would do this job compared to us. Nevertheless, it was great fun and I was SO pleased with the results! The final thing to do once the last layer of mud is on is to seal it! I decided I wanted to try out linseed oil as a natural option that is a good sealant and water proofing as well as having a nice glossy finish to it. It takes many applications to get it perfect and evenly coated and so I'm not sure I recommend it, but it does work well! Also as you can see below, we left the bumps of the tyres showing. If we wanted we could have packed more mud in the gaps and had a more flat finish, but I like it like this though!
We learned a lot about mud plastering during this process. We we lucky because the dirt that we had to hand had a pretty much perfect mix without us needing to do too much. When you do any plastering work with mud you have to perform some testing to see what kind of soil you have. One good test is the mason jar test . Once you figure out your mix and it's working well then you just have to be careful to stick to the same proportions. This is easier said than done when you are working with volunteers. There is often much randomness going on! To be honest though, its not much different with the paid labor around here too!
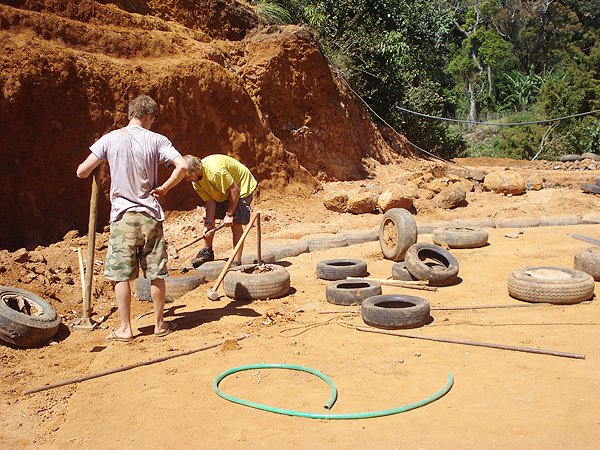
We we're just about to start the main build and I was busy planning the final steps before that would happen. My main issues were whether the land was level, and finding the exact spot for the building that would leave enough room on all sides. It was a tight squeeze and I think I spent several days making circular lines on the ground and changing it until I was happy with the spot! The leveling of the land was done without any tech. The traditional method to level without any lasers is to use what is called a 'tube level'. This is basically a VERY long and thin rubber hose that is filled with water. The ends are marked and you can use the water level in the tube to determine if two spots are the same height or not. You can watch this short video if you want to see how to do it!
One of the great things about building like this is that we can go very low tech! When you build with a concrete foundation, everything has to be perfect before you pour or set the cement. With this approach it is very easy to set tyres down and fill them, and then lift them so that we can either raise or lower the ground a bit if they are not all the same height. Therefore we roughly leveled the plot to within a few inches. That final perfection would be done as we filled the tyres up. It's also worth mentioning here that the main requirement for a stable building that wont subside is that the ground level is firm. Since we have dug out many many feet of soil as well it being very clay rich and tightly packed, meant that I had no concerns about it. If you live in an area prone to flooding, for example, you would raise up the ground level around the edge of the house a few feet using stones and probably concrete or limestone. Since we live on a mountain edge, that was not necessary. As I explained in the previous chapter,
So finally after much tinkering, we were truly ready! I had two English lads who were very keen and full of energy and had come just to learn how to do tyres. Jon and Andy we're the first to start on the tyre ramming with me, this was extremely exciting! We had laid out the empty tyres in a circle to mark out where they would be and see how it fitted. We always use the largest tyres on the foundation course. In my case I used a size called R16, which basically means about 2 ft diameter. The bigger the base tyres are the better! This is because it reduces the chance that the ground will sink, since the load of the house is spread out over a larger surface area. We always build from big to small, as we go up. In many countries they just use the same size tyres all the way up. That does make life a bit easier since you know they are all going to be the same height and width and therefore it will be even without having to tweak it too much. I had no such luxury and had to make do with very different sizes.. nevertheless we did make it work!
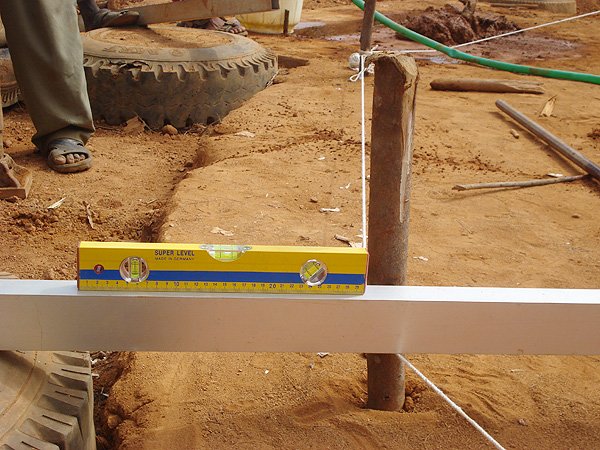
As you can see, we laid the tyres relatively level and filled them up. Once they were totally packed tight we could see their final height. We then used a long flat piece of metal to see if they were level. We then put a spirit level on top of the metal to see if it is level. You can see this on the image below. We are checking the level in this picture in one direction. We also check it against the tyres in the other direction. As you can see we have also marked out the entire level of the first course with string that is level to check the height against.
Once this level was done all the way around, we began work on some waterproofing! The decision was made to dig a 1 ft gutter around the outside of the entire area as the below image shows.
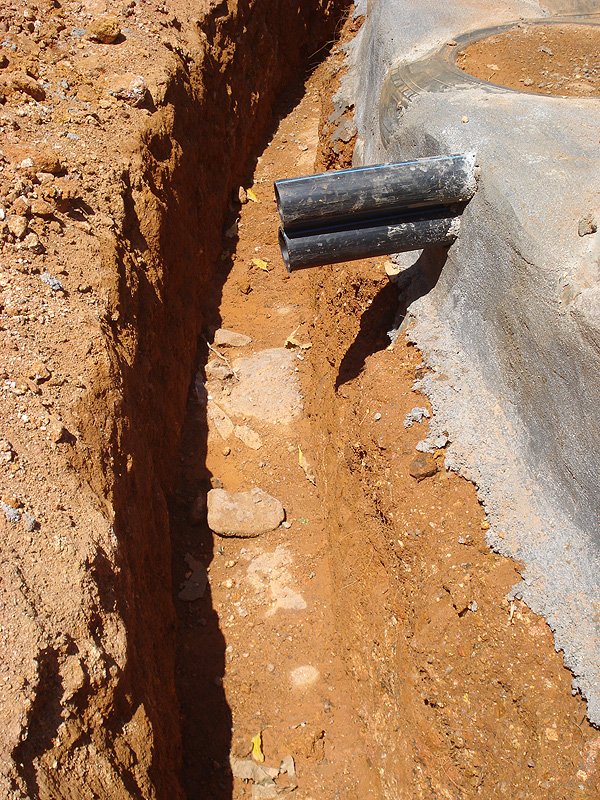
I also decided to use some cement to fill the gaps at this vulnerable level. The main issue here is to prevent water from seeping in. This gutter was literally filled with cement as a 1ft block against water. This was actually really not necessary and I think a waste of cement. It was done because I was advised to do it by a German man who was helping me at the very start. Since I was quite nervous about dampness, I decided to do it.
Once that was done the final step was to cover the side of the first two layers with a sheet of plastic and a tar based waterproof sheet as well. This should provide an impermeable membrane that will stop water seeping both up and sideways in the walls. You can see below how this looked once we were done.
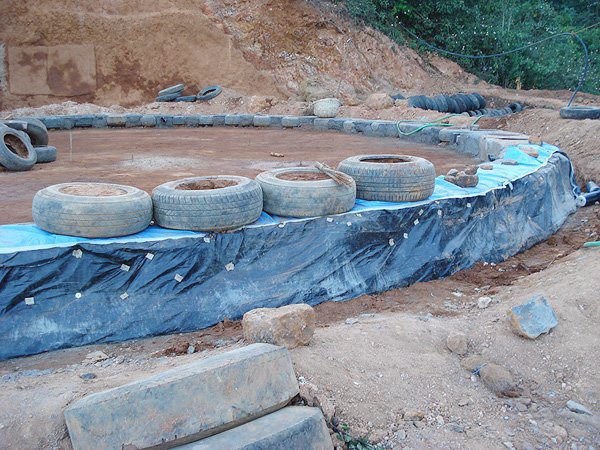
As you can see, water is probably not going to make it through this wall even without a final plastering on the top! As you can see the level of the wall looks very neat and I can assure you I was very anal about getting each tyre the right height and position. Luckily its very easy with tyre work to either raise or lower the height by quite a few inches. All you have to do is add more dirt or stones, or remove some. One of my main jobs was monitoring this as people filled them up. I was constantly checking everyones tyres, making SURE they were filled tight enough. This base layer is going to have to hold the most amount of weight from the tyres on top of them and so they must be totally rammed to around 96% compaction. This is hard work, and people always miss a bit here and there. I felt like a detective sometimes, looking for the soft spots on everyones work. I always found them!
I can still feel the excitement of actually starting this. There's no feeling like really seeing something solid starting right before you eyes. Since it was SUCH a simple design in terms of it being one big circle, I could instantly see the house start to appear from the ground after just two courses.
One thing you can't see in most of these pictures is that we have added quite a few 2 inch plastic or metal pipes through the gaps in the tyres. We did this before we added any cement. These pipes will be used to bring in all the water and power lines that we will need. We also installed a large pipe under the ground level for the toilet. This is critical to get right, and when in doubt I added more as they are easily plugged up if we didn't use them. In a conventional house you can just make a hole in a wall and bring in any necessary pipes that you need. You just try that with a tyre wall!! No no!
So the days were jam packed full of work and in so many ways. My mind was very busy with 100 things at once. I had to manage the actual build, explain and talk to many people about what was going on and what to do. I also had to keep a VERy keen eye on the materials we needed for any work that day or the next. One thing about living in the middle of nowhere was that I couldn't get anything within less than a couple of weeks. The local shops that I could get certain things in were almost totally useless for many things. Even something as basic as a screw had to be ordered and shipped to me. The local quality was just too bad to use. I became really very good at pre planning what things we would need down to the letter. I think half my mind was preoccupied with constantly thinking what we needed and what we would need to be able to keep going. The worst thing that can happen is that we don't have something! When that happens its never good news! Either the work stops totally and you end up paying or hosting people with nothing to do, OR even worse you just fudge it and make it work, but probably with some sacrifice in quality or functionality.
After the end of a build day, cooking dinner, and enjoying some good company my day still wasn't over yet! After all of that, I somehow then found the energy to do a few hours of work making websites! I still had my job throughout this, and HAD to keep working to pay for it all! It was also much harder then it should have been as I had a terrible 2G Internet connection that ran at a crazy 5kb/s. I would have to spend hours trying to download and grab data for my work.. Today what took one hour takes around 5 seconds! Nevertheless, I was basically blissed out and seemed to have unlimited energy. I tapped my resources to their limits, and managed to keep going for a very long time. I did discover some tricks to stay sane, that I will come to next time ;-)
Once of the things that I can say right now is that we shouldn't self build alone! What I did was crazy in a way. I was able to pull this off because my temperament allowed me to keep making it work despite any obstacles, without getting upset or giving up. I know this is one of my saving graces here, and also know that many people would never have put up with the kind of shit I put up with. I am very pragmatic, and will do whatever it takes to get the job done. For any normal sane person, what I advise is to get into a small group and do it together. It is much more fun that way, and much easier to catch any problems along the way. My mind was full of thoughts about every little detail and all of the time, in case I was missing something that I needed to know before it was too late!
So next time we can see this house grow, and fast! The tyre work is hard work, but it is also fast work. We had a fantastic time doing the tyre ramming.. This you will see in part 7!
I really hope you are keeping up with this ecoDiary. I have decided to make this post a little bit shorter than previous parts. I feel that it helps you to be able to read it all and spread out the reading over more time. I hope you agree.. If you have any questions about any details I have explained here I am very happy to answer them. Just ask away in the comments!
Thank you so much for taking the time to read until the very end, and I hope see you next time!
PLEASE HELP ME TO SPREAD THE WORD AND RE-STEEM THIS
READ PARTS 1-5 HERE:
Part 1: The creation of my life's dream, a totally off-grid self sufficient home - Earthship Karuna
Part 2: The dream was born.
Part 3: HOW TO ACCOMPLISH ANYTHING IN LIFE!
Part 4: Finding My Spot in India at Last! The Journey Ends and Starts!
The Remarkable Diary of an ecoBuilder. Part 5: A plan and vision was born
Don't Want to Miss the Next Remarkable Diary Post?

Click here to subscribe to email notifications and nothing else

See what's trending today on the ecoTrain! Read diverse and great quality posts from 14 special passengers.
great and quite inspiring work @eco-alex earthship with natural environments and building with mud... you doing great mate... keep it up and thanks for sharing this...
thank you @kenhudoy for the encouragement! Im keeping it up! ;-)
Good choice ...we always here to learn from you...find time also to check my blog posts...regards
Impressed by your work, I am going to read part 1-5.
HAPPY TO HEAR! u might need a coffee or Chai ;-)
So I read your articles, and I guess, you are building your home at Goa ? One other thing to consider is the bamboo pack that was used in ancient age in India. I remember my Grand mother had a house having one roof like that, and it was more cool than AC.
I am really impressed by your work, and would love to do build something similar. I am located at Bhubaneswar, if you plan to come along. I can show you a lot of great places here.
glad you read this.. I have actually built in Kodaikanal.. which is quite high up and gets REALly wet and quite cold in winter.. so yes nice idea for Goa to do bamboo but really not so good in Kodai!..
thanks for this invite too! very cool! first i have to get off the mountain!! ;-)
Kodai is a great place, I had been to ooty 2-3 months back with family. And yes it gets quite cold in winter.
Get off, and I will grab some ideas to do one at my place. Its extremely hot, gets to 46 degree Celsius in summer.
wow! 46!!! lol.. i think i will die in that heat ;-)
Ooty is nice also yes.. and yes it gets cold in winter.. but not in the Earthship! ;-)
I really think this is awesome would have loved to do this when we were younger hope you really enjoy your home.
thank you big bear.. I remember you said that before.. what to do! I hope you at least have some security and a nice space too!
Eco living, building, thinking etc is so important. We need to talk about this stuff and support the people who are already doing it.
There ARE sustainable solutions for all aspects of life. Humanity has been hijacked by corporate greed and its time we wake up and build a world wide paradise.
Blessings~*~
Yes! It is time absolo-friggin-lutely !!! Today there are SO many solutions if u dare to dream! I have a saying..
"The only way is OUT, are you ready to jump yet?"
So cool to see projects like this. Solid post and thanks for linking the previous ones too.
Thank u! Happy you found this! Quite some reading on the previous parts! ;)
I am glad that you re-posted this because it was a great article about the building of your wonderful earthship! The more you inspire others, the more you will help the earth and its resources. It was all meant to be when people came to help you. And your journey on Steemit is also meant to be!
You have such an abounding spirit that permeates the heart of many who need it. Keep up the energy and education to all. Always, Cabbagepatch!!! :D
happy to have some approval .. im happy i reposted also.. although rarely done sometimes there is a time for it.. im happy to spread the word out a bit further whenever i can!
Glad u are feeling me too! wOw!
This is awesome. We are doing something similar in Canada.
Horrahh! Not many peope can say that! Canada is a great place for this with those cold winters! Which part are u in!?
We are in Eastern Ontario, near Ottawa but looking for land up on Lake Superior closer to family. We spend our summers out there in a very small bunky (12 x 14 cabin) practicing our future life off the grid.
sounds lovely! there is a lot to be said for both building small and living small.. life gets so much easier ;-)