Martes de #cotinacreative: Hermoso cofre elaborado con material reciclable. 24/08/2021 @tormenta
Hola queridos amigos de esta hermosa comunidad, hoy martes creativo les traigo la elaboración de un cofre realizado con mucho amor y material reciclado, aquí les muestro el paso a paso para su elaboración.
Hello dear friends of this beautiful community, today creative Tuesday I bring you the elaboration of a chest made with a lot of love and recycled material, here I show you the step by step for its elaboration.
Hermoso cofre
Materiales a Utilizar// The materials to use Caja de cartón, hoja reciclable, cinta decorativa, Pega, tijera//Cardboard box, recyclable sheet, decorative tape, Glue, scissors
Materiales utilizados
Proceso de elaboración: / / Elaboration process
Paso 1 // Step 1
Colocamos la hoja de papel en que vamos a utilizar, en este caso use de revistas, luego en la parte de arriba colocamos el palito de madera.We place the sheet of paper on which we are going to use, in this case use magazines, then at the top we place the wooden stick.
Paso 2 // Step 2Se va enrollando la hoja en el palito de madera, que quede bien apretado.The blade is rolled up on the wooden stick, which is tight.
Paso 3 // Step 3Se retira los palitos de madera con mucho cuidado, y nos quedara ya listos los palitos enrollados de las hojas.The wooden sticks are removed very carefully, and the rolled sticks of the leaves will be ready.
Paso 4 // Step 4Se cortan tiras de papel de aproximadamente 4 cm, y se pegan 4 palitos de papel sobre ella, como se muestra en la foto.Strips of paper of about 4 cm are cut, and 4 sticks of paper are glued on it, as shown in the photo.
Paso 5 // Step 5Luego se cortan los palitos de 4 cm cada uno.Then the sticks of 4 cm each are cut.
Paso 6 // Step 6Cada cuadro se va pegando en la caja de manera que queden combinados vertical y horizontal.Each square is glued into the box so that vertical and horizontal are combined.
Pegando los cuadros a la caja//Gluing the pictures to the box
Pegando los cuadros a la caja//Gluing the pictures to the box
Paso 7 // Step 7Se corta la tapa de la caja eliminando los bordes, que solo nos quede el cuadrado.The lid of the box is cut, eliminating the edges, so that only the square remains.
A la tapa le hacemos el mismo procedimiento y la forramos con cada cuadro, hasta cubrirla por completo.We do the same procedure to the lid and we cover it with each square, until it is completely covered.
Para forrar la caja utilice una tela de forro color mostaza, para embellecer la caja.To line the box use a mustard colored lining fabric, to embellish the box.
Lo forre tratando que quedara de manera abultada//I lined it trying to make it bulky
Esta soy yo pintando la caja//This is me painting the box
Paso 8 // Step 8Se pinta por completo la caja, dejando secar para dar pintar dos veces.The box is completely painted, allowing it to dry to paint twice.
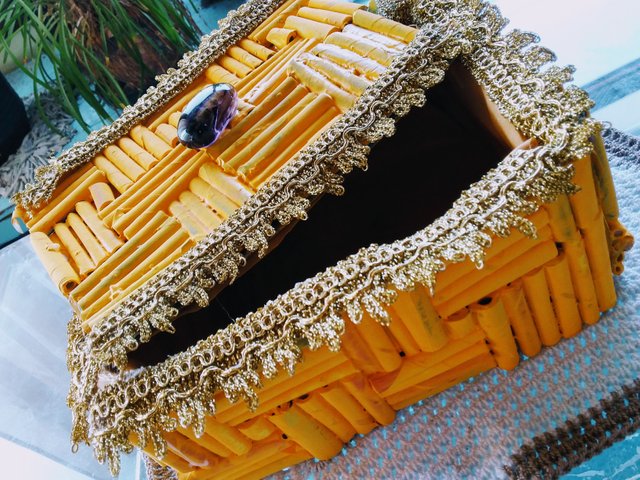
Paso 9// Step 9Luego se va pegando la cinta decorativa por todos los bordes de la caja y la tapa.Then the decorative tape is glued around all the edges of the box and the lid.
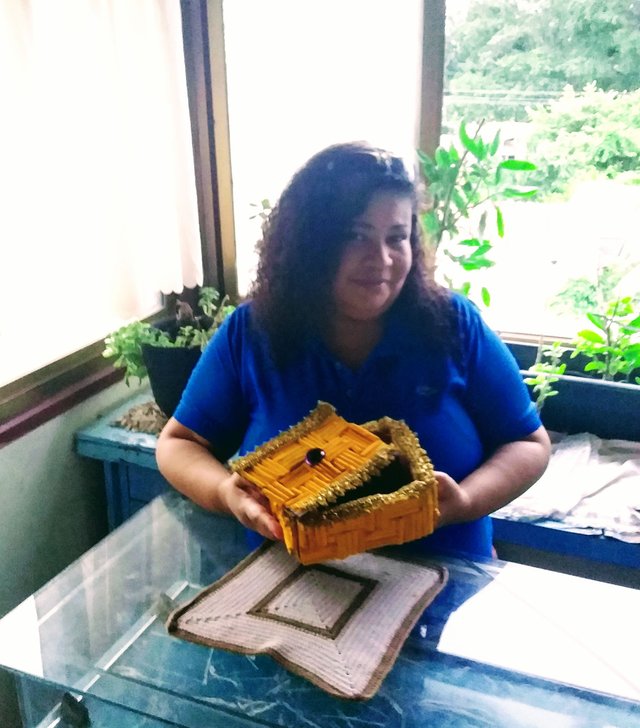
Y este es el resultado final del cofre realizado con material reciclado.And this is the final result of the chest made with recycled material.
Cofre elaborado por @tormenta//Chest made by @tormenta


Hi, @tormenta,
Thank you for your contribution to the Steem ecosystem.
Please consider voting for our witness, setting us as a proxy,
or delegate to @ecosynthesizer to earn 100% of the curation rewards!
3000SP | 4000SP | 5000SP | 10000SP | 100000SP
Muchas gracias @ecosynthesizer
Hola gracias por participar en nuestros martes creativos con este hermoso cofre realizado con material de reciclaje y el material principal el amor.
Gracias por tu explicación paso a paso y darle vida al cofre con tu creatividad.
Hermoso el trabajo que realizaste amiga te felicito muchas bendiciones y éxito para ti 🙏😇💖