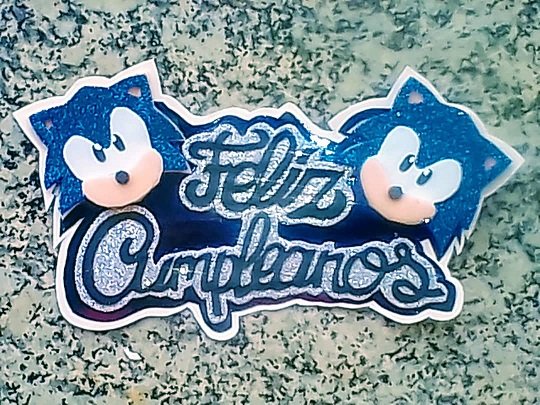
[ENG-ESP] comunidad Steem Women Club: Cake Topper Inspirado en el Personaje Sonic// Steem Women Club Community Cake Topper Inspired by Sonic Character
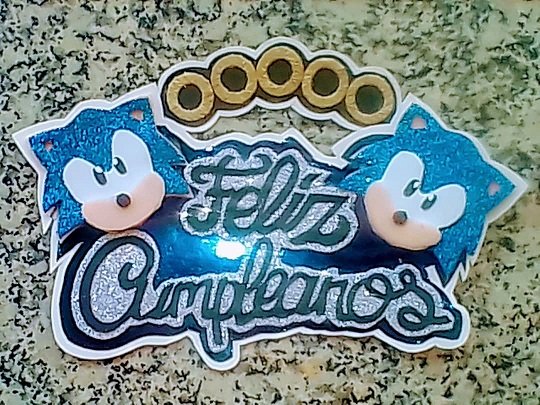
Cake Topper Inspirado en el Personaje Sonic
Hola, gente bella de Steemit. En esta oportunidad les traigo otro tutorial paso a paso, donde aprenderemos como realizar Cake Topper Inspirado en el Personaje Sonic espero les guste el paso a paso.
Hello, beautiful people of Steemit. This time I bring you another step by step tutorial, where we will learn how to make Cake Topper Inspired by the Sonic Character I hope you like the step by step.

Materiales:
• Cartulina Negra
• Cartulina Blanca
• Cartulina Azul Metalizada
• Foami Color Carne
• Foami Blanco
• Foami Azul Escarchado
• Foami Plateado Escarchado
• Foami Negro Escarchado
• Papel de Seda Dorado
• Pintura al Frío Blanca
• Marcador Extra Fino Negro
Materials:
• Black Card
•White cardboard
• Metallic Blue Card
• Flesh Color Foami
• White Foami
• Frosted Blue Foami
• Frosted Silver Foami
• Frosted Black Foami
• Gold Tissue Paper
• Cold White Paint
• Extra Fine Black Marker
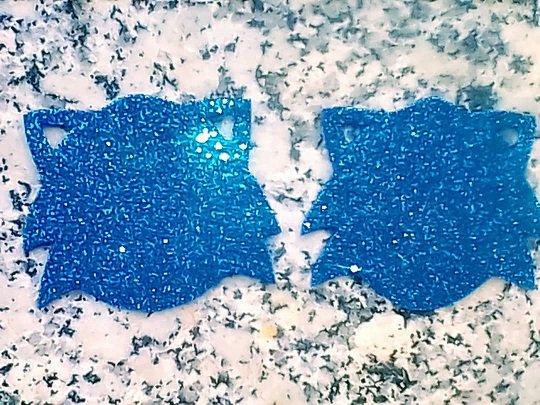
Paso 1: Imprime la imagen del personaje y guíate para sacar los moldes por separado (así como los tenemos aquí en la muestra) para darle volumen en 3D al muñequito a la hora de pasarlo al foami.
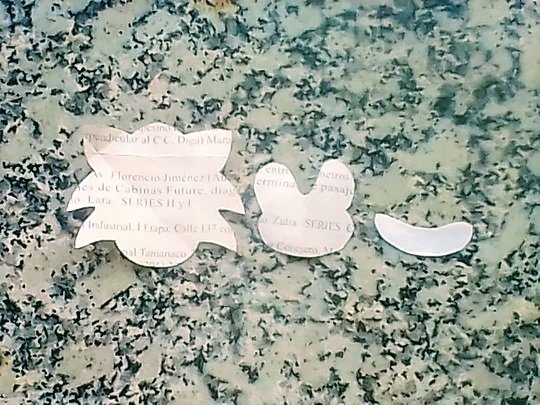
Step 1: Print the image of the character and guide yourself to remove the molds separately (as we have them here in the sample) to give the doll volume in 3D when passing it to the foami.
Paso 2: Con el molde N°1 marcaremos en el foami beige 2 formas, igualmente en el foami azul escarchado. En el foami blanco marcamos 2 formas con el Molde N°2 y en el foami beige nuevamente, marcamos 2 formas pero con el molde N°3. Y cortamos. En el foami negro escarchado, cortamos 2 Pequeños círculos que serán la nariz.
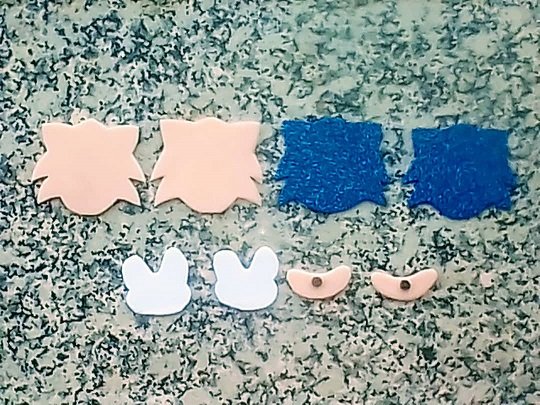
Step 2: With mold N ° 1 we will mark 2 shapes on the beige foam, also on the frosted blue foam. In the white foami we mark 2 shapes with Mold No. 2 and in the beige foami again, we mark 2 shapes but with the mold No. 3 and cut. In the frosted black foam, we cut 2 small circles that will be the nose.
Paso 3: En el foami azul escarchado que cortamos, vamos a marcar en las orejitas 2 pequeños triángulos. Y procedemos a cortar.
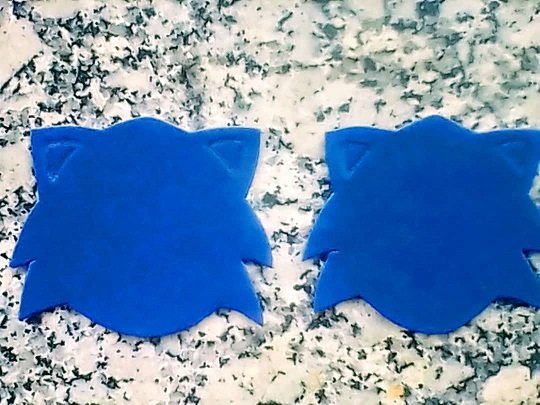
Step 3: In the frosted blue foami that we cut, we are going to mark 2 small triangles on the ears. And we proceed to cut.
Paso 4: Pegamos sobre el foami color beige, el foami azul escarchado.
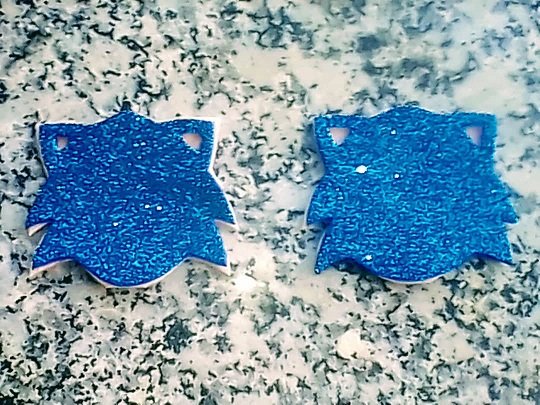
Step 4: We glue on the beige foami, in frosted blue foami.
Paso 5: Sobre el foami azul escarchado, procedemos a pegar el foami blanco
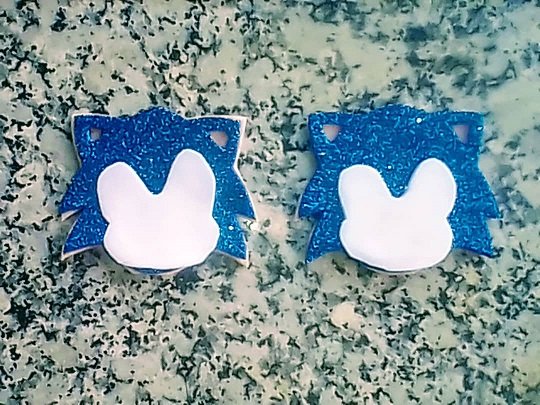
Step 5: On the frosted blue foami, we proceed to glue the white foami
Paso 6: Sobre el foami blanco, pegamos el foami beige de la boca y sobre éste la nariz que cortamos en el foami negro escarchado
Step 6: On the white foam, we glue the beige foam from the mouth and on it the nose that we cut in the frosted black foam
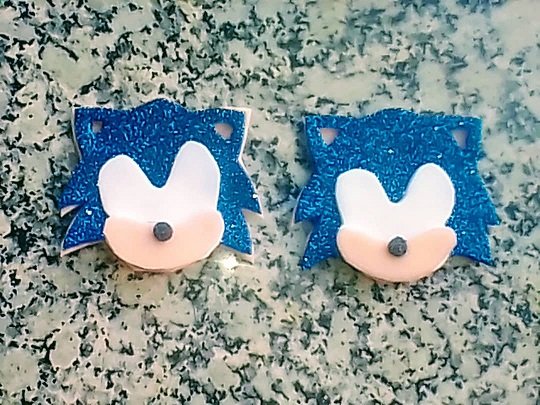
Paso 7: En la cartulina negra, cortamos cuatro ovalos que serán los ojos.
Y procedemos a pegarlos.
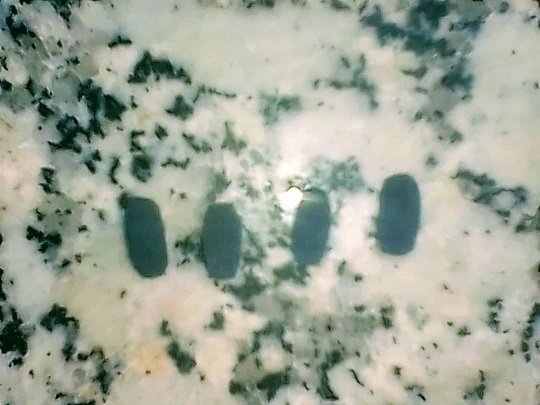

Step 7: In the black cardboard, we cut four ovals that will be the eyes.
And we proceed to glue them.
Paso 8: Sobre los ojitos en la parte interna superior de cada uno, vamos a pintar un pequeño punto blanco con pintura al frío. Yo me ayude con un molda dientes. Y Dejamos secar.
Step 8: On the eyes in the upper internal part of each one, we are going to paint a small white dot with cold paint. I help myself with a teeth mold. And we let it dry.
Paso 9: En la cartulina negra, vamos a escribir lo que deseemos colocarle al Topper, bien sea el Nombre del Cumpleañer@ o simplemente “Feliz Cumpleaños” (cómo le coloque yo). Recuerden si no quieren hacerlo a pulso también pueden imprimir una plantilla con el tipo de letra de su preferencia. Y cortamos con mucho cuidado
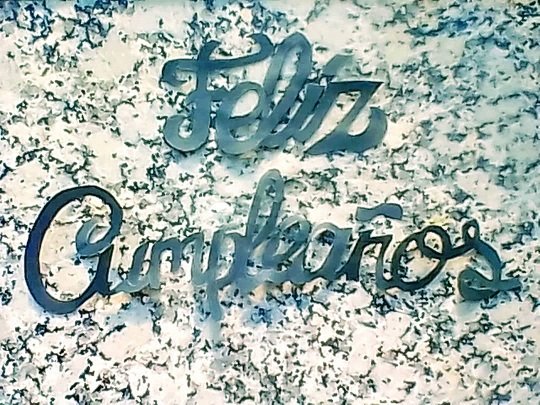
Step 9: On the black cardboard, we are going to write what we want to place on the Topper, either the Name of the Birthday @ or simply "Happy Birthday" (how I put it). Remember if you do not want to do it freehand you can also print a template with the font of your choice. And we cut very carefully
Paso 10: Procedemos a pegar las letras en el foami plateado escarchado y cortamos resaltando la forma de las letras y dejando un espacio para que luzca el foami de fondo.
Step 10: We proceed to glue the letters on the frosted silver foami and cut highlighting the shape of the letters and leaving a space for the background foami to appear.
Paso 11: En la cartulina azul metalizada, pegaremos las letras en el centro y en los extremos a cada lado ambas caritas. Y cortamos, dejando un espacio de separación. Luego lo llevamos a la cartulina blanca, dónde pegaremos y posteriormente cortaremos, dejando igualmente un espacio.
Step 11: On the metallic blue cardboard, we will glue the letters in the center and both faces on each side. And we cut, leaving a gap. Then we take it to the white cardboard, where we will paste and later we will cut, also leaving a space.
Paso 12: En la cartulina blanca, cortaremos 5 anillos.
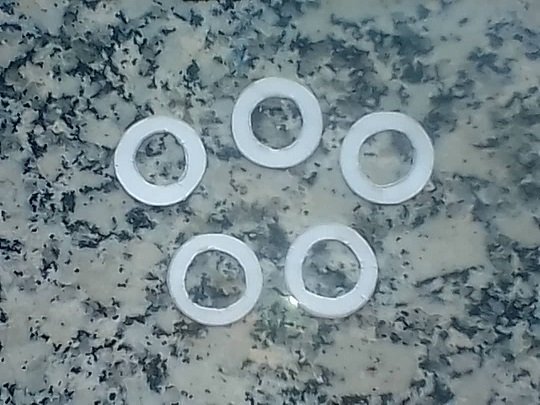
Step 12: On the white cardboard, we will cut 5 rings.
Paso 13: En el papel de seda dorado, cortaremos tiras finas. Luego debemos enrollar las en nuestros Anillos.

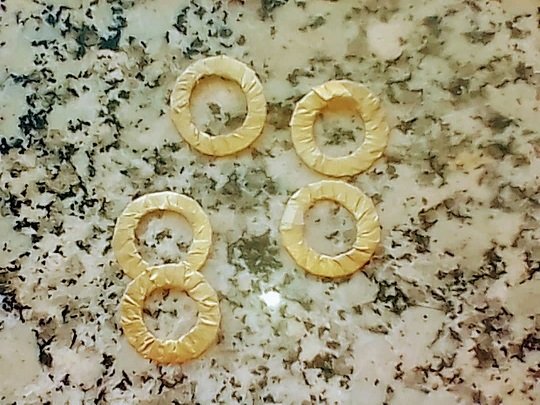
Step 13: On the gold tissue paper, we will cut thin strips. Then we must roll them into our Rings.
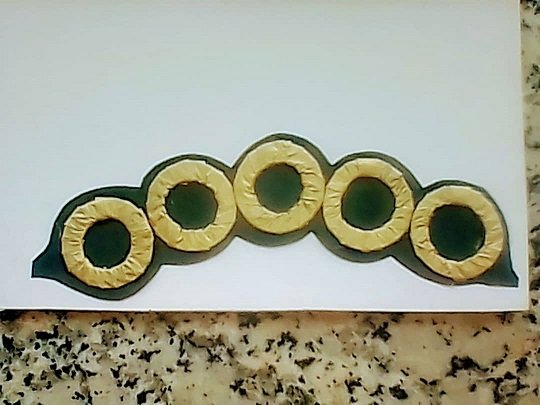
Paso 14: Procedemos a pegar los anillos en cartulina negra, realizando una especie de semi circulo. Y cortamos, dejando un espacio.

Step 14: We proceed to glue the rings on black cardboard, making a kind of semi circle. And we cut, leaving a space.
Paso 15: Luego procedemos a pegarlos en la cartulina blanca. Y cortamos, dejando previamente un espacio.
Step 15: Then we proceed to stick them on the white cardboard. And we cut, previously leaving a space.
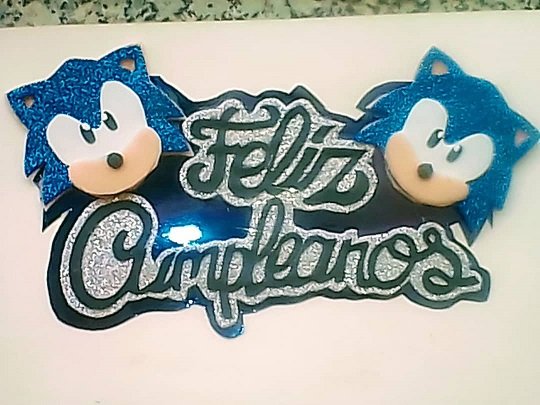
Cake Topper, entre la dos Caritas Paso 16: Pegamos en la parte superior de nuestro de Sonic
Cake Topper, between the two faces Step 16: We glue on the top of our Sonic
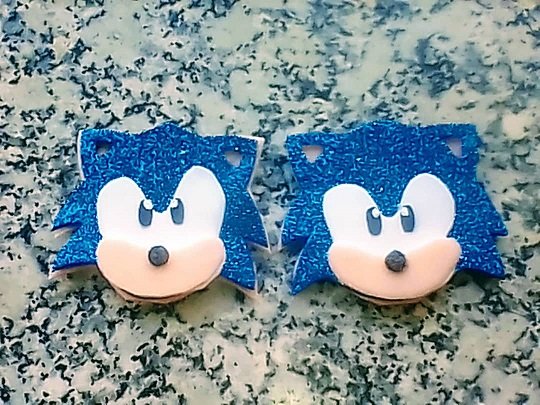
Paso 17: Para el toque final, con ayuda del marcador extra fino negro vamos a dibujar la boca de medio lado, las cejas, realizamos la separación entre los cachetes y resaltamos un poco los triángulos de las orejas.
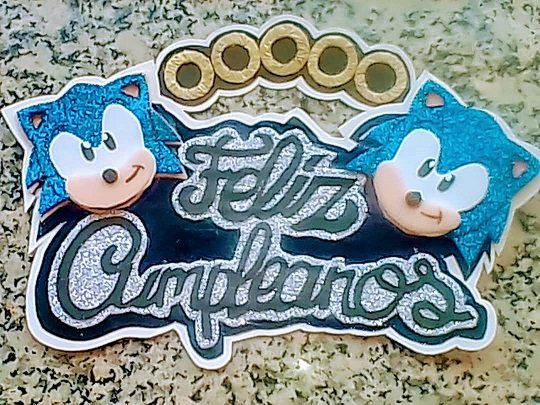
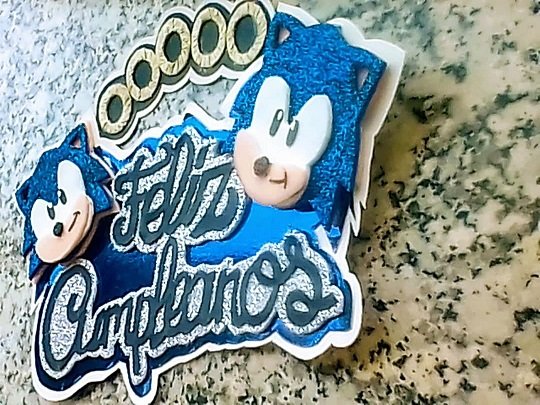
Step 17: For the final touch, with the help of the extra fine black marker we are going to draw the mouth on the side, the eyebrows, we make the separation between the cheeks and highlight the triangles of the ears a little.
Y listo nuestro Cake Topper Inspirado en el Personaje Sonic. De esta semana espero les guste.
And ready our Cake Topper Inspired by the Sonic Character. This week I hope you like it.
¿Te gustó el resultado? Comenta si te gustó la idea.
Did you like the result? Comment if you liked the idea.

Espero que este post sea útil para ti. ¡No olvides dejar un comentario! Hasta un próximo post...