Horsemanship Jr. - Preliminary Skills - Chapter Two continued

Halters are used when you are leading or grooming your horse.
How to put on the halter in the stall:
As you enter the stall, try to always approach the horse from his left side (toward his left eye and left ear). This may take some jockeying around at first, but if you are consistent your horse will learn where you want to stand.
EXPLANATION OF THE HALTER:
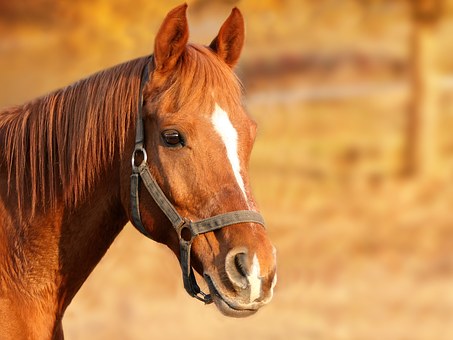
The halter consists of a circular noseband (goes all the way around the horse’s nose) and a circular crown piece (goes all the way around the horse’s head behind his ears and under his throat). There are three straps (a-c) connected between the noseband and the crown piece:
a. Strap from the noseband under the chin back to the throat where it connects to the crown piece – this is called the throatlatch (1)
b. Strap from the noseband across the left cheek back to where it connects with the crown piece.
c. Strap from the noseband across the right cheek back to where it connects with the crown piece.
The circular noseband and circular crown piece are completely hooked together with the straps as was explained above. Therefore, to put the halter on your horse you will have to open the halter by unbuckling the left side of the circular crown piece.
As you enter the stall, remember, you are on the horse’s left side. Hold the halter so the noseband is facing the same direction as the horse. Take the lead rope in the stall with you.
There is a ring at the end of the noseband and you will clip the lead rope to the noseband. The reason for the lead rope is that you will be ready to move the horse where you want him as soon as you have the halter in place.
Be sure the buckle on the left side of the circular crown piece is open.
As you enter the stall, also talk to the horse so he does not become nervous when you approach him. WHAT DO YOU SAY? ANYTHING! AS LONG AS YOU SOUND CALM!
When you are close to your horse’s head, place the loose end of the lead rope over the horse’s neck so it will be handy when you are finished with the halter.
NOW, BECAUSE YOU HAVE UNBUCKLED THE CROWN PIECE, you can slip the horse’s nose through the circular nosepiece and guide the lower part of the halter over the horse’s muzzle (2) and back to his throat. Then guide the open circular crown piece up the right side of the hoarse and over the ears and behind them. You may have to bend the ears back carefully and then make sure they are not being held down by the circular crown piece. Hold the halter in place with your left hand and buckle the open end of the crown piece into the buckle on the left side of the horse’s head. The halter is now secure on your horse’s head and it can only be removed by unbuckling it on the left side of the horse’s head.
Continue to reassure your horse by patting and talking to him throughout this process. Horses are creatures of habit and they will learn very quickly if your behavior is consistent.
When the halter has been buckled, immediately take a firm hold of the lead rope that you laid on your horse’s neck. But do not be jerky or fast as you might scare your horse. You are now in control of where your horse goes next. There is a lot to learn about leading your horse and that will be our next skill.
But let me mention one more thing here, as you will be removing the halter and lead rope. Always remove them together. Never let your horse run loose anywhere if his halter is on. The halter can easily catch on tree limbs or fences and cause him injury.
(1) Throatlatch – strap that passes from the circular noseband under a horse’s throat where it connects with the circular crown piece
(2) Muzzle – the projecting part of a horse’s head including the mouth, nose and jaws.