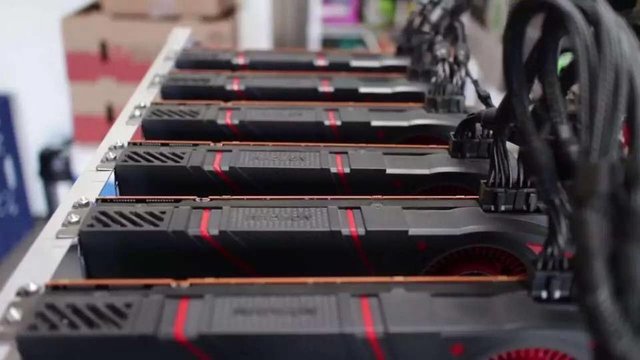
Building an Ethereum Mining Rig (13 GPU) - 4th part

Third update to the guide "Building a Mining Rig for Ethereum". The absolute first guide to building a RX Vega 64 8gb 13 GPU Mining Rig.
Reading this guide to building a 13 GPU Ethereum mining rig requires adequate knowledge of building and running an Ethereum Mining Rig. We therefore recommend a previous view of our Guide to build a Mining Rig and related updates.
Let's immediately list the hardware used:
- Asus Mining Master X370 mainboard
- Core i5 Coffee Lake CPU
- 480 or 500GB SSD
- 32Gb Ram
- 13 GPU RX Vega 64 8Gb
- 3 x 1000W power supplies
- 1 1200W power supply
- 8Gb USB stick
In this guide we will obviously not explain how to mount the hardware of a Rig. The only notes we wish to underline are the following:
the 1200W power supply must be the primary one on which to connect 4 GPUs and the video output for the monitor
all the risers, as well as obviously the GPUs, must be powered through the 8-pole connections of the power supplies. We strongly advise against the use of 6-pole ports. Therefore, have the appropriate number of cables available for all connections. Risers can also be powered in pairs.
the model of the video card used is the Asus Rog Strixx Gaming RX Vega 64 8Gb
The operating system is Windows 10 updated to the latest version available. The tool for creating installation media is available at the following link https://www.microsoft.com/it-it/software-download/windows10 to be able to use the USB key as a launcher for installing Windows 10 .
With the Asus Mining Master, the GPU risers can be connected directly to the motherboard via the USB cable, thus making one of the small components of the riser kits unusable.
After making all the connections on the motherboard, check that all GPUs are highlighted in green when the PC starts up. If not, move the USB cable on the motherboard one position. It may take at least 2 or 3 attempts.
Ethereum mining with 13 GPUs
Having solved this possible small inconvenience, let's proceed with the installation of the AMD Adrenaline 2020 drivers, always updated to the latest version, relating to the RX Vega Series.
If you want to proceed with more caution, the advice is to disconnect all the GPUs (remembering the locations of the USB cables) except one before installing the drivers.
The mining will be carried out on the Ethermine pool, our favorite, using the Claymore 15 software.
Once the download is complete, you will have to unzip the folder on the desktop and open the start.bat file contained in the Claymore folder using Notepad. The procedure is the usual one: delete the content and copy-paste the following command string:
start config.dll -epool eu1.ethermine.org:14444 -ewal "your ETH wallet address" -epsw x -worker "worker"
EthDcrMiner64.exe
Where EthDcrMiner64.exe is the executable, -epool indicates the pool to mine and its port, -ewal is the wallet address and -epsw is the password that we leave blank (X).
In place of "your wallet address" you will have to put your Ethererum wallet and instead of worker you will enter an identification number in case you plan to build more RIGs (such as RIG1, RIG2, etc ...).
At the following link, many other useful commands for your Rig:
https://github.com/Claymore-Dual/Claymore-Dual-Miner
Try to run mining and check that the system is stable.
In the Payouts section, after a few minutes of mining, you can decide the minimum amount of Ether to be sent to your wallet by simply entering the IP address of the RIG.
We performed the mining directly on the Ethereum address of the Exodus wallet. Coinbase is not supported.
Overclocking with OverdriveNTool
Let's proceed now with the download of OverdrivenTool at the following link: https://forums.guru3d.com/threads/overdriventool-tool-for-amd-gpus.416116/
For those unfamiliar with it, we recommend reading our software guide.
For those who do not intend to experiment or do not completely trust their software experience, at the following link you can view the settings on the parameters of the GPUs and the RAM of the GPUs - and other small tricks - to obtain the best possible performance without forcing the cards too much. video.
On our Youtube channel (subscribe numerous !!!) you will now be able to see the video relating to the start of mining and the one concerning the stabilization phase.
To better cool the Rig we have also installed fans for the extraction of heat as caution is never too much. Moreover, there is also an aesthetic gain.
Conclusions on the guide to build a 13 gpu ethereum mining rig.
Finally, we conclude this guide by reporting what everyone was waiting for (we do not say how long we had to wait before obtaining this result) the video link complhttps: //www.youtube.com/watch? V = k53XZn3zc9I & t = 61seto del Rig e del Mining .
We remain available for any advice, both on pools, on yield and on consumption.
Feel free to contact us in case you run into any problems where our guide to Building a 13 GPU Ethereum Mining Rig has not been completely helpful.
See you soon.
If you liked this article and would like to contribute with a donation:
Bitcoin: 1Ld9b165ZYHZcY9eUQmL9UjwzcphRE5S8Z
Ethereum: 0x8D7E456A11f4D9bB9e6683A5ac52e7DB79DBbEE7
Litecoin: LamSRc1jmwgx5xwDgzZNoXYd6ENczUZViK
Stellar: GBLDIRIQWRZCN5IXPIKYFQOE46OG2SI7AFVWFSLAHK52MVYDGVJ6IXGI
Ripple: rUb8v4wbGWYrtXzUpj7TxCFfUWgfvym9xf
By: cryptoall.it
Telegram Channel: t.me/giulo75
Netbox Browser: https://netbox.global/r/PZn5A
Horizen Faucet: https://getzen.cash/auth/register?ref=153228