Wicking Garden Beds. How to have a luscious vegetable garden with minimal water.
I am new to Steemit, and this is my first post. I hope you will find informative and useful.
Living in a very hot climate in the summer, my wife and I have struggled over the years with our vegetable gardens. Our home is on a hill with very little available ground for vegetable gardens, so I built a retaining wall and filled with soil on top for a garden. It served its purpose for a while, but because temperatures often exceed 100-110 degrees in the summer it was often necessary to water twice a day. In addition the water would seep out the side of the hill. Watering the garden became a very uncomfortable chore in 110 degree weather.
We found the solution about three years ago when I heard about wicking beds. It is a self contained raised garden bed with a reservoir of water under the soil. Now our gardens require a fraction of water once a week, and twice a week during the hottest months of July and August. As you can see, we now have a vibrant and healthy garden that requires very little maintenance or water.
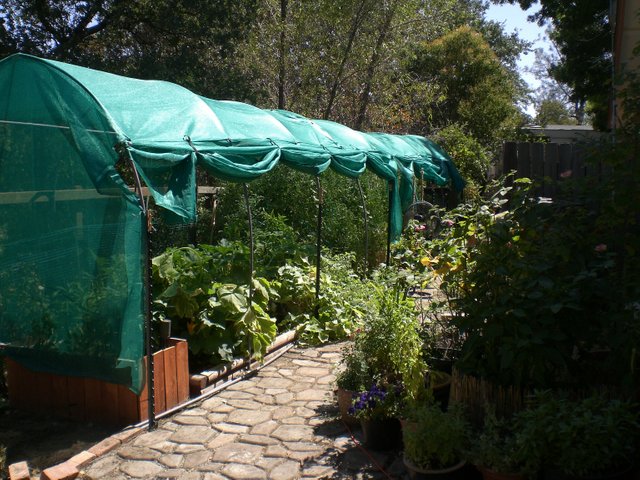


All of these vegetable beds are wicking beds. They are not planted in the ground, and even though the temperatures have often exceeded 100+ degrees for over a month, they are watered only twice a week.
The general idea is to have a reservoir under the soil, which will then "wick up" through the sand and into the soil. The plants will always get all the water they need, without you having to be concerned about your vegetables being over watered or under watered. The Perforated Corrugated Drain Pipe will contain the water and provide support for the sand and soil above.
If you are interested in building your own, here are the basic steps and list of supplies;
1. A water tight container at least 24 inches tall. IBC totes cut in half work very well. You can also use 55 gallon water or food grade barrels cut in half. We have even used smart pots lined inside with plastic. Note: You should use only HDPE plastic because you do not want chemicals leaching into your water. IBC totes and the blue plastic water barrels are food grade (HDPE2).

2. Perforated Corrugated Drain Pipe, available at any Home Depot or Ace Hardware. This will be the base of your water reservoir. If you can obtain socked pipe, you can skip the landscape fabric to seal the ends of the pipe. The vacant hole in the center is for the sand.

3. Landscape Fabric. This will keep the sand out of the drain pipe and separate the soil from the sand.
4. Zip ties.
5. Black ABS pipe for fill tube.
6. Sand
7. Small amount of 5/8 inch irrigation pipe. This will be used as an overflow to let you know the reservoir is full. Also helps drain excess water resulting from heavy rains.


Note the 2" ABS Pipe in the corner of the IBC tote. This is the fill tube. Also there is a 5/8 inch irrigation pipe with some fabric zip tied on the end. This is the overfill drain. You will need to drill a 5/8 hole about 5-6 inches from the bottom.

Fill with sand and level, just above the drain pipe.

Place Landscape Fabric (I used burlap on this one) on top the sand, and then top off with you favorite garden soil. You want to keep the soil separate from the sand.
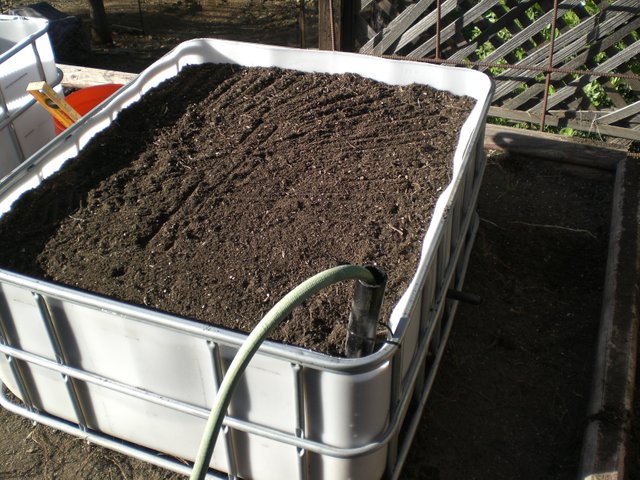
Fill with water till it come out the drain pipe. Add you started plants, and Enjoy your Garden.


Your pictures are not working for me. Just blank squares.
Thanks. I think I just fixed it.
Yes, looks good.🍑
Thank You. It has taken a lot of time and effort, but it is working very well for us. We plan to double up our wicking beds in the next year or two. The shade cloth was just added in the last two weeks because the high temps and direct sun were cooking our tomatoes on the vine.