Homemade Bread for Time Poor People
For many people the origins of their food is an understanding they strive for. The elimination of Genetically Modified foods from their diet, regular visits to Farmers Markets to buy produce that is as fresh as possible and discovering local Bakeries that produce Artisan Breads is becoming increasingly important for.
Many would love to be able to bake their own bread, but the necessity to work long hours often precludes this, as traditionally bread baking demands your attention over several hours. So for those who would like to make their own bread but don’t have the time for traditional techniques, here is the answer:
I have been developing and tweaking this recipe for a number of years, it is almost fool proof and I use it to bake a loaf once or twice per week, depending on how many of my brood are around. It takes about 5 minutes before you go to work and around 20 – 30 minutes when you come home, before you leave it to rise and finally bake. So what’s involved…
The Ingredients:
- 2½ cups Strong White Bakers Flour
- 2 cups Stone Ground Wholemeal Flour. If you can’t get Stone Ground, any good Wholemeal will do.
- 2 Teaspoons Dried Baker’s Yeast
- 1/3 cup Extra Virgin Olive Oil
- 3 Teaspoons Salt. I use Himalayan Pink Salt but any salt will work fine.
- 400ml Pure Water. Yeast doesn’t like Chlorine so tap water needs to be filtered or use bottled water.
Loaf Tin: Around 225mm (9”) x 150mm (6”), non-stick if you can get one, but not critical.
Stainless or glass Bowl: 2 litre or 3.5 pint minimum, larger if using for the final dough mixing.
Cling wrap
Optional Extras:
You can add seeds, dried fruit and other goodies in small quantities, I often use Chia Seeds and Quinoa Flakes. Best to get the basics right first before going too fancy.
Now let's get started with the first part:
Mix 1½ cups Wholemeal Flour, 1 cup White flour and 2 teaspoons of yeast in a large bowl that will give plenty of room to rise. The ‘porridge’ will more than triple in volume.
Mix these ingredients with 400ml of water into a thickish porridge and cover the bowl with cling film. Leave this in a warmish room while you go to work. While you’re away, the yeast will become active and the porridge will rise very close to the top of the bowl, it will then collapse and wait for your return. For me this is often 10 hrs or more, but that doesn’t matter as the final stage will soon wake the yeast up again. So if you’re away for longer, don’t worry it will still work just fine.
When you get home some hours later you can get into the second stage:
Prepare your loaf tin, if non-stick then you’re good to go, if your tin doesn’t have a non-stick surface, you have to grease and flour the inside of the tin to prevent the dough from sticking.
Making the dough might need a slightly bigger bowl depending on the size of the first one, or you can use a Kitchen Mixer with a dough hook, this is what I use.
Turn the bubbly porridge into the mixer bowl and add the remaining ingredients; 1 cup Wholemeal Flour, 1 cup white flour, the salt and the olive oil and start mixing. Work the dough for a little while before you make any final adjustments, you are looking for a soft, elastic dough that is not sticky. If it is sticky add a little more flour, if too firm a little more water but go very gently as the consistency of the dough changes as you bring it together before kneading it.
A note on working surfaces; I like to knead on timber and I have a special board for this, stainless and stone bench tops are fine, but they are cold and will chill the dough so the second rise could take a little longer to get started until the dough has warmed up. Laminate is fine as well, tiled bench tops are tricky and I would suggest you use a large cutting board as a kneading surface.
Once the texture of the dough is about right, knead and stretch for about 10 minutes, then shape and place in the baking tin. Place the tin in either a large plastic bag with enough space for the dough to rise, or cover with a damp kitchen towel, this is to prevent the top of the dough from drying out.
Leave in a warm place and check regularly as the dough can rise quickly. The warmer, the quicker, on a warm summer day the dough can be ready for the oven in less than an hour! You want the dough to double in size as a minimum, I normally let mine rise around 2½ times its volume, more than this it has probably over risen and will partially collapse in the oven.
Once fully risen place in a 230°C (450°F) non fan forced oven for around 40 minutes. I prefer non fan forced as I have discovered that fan forced tends to burn the bread on one side. If fan forced is your only option use 210°C (410°F).
Oven temperatures can vary so keep an eye on your loaf during the latter stages of baking, if you oven runs hot, you might want to remove your loaf early so it doesn't burn.
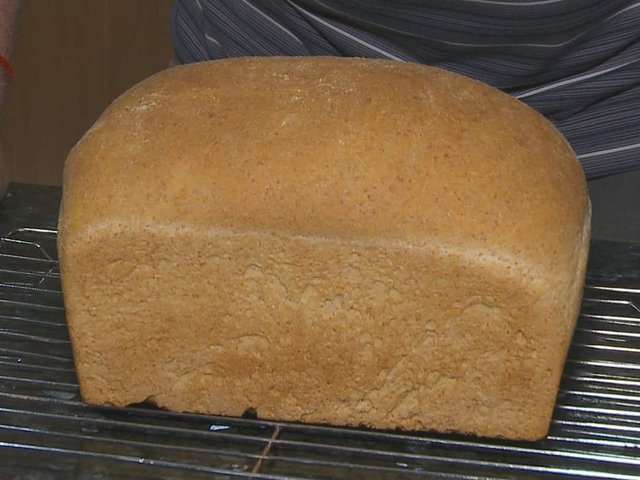
Your loaf should have risen a bit more and be a even golden colour, to make sure it is fully cooked, turn the loaf out of the loaf tin and tap the bottom, it should be firm with a hollow sound. Cool on a wire rack and enjoy bread by your own hand.
Other things you can do to your bread:
Adding seeds: I add no more than ¼cup of seeds when making the final dough, you can also roll the finished dough in seeds before it goes into the loaf tin.
Steaming: If you like a really crisp crust, add a tray to the bottom of the oven when it's heating up, then quickly pour a half cup of water into the tray as soon as the loaf goes into the oven. Be careful as steam is produced instantly so keep your face away and close the door fast!
Other flours: I have used Rye flour and Spelt flour as well. With Spelt flour I use it to replace the Wholemeal flour, with Rye flour, I replace the wholemeal in the first stage only and replace the wholemeal in the second stage with white flour.
These specialty flours respond differently and I have found that I need to reduce the water by about 50ml otherwise the dough is sticky and you'll have to add a fair bit of extra flour when making the final dough.
One thing to keep in mind is flours vary, so though the 400ml water volume might work well with the flour I get in Australia, flours in other parts of the world will be slightly different, some might need more water, some might need less, so you will find yourself making little adjustments to suit your local ingredients.
On a final note, the smell of fresh bread from your own oven is an aroma to die for, and the first slice of crust from the end of the loaf is rarely there by the time you go to bed!
Hope you love this as much as my family does.
Here's a video of the whole process: https://youtu.be/oxKAZfdqg2A
Fantastic post. This is just the sort of thing that I love to see. I think I might give this a try.
Wonderful post @mungus, resteemed :)
Thank you, going to give it a try???