SEC S20W5 - Flutter Toolkit – Managing Packages, Custom Application Icons, and Streamlining Navigation
Hello Steemians, welcome to my post and stay safe as you read through this post.
Explore Pub.dev: What do you understand by pub.dev? How it helps in flutter development? If you are a developer then how can you publish your own package in pub.dev (2 Points)
Pub.dev is the official package for Flutter and Dart. Simply put, pub.dev, provides a central repository for discovering sharing, and using open-source packages that can be added (integrated) into the project of Dart and Flutter. In this post, we will be looking at how Pub.dev is helpful in Flutter development which I have shared below.
Benefits
Provide Access to Packages:
Pub.dev helps to host a vast collection of Dart and Flutter libraries, which helps to speed up the affair of development by allowing developers, programmers etc to use already pre-built functionalities like state management, animations, UI components, and several others.Help Package Documentation:
Every package that has to do with Pub.dev comes with documentation, with also installation information, and use which helps developers/programmers get started so easily and faster.Dependency Management:
Pub.dev allows developers/programmers to manage dependencies so easily by adding a package version and name to thepubspec.yamlfile, the needed package is downloaded and integrated into the required project.Package Versioning:
As a developer, I can specify package versions to ensure that there is compatibility with the App I am developing, which will help me to prevent issues from breaking changes in the latest versions.Community and Collaboration:
As a developer, Pub.dev can allow me to easily share and collaborate with my community enabling improvements and contributions from other developers.
How Package Can Be Publish on Pub.dev
As a developer publishing my package to pub.dev can be so easy for me all that I need to do is follow the tips shared below.
Tip 1: Create a Flutter/Dart Package:
I can start by organizing my project as a package and ensure my project contains a
libfolder where the main code resides, along with apubspec.yamlfile for metadata.Tip 2: Prepare the package:
I will make sure my package includes the following:Proper documentation (
README.md,CHANGELOG.md, and optionallyEXAMPLES.md).I will do unit tests to ensure the quality.
I will ensure there is a well-structured and clear API.
Tip 3: Pubsoec.yaml Setup:
Add metadata like the package description, name, authors, version, and other dependencies in the
pubspec.yamlfile.Tip 4: Analyze and Test:
Run
dart analyzeto ensure there are no problems with my package anddart testto verify it passes all tests.Tip 5: Publish the Package:
I will need to register on pub.dev using my Google account first.
Once I have registered, I will then run the following command from the package directory to upload the package:
dart pub publish
The command above, will prompt me to confirm the details of the package before uploading it to pub.dev.
Tip 6: Versioning and Maintenance:
After the first release, I will then need to maintain and version my package by updating the
pubspec.yamland publish new versions when I am adding features or fixing bugs or issues.
Pubspec.yaml file: What is pubspec.yaml file? How we use it and explain its components with examples. (2 Points)
The key configuration file in every Dart and Flutter project is pubspec.yaml file. It is a file that defines the metadata of the project, assets, dependencies, and other configuration settings. It is written in YAML (YAML Ain't Markup Language), a human-readable format used to configure Flutter and Dart projects.
Purpose
The purpose of pubspec.yaml are:
To manage dependencies (package) for the project.
To define project details like description, author, name, and version.
To declare assets such as fonts, images, and other resources that are used in the app.
To specify environment constraints like the SDK version of Dart.
Components
Project Metadata:
This is the section of punspec.yaml that contains basic about the project.
name: my_flutter_app
description: A new Flutter application.
version: 1.0.0+1
homepage: https://example.com

environment:
  sdk: ">=2.19.0 <3.0.0"
Interpretation
name: This has to do with the name of my project.description: A short description of my project.version: this consists of two parts which are:1.0.0as the version number and+1as the build number.homepage: A link to the project homepage which can be optional.environment: Specifies the Dart SDK version which is required by the project.
Dependencies
This is the section of pubspec.yamlthat lists the external libraries (packages) that my project depends on.
dependencies:
  flutter:
    sdk: flutter
  http: ^0.13.3
  provider: ^6.0.0
Interpretation
flutter: This specifies that the above project uses the Flutter SDK.http: A package for making HTTP requests (version `^0.13.3).provider:A state management package (version^6.0.0).
Dev Dependencies
These are the packages of pubspec.yaml that are only needed during development, such as code generation tools or testing.
dev_dependencies:
  flutter_test:
    sdk: flutter
  build_runner: ^2.3.0
Interpretation
flutter_test: This provides testing utilities for Flutter apps.build_runner: This is a tool that is used for code generation.
Environment Constraints
This is the section that specifies the minimum and maximum Dart SDK version my app can run on. It makes sure there is compatibility with a specific version of Dart.
environment:
  sdk: ">=2.19.0 <3.0.0"
  flutter: ">=3.7.0"
Interpretation
sdk: Ensures that my project runs only on Dart SDB versions between2.19.0and3.0.0.flutter: Ensures compatibility with specific flutter versions.
Assets and Fonts
I can use this to declare static assets and custom fonts used by the application in this section
flutter:
  assets:
    - assets/images/logo.png
    - assets/icons/
assets: This specifies the paths to images or files that I can include in my project.
Fonts
flutter:
  fonts:
    - family: Roboto
      fonts:
        - asset: fonts/Roboto-Regular.ttf
        - asset: fonts/Roboto-Bold.ttf
          weight: 700
family: This has to do with the name of the font family.asset: This has to do with the path to the font file.weight: This has to do with the weight of the font (e.g.,700for bold).
Example of a Full pubspec.yaml File:
name: my_flutter_app
description: A new Flutter project.
version: 1.0.0+1
homepage: https://example.com

environment:
  sdk: ">=2.19.0 <3.0.0"
  flutter: ">=3.7.0"

dependencies:
  flutter:
    sdk: flutter
  http: ^0.13.3
  provider: ^6.0.0

dev_dependencies:
  flutter_test:
    sdk: flutter
  build_runner: ^2.3.0

flutter:
  uses-material-design: true

  assets:
    - assets/images/logo.png
    - assets/icons/

  fonts:
    - family: Roboto
      fonts:
        - asset: fonts/Roboto-Regular.ttf
        - asset: fonts/Roboto-Bold.ttf
          weight: 700
Interpretation
In the above file/code.
- The project is named as "my_flutter_app"
- The app has dependencies on Flutter SDK,
http, andprovider - Some assets and custom fonts are included.
Application Icon: Describe different ways to add an Application Icon. Develop an application add Icon to the application and represent it visually. (2 Points)
There are several ways to add a custom application icon in a Flutter app, which all we need to do is to replace the default Flutter icon with the one we want to add. Below are two simple ways we can add an application icon.
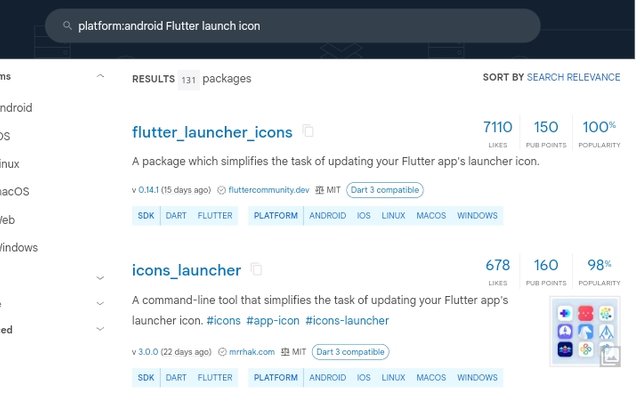
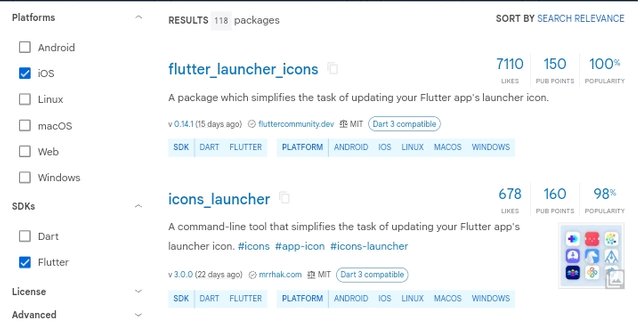
By sing the flutter_launcher_icons Package
This method is the most common method and the most convenient way we can set up an application icon for both iOS and Android platform. The package generates the appropriate icon sizes for each platform automatically.
Steps: 1
**Add flutter_launcher_icons to pubspec.yaml.
Add the following lines into your pubspec.yaml file under dev_dependencies.
dev_dependencies:
  flutter_launcher_icons: ^0.10.0

flutter_icons:
  android: true
  ios: true
  image_path: "assets/icon/app_icon.png"
flutter_luncger_icons: The package itself.android: Set to truetrueto generate Android app icons.ios: Set totrueto generate iOS app icons.image_path: The path to my custom icon image.
Step 2:
Run the package: In the terminal, the following command need to be run to generate the app icons:
flutter pub run flutter_launcher_icons:main
The above command will automatically generate icons in all the required sizes and configure for both Android and iOS.
Step 3:
Check the results After the command has been run, the next step is to check the generated icons in the respective folders:
Android:
android/app/sec/main/res/mipmap-*iOS:
ios/Runner/Assets.xcassets/AppIcon.appiconset/
Using the Manual Method.
Sometimes we may want to add icon for Android and iOS manually or in a situation where the flutter_launcher_icons package is no suitable for my project I can use this manual method.
For Android
Generate icon sizes: We will need to Frist create multiple versions of our icon in different resolutions.
Replace icons in the Android Project: Navigate to the
androd/app/sec/main/res/directory in the flutter project.Replace the default
mipmap-folder (e.g-,mipmap-mpdpi,mipmap-hdpi,mopmap-xhdpiand so on) with the generated icons.Update the
AndroidManifest.xmlMake sure that theAndroidManifest.xmlfile points to the new icon:
Update the
AndroidManifest.xml:
Ensure theAndroidManifest.xmlfile points to the new icon:<application android:icon="@mipmap/ic_launcher" android:label="MyApp" ... >
For IOS:
Generate iOS Icon Sizes: Use a tool to generate various icon sizes needed by iOS.
Replace Icons in Xcode: Open the
iosfolder of your flutter project in Xcode.Navigate to
Runner/Asseta.xcassets/Applcon.appiconset/.Replace the existing icons with the new ones in the appropriate sizes.
Update the
Info.plist(Optional,): In some cases we may have to updayor verify theCFBundleIconsin theInfo.plistfile.
Visual Example:
Below is a a Flutter app that is build which we have add a custom icon to it using the flutter_launcher_icons package.
1. Create a Flutter App:
flutter create app_with_custom_icon
cd app_with_custom_icon
2. Modify pubspec.yaml:
dev_dependencies:
  flutter_launcher_icons: ^0.10.0

flutter_icons:
  android: true
  ios: true
  image_path: "assets/icon/app_icon.png"
3. Add an Icon Image:
At this point we are to place our custom app icon (app_icon.png) in the assets/icon/ folder of your project.
4. Run the Icon Generation Command:
flutter pub run flutter_launcher_icons:main
Develop a "Recipe Book App" browse different categories of recipes (e.g., Breakfast, Lunch, Dinner), view specific recipes. Implement TabBar for navigating between recipe categories, a BottomNavigationBar for quick access to Home, Favourites, and Profile sections and add a custom app icon to represent the app. ( 4 Points)
In order for me to develop a recipe book app in flutter having the below given features; TabBar, BottomNavigationBar, and custom app icon, I will have to follow the steps below
The first thing is to create a new flutter project as shown below.
``
flutter create recipe_book_app
cd recipe_book_app
After creating the above, the next is to place my custom app.im the `assets/icons/` folder and add any image that is related to food,.under the `assets/image` folder.

The third thing is for me to modify my `pubspec.yaml` to include the custom app icon as shown below.
dev_dependencies:
flutter_launcher_icons: ^0.10.0
flutter_icons:
android: true
ios: true
image_path: "assets/icons/app_icon.png"
flutter:
assets:
- assets/images/
**Fourthly is to generate the app icon:**


```bash
flutter pub run flutter_launcher_icons:main
The implementation of the main UI will be as shown below.
import 'package:flutter/material.dart';

void main() {
  runApp(RecipeBookApp());
}

class RecipeBookApp extends StatelessWidget {
  @override
  Widget build(BuildContext context) {
    return MaterialApp(
      title: 'Recipe Book App',
      theme: ThemeData(
        primarySwatch: Colors.orange,
      ),
      home: HomeScreen(),
    );
  }
}

class HomeScreen extends StatefulWidget {
  @override
  _HomeScreenState createState() => _HomeScreenState();
}

class _HomeScreenState extends State<HomeScreen> {
  int _selectedIndex = 0;

  final List<Widget> _pages = [
    RecipePage(),
    FavouritesPage(),
    ProfilePage(),
  ];

  void _onItemTapped(int index) {
    setState(() {
      _selectedIndex = index;
    });
  }

  @override
  Widget build(BuildContext context) {
    return Scaffold(
      appBar: AppBar(
        title: Text('Recipe Book'),
      ),
      body: _pages[_selectedIndex],
      bottomNavigationBar: BottomNavigationBar(
        items: const <BottomNavigationBarItem>[
          BottomNavigationBarItem(
            icon: Icon(Icons.home),
            label: 'Home',
          ),
          BottomNavigationBarItem(
            icon: Icon(Icons.favorite),
            label: 'Favourites',
          ),
          BottomNavigationBarItem(
            icon: Icon(Icons.person),
            label: 'Profile',
          ),
        ],
        currentIndex: _selectedIndex,
        selectedItemColor: Colors.orange,
        onTap: _onItemTapped,
      ),
    );
  }
}
Unfortunately, I couldn't run this successfully, despite numerous try and efforts that I did to install flutter on my laptop which I even try running the program using Dartpad but still couldn't.
I am inviting: @kuoba01, @simonnwigwe, and @ruthjoe
Cc:-
@mohammadfaisal
Upvoted. Thank You for sending some of your rewards to @null. It will make Steem stronger.
Wow you really did a great job here. You must have really invested so much of time and energy in this and I must confess it was so detailed also. I was able to learn a whole lot in this your post