SLC21/WK4: Stabilizing Fractures- Comprehensive First Aid for Different Types of Breaks
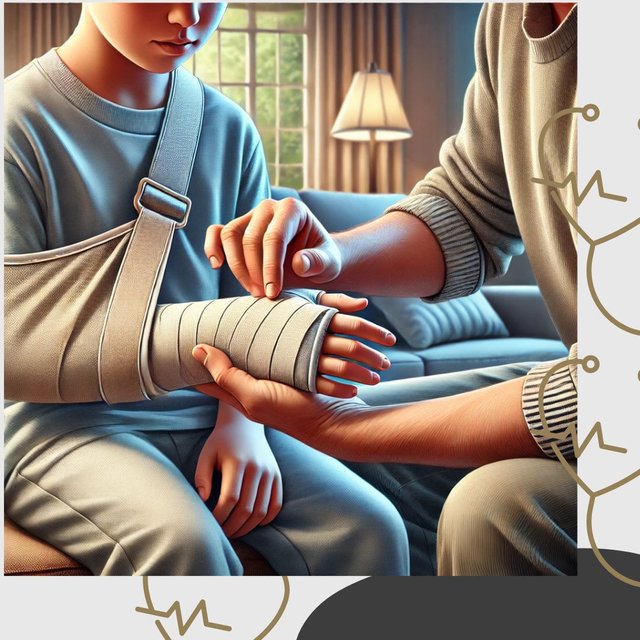
Sling
- Procedure for Applying a Sling on the
Materials Needed:
- A bandage that looks like triangle or piece of fabric
- Scissors (should modifications be required)
- Safety pins are optional but can be used to secure
Steps:
Get the Sling Ready: - Spread the triangle bandage wide. With the base parallel to the chest and facing upward, place the triangle's point beneath the wounded arm.
Arm Position: - Make sure the injured arm is at an elbow angle of a comfortable 90 degrees. To lessen swelling, the hand should rest just above the elbow.
To bind the bandage, bring the triangle's two ends, or upper corners, up around the neck and tie them comfortably but firmly on the side that is not damaged. Modify the knot to provide support for the arm without putting undue strain on the neck.
Fix the Sling: - Fold the extra material neatly for stability, or tuck it in behind the elbow and pin it.
Key Points for Immobilization:
To keep the arm from moving, the sling should support it firmly.
- The sling must provide complete support for the elbow.
- Verify adequate circulation by examining the fingers' colour and temperature after treatment.
- Procedure for Applying a Splint on the Finger
Materials Needed:
- something hard, like as a pen, a popsicle stick, or other object that look sturdy
- Soft padding or gauze Bandages
- adhesive tape
Steps:
Splint Preparation: - Choose a splint that is only a little bit longer than the wounded finger.For comfort, wrap the splint in cushioning or gauze
posture the Finger:
- If at all feasible, gently straighten the wounded finger; if this causes discomfort, leave it in its existing posture.For protection, place the splint along the wounded finger, making sure it reaches just a little bit past the tip.
- Securing the Splint:
- Attach the splint on the finger with adhesive tape.Avoid making the tape too tight while applying it to the base, middle, and tip of the finger.
- Verify Comfort:
- Verify that the splint keeps the finger stable without obstructing blood flow
- Look for symptoms of too-tight wrapping, such as tingling or numbness in the finger.
- Key Points for Stabilization:
For efficient stabilisation, immobilise the joint both above and below the damage.
To avoid creating pressure, do not wrap the tape directly over any swollen regions.
Throughout the splinting phase, periodically assess sensation and circulation.
- Photo Requirement
Attach a clear image of the applied sling and splint, showing:
- The arm will be fully supported in the sling.
- The finger will be properly arranged well with the splint.
In order to encourage healing and lessen pain, this procedure makes sure that both injuries are immobilised and stabilised. Always get medical help from a specialist for additional assessment.
Helmet extraction
- Helmet Extraction in Head and Neck Injury Cases: Procedure and Significance
Helmet extraction is an important yet delicate procedure in cases involving head or neck traumas, especially those with suspected spinal damage. Incorrect or early helmet removal can worsen spinal injuries and result in serious consequences. Here is a summary of the procedure, its significance, and the appropriate actions to take:
- Importance of Delayed Helmet Removal
Helmets aid in keeping the cervical spine in a neutral position, which is known as spinal alignment protection. If the helmet is removed without taking the right precautions, the spine may bend or stretch, increasing the risk of further harm.
Airway Management:
Helmets frequently block the face's ability to be accessed for airway management. Nonetheless, it is better to leave the helmet on until medical assistance arrives in situations where the airway is unhindered.
Minimised Movement:
Excessive movement when taking off a helmet might exacerbate neurological consequences, especially if the spinal cord is compromised.
- Procedure for Safe Helmet Removal
The following actions should be performed if it is judged necessary to remove the helmet (for example, to secure the airway or in cases of helmet misalignment):
Preparation: First, make sure there are two or more trained rescuers on hand.Evaluate breathing and the patient's airway. If it is absolutely required for airway control, take off the helmet.
Stabilisation: The patient's head should be held firmly in a neutral position by one rescuer (Rescuer 1) to maintain manual inline stabilisation.As the second rescuer (Rescuer 2) gets ready to help remove the helmet, they cut the chin strap.
Face Shield Removal: To enhance airway access and lower the chance of spinal movement, the face shield on the helmet should be taken off first.
Helmet Removal: Rescuer 1 carefully removes the patient's helmet as Rescuer 2 assumes stabilisation from the front.- To avoid neck flexion or extension, the helmet is rotated forward a little to ease it off.If at all feasible, remove any cheek pads or other padding from the helmet before wearing it.
Post-Removal Stabilisation: - Manually stabilise the head once more after removing the helmet, and if a cervical collar is available, place it in place.- In order to preserve spinal alignment, padding should be put beneath the patient's head if they are wearing shoulder pads.
- Considerations
Collaboration: To comprehend the type of helmets worn and establish procedures beforehand, EMS professionals should work with sports trainers and medical staff at sporting events.
The use of tools: such as cordless screwdrivers, can facilitate the removal of face shields in emergency situations.
In trauma situations, the ability to properly remove a helmet is essential to preventing additional harm. Patient safety and protection against exacerbation of spinal injuries are guaranteed by training in these approaches.
How C-spine stabilization is done
Cervical Spine (C-Spine) Stabilization: Detailed Procedure
In trauma situations where there is a chance of head, neck, or spinal injuries, C-spine stabilisation is essential. Preventing cervical spine movement lowers the possibility of spinal cord damage during treatment or transportation. This is how it is done:
- When to Use C-Spine Stabilization
Stabilisation of the C-spine is necessary when:
-The patient has suffered injuries to the head, neck, or back, particularly in high-impact situations like falls or car crashes.
-The patient has neurological symptoms including paralysis, tingling, or numbness, or they are unconscious.
-A noticeable injury or deformity is present in the neck area..
- Methods of C-Spine Stabilization
1. Manual Stabilization
The initial line of stabilisation is this technique, which can continue until equipment becomes available.
Steps:
-2. Position yourself: Kneel behind the patient's head in the first position. Be sure that they are on a surface that is level, lying supine.
2.Hold the Head Steady: Place your hands on either side of the patient's head, supporting the base of the skull with your fingers and the jawline with your thumbs.
- Align the Spine: If at all feasible, gently bring the head and neck into a neutral position. If there is resistance or pain, retain the head in its current position.
- Maintain Alignment: Holding until a cervical collar or other device is fitted is the fourth step in maintaining alignment.
- 2. Use of Head Blocks and Straps
Head blocks provide additional support and are typically used in conjunction with a spinal board or stretcher.
Steps:
- Place the Patient on a Spine Board: If manual stabilization is being used, log-roll the patient onto a spine board with the assistance of at least two additional rescuers.
- Position the Head Blocks: Place the blocks on either side of the patient’s head, ensuring they are snug but not overly tight.
- Secure with Straps: Use a forehead strap and chin strap to hold the blocks in place. Ensure the straps are firm but not restrictive to circulation or breathing.
- Check Alignment: Ensure the cervical spine remains aligned with the thoracic and lumbar spine.
- 3. Application of a Cervical Collar
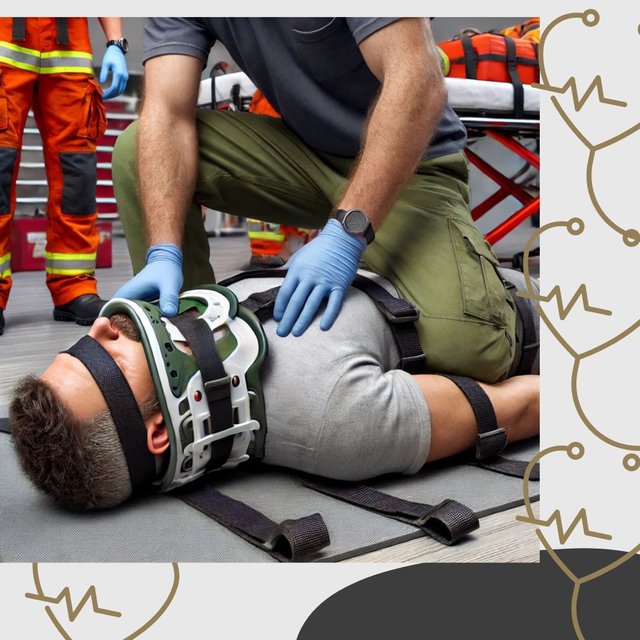
Manual stabilisation is frequently supplemented with a cervical collar. Steps:
- Pick a collar that fits well.
- Place the collar's back part at the back of the patient's neck.
- Protect the collar with a strap call Velcro and raise the front part so as to support the chin.
- Make sure it fits snugly without getting in the way of swallowing or breathing.
- Key Points for Effective Stabilization
- Avoid Movement: Avoid bending, twisting, or extending the head or neck.
- Keep an eye on the patient: Throughout stabilisation, periodically check for breathing, circulation, and airway patency.
- Reassess: Verify that the straps stay in place and aligned during transportation.
- One rescuer is keeping things manually stabilised.
- The correct positioning and fastening of straps and head blocks.
- Cervical collar application, making sure the neck stays in alignment the entire time.
How to manage unconscious person situation
The ABCDE principles of trauma care—Airway, Breathing, Circulation, Disability, and Exposure—must be followed when dealing with an unconscious person who has a compound fracture on their arm, severe bleeding, no distal pulse, and restricted breathing.
- 1. Ensure Scene Safety and Call for Help
- Make sure the patient and you are both safe at the scene.
- Make an instant call to emergency services and give a thorough account of the patient's condition.
- 2. Airway Management
Check the Airway: Unless you suspect a spinal injury, use thejaw-thrust manoeuvre to open the airway. Otherwise, use the head-tilt, chin-lift approach.
Clear Obstructions: Clear the airway of any obvious obstructions, such as blood, vomit, or debris.
Maintain Airway Patency: If breathing is still difficult after clearing the airway, think about putting in an oropharyngeal airway, if you are medically prepared to do so.
- 3. Breathing Support
- Assessing breathing: involves feeling, hearing, and looking for breath sounds as well as observing a rise in the chest.
*Provide Ventilation: If breathing is insufficient, administer rescue breaths or, if one is available, use a bag-valve mask (BVM).
Treat Possible Tension Pneumothorax: Check for chest injuries that might need more complex interventions if the chest exhibits symptoms of trauma and breathing is still difficult.
- 4. Control Massive Bleeding (Critical Priority)
Apply Direct Pressure:
-Firmly push on the bleeding spot with sterile gauze or a clean towel. Steer clear of applying pressure directly to exposed bone fragments. To lessen bleeding, raise the arm above the level of the heart if at all possible.
Apply a Tourniquet:
- Apply a tourniquet close to the bleeding location if direct pressure doesn't work. Until the bleeding stops, tighten. Take note of the application time.
Dress the Wound:
-To stop infection, apply a sterile dressing over the compound fracture. Make sure the dressing isn't too tight to prevent blood flow.
- 5. Circulation Assessment and Fracture Stabilization
Check for Shock: Low blood pressure, a fast pulse, and pale, cold skin are symptoms. Be sure the patient is in a supine position and a warm place.
Stabilise the fracture: In order to stabilise the fracture, immobilise the arm while keeping the fractured bone in place. Make use of a splint or makeshift support, such as a solid board or pole. Be sure the joint above and below the fracture is immobilised by bandaging the arm to the splint.
Never try to push the bone back in or realign it.
Reevaluate Distal Circulation:
- Following splinting, look for indications of circulation (such as capillary refill) or a pulse at the distal radius.
6. Monitor and Reassess
- Keep an eye on
- Patency of airways.
- The quality and rate of breathing.
- Signs of shock and circulation.
- If the patient's health deteriorates, be ready to perform cardiopulmonary resuscitation.
- 7. Handover to Emergency Responders
- Give a thorough description of your initial findings (airway status, breathing, bleeding severity, and pulse state) to emergency personnel as soon as they arrive. - Measures implemented (airway support, splinting, tourniquet administration).
- Notes made while providing care (e.g., when the tourniquet was applied, when breathing or consciousness changed).
Keys to give Considerations
Prioritise life over limb at all times: breathing, circulation, and airway are more important than the fracture itself.
Transport to a hospital for advanced care should not be postponed.
Steer clear of needless movement and maintain head and neck stability if spinal damage is suspected.
Guidelines from trauma care systems such as ATLS (Advanced Trauma Life Support) are in line with this strategy.
INFOGRAPHIC (visual illustration) on managing fractures
Here’s a tabular representation of managing fractures, including steps for immobilizing the limb, applying a splint, and stabilizing the spine:
| Step | Action | Key Points |
|---|---|---|
| 1Examine the situation | for indications of a fracture, such as discomfort, swelling, deformity, or exposed bone. First, check for injuries that could be fatal, such as bleeding or problems with the airway. Avoid needless movement and always | make sure the scene is secure. |
| **2. Immobilise the Limb | - Stop the wounded limb from moving.To keep the limb steady, use your hands or any other available support. If the bone is protruding | do not try to press it back into place or relocate it. |
| 3. Control Bleeding | - Using a clean cloth or sterile dressing, apply direct pressure.If at all feasible, elevate the affected limb Only apply a tourniquet in cases of significant bleeding | Don't put pressure on exposed bone directly. When tourniquet is applied, then note the time. |
| 4. Apply a Splint | - Choose a stiff object, such as a board, pole, or rolled newspaper don't expose the joints above the fracture above and below the fracture with the splint. | Without stopping circulation don't expose the splint with a bandage or piece of fabric, cover it. Once the splint is secured, check for circulation indicators (pulse, capillary refill). |
| 5. Stabilize the Spine | - Avoid moving the patient if there is a suspicion of spinal damage. To keep the head in a neutral position, try to make use of head blocks or what they call manual stabilisation. | Remain in line with your body and refrain from twisting. The head can be manually stabilised by firmly grasping its sides. |
| 6. Monitor and Reassess | - Keep an eye out for any indications of shock, airway blockage, or deteriorating health Maintain the patient's comfort and warmth | Regularly check breathing, circulation, and response. |
| 7. Seek Emergency Help | - Request emergency medical assistance. Give responders all the information they need, including patient condition, steps taken, and injuries. | Don't put off getting professional help. Find transportation to a medical quickly. |
The procedures are made simpler in this table, which makes it simple to refer to in an emergency.
Conclusion
In summary, stabilising fractures is an essential first-aid skill that can stop additional harm and provide comfort until professional medical assistance arrives. Proper stabilisation entails evaluating the situation, immobilising the affected area, controlling bleeding, applying a splint, and keeping an eye on the patient. Each step must be carefully carried out to minimise complications like nerve damage, improper healing, or worsening of the fracture.
Adaptability and prompt response are essential when dealing with fractures of various forms, such as closed, open, or compound fractures. While spinal stabilisation necessitates additional care to prevent further damage to the spinal cord, controlling bleeding and shielding the wound from contamination are crucial for open fractures.
Both laypeople and first responders can significantly impact the results of fracture management by adhering to established protocols and placing a high priority on patient safety. While waiting for more advanced care, first aid training and knowledge of emergency procedures guarantee that life-or-limb-threatening emergencies are managed efficiently.
Hello Teacher @abdu.navi03 I can't find the instruments near me here but i know and have experience on how it's done because I've worked in hospital. I've always want to do your assignment tasks but it always require too much cost instruments but I gave it try this time and that's why I use Canva images, to show that I know what I write and I can practice it.
@olawalium @princefm @olamideoguns come and learn.


https://x.com/opeyemioguns3/status/1860032583444365760?t=K_T6_-mvbXbqz8SyCDV05w&s=19
Student Name: @opeyemioguns
Overall grade: 6.4
Plagiarism Check: Pass
AI Use: No
General Feedback: The student has shown good understanding of the course and has come up with a good explanation on how to manage fractures. Good job.
Regards,
@huzaifanaveed1