[Truffle, React.js] 과일 가게 dApp 만들기 (2/2)
할 것
React.js로 프론트엔드를 구성합니다.Web3.js를 활용해dApp을 완성시킵니다.
완성물 미리보기 (Youtube)
실제 완성물은 조금 더 못생겼습니다. css 를 다루기 귀찮아서...
React.js 불필요 코드 제거
우리가 받아온 react box 에는 미리 작성되어있는 코드가 존재합니다. 이제 그 부분은 필요가 없으므로 제거합니다.
src/App.js 를 아래 소스코드로 바꿔주세요:
import React, { Component } from "react";
import getWeb3 from "./utils/getWeb3";

import "./App.css";

class App extends Component {
  constructor(props) {
    super(props);

    this.state = {
      web3: null
    };
  }

  componentWillMount() {
    getWeb3
      .then(results => {
        this.setState({
          web3: results.web3
        });

        this.instantiateContract();
      })
      .catch(() => {
        console.log("Error finding web3.");
      });
  }

  instantiateContract() {
    const contract = require("truffle-contract");
  }

  render() {
    return <div className="App">Fruit shop</div>;
  }
}

export default App;
이제 App.js 는
componentWillMount에서Web3를 불러오고state에 저장합니다. 앞으로 우리는this.state.web3를 통해Web3.js를 사용합니다.또한
instantiateContract함수를 실행하고truffle-contract모듈을 불러옵니다. 이 모듈은 Truffle 에서 작성한 컨트랙트를Javascript로 손쉽게 불러오고 사용하도록 만들어줍니다.
Shop 인스턴스 저장하기
우리가 컴파일한 Shop.json 파일을 불러옵니다:
import React, { Component } from "react";
import ShopContract from "../build/contracts/Shop.json";
import getWeb3 from "./utils/getWeb3";
instantiateContract 함수를 수정합니다:
const contract = require("truffle-contract");
const shop = contract(ShopContract);
shop.setProvider(this.state.web3.currentProvider);
truffle-contract를 통해 우리가 불러온Shop.json파일을const shop에 저장했습니다.Provider를 우리가 현재 사용하는MetaMask로 설정합니다.
state 에 shopInstance, myAccount 를 추가해주세요. 우리가 배포한 컨트랙트의 인스턴스와 구매, 판매에 사용할 계정을 할당할 state 입니다:
class App extends Component {
  constructor(props) {
    super(props);

    this.state = {
      shopInstance: null, // shopInstance 추가
      myAccount: null,    // myAccount 추가
      web3: null
    };
  }
이제 instantiateContract 함수를 마저 완성합시다:
instantiateContract() {
  const contract = require("truffle-contract");
  const shop = contract(ShopContract);
  shop.setProvider(this.state.web3.currentProvider);

  /* 이것을 추가하세요. */
  this.state.web3.eth.getAccounts((error, accounts) => {
    if (!error) {
      shop.deployed().then(instance => {
        this.setState({ shopInstance: instance, myAccount: accounts[0] });
      });
    }
  });
}
web3 의 getAccounts 를 통해 계정을 받아오면,
shop에 배포된 인스턴스를shopInstance에 저장합니다.accounts에는Ganache에서 생성한10개의 계정이 들어있습니다. 우리는 그 중 첫번째 계정인accounts[0]을 사용합니다.
Shop 컨트랙트를 사용할 준비는 모두 마쳤습니다. 마지막으로 App.js 코드를 확인해주세요:
import React, { Component } from "react";
import ShopContract from "../build/contracts/Shop.json";
import getWeb3 from "./utils/getWeb3";

import "./App.css";

class App extends Component {
  constructor(props) {
    super(props);

    this.state = {
      shopInstance: null,
      web3: null
    };
  }

  componentWillMount() {
    getWeb3
      .then(results => {
        this.setState({
          web3: results.web3
        });

        this.instantiateContract();
      })
      .catch(() => {
        console.log("Error finding web3.");
      });
  }

  instantiateContract() {
    const contract = require("truffle-contract");
    const shop = contract(ShopContract);
    shop.setProvider(this.state.web3.currentProvider);

    this.state.web3.eth.getAccounts((error, accounts) => {
      if (!error) {
        shop.deployed().then(instance => {
          this.setState({ shopInstance: instance });
        });
      }
    });
  }

  render() {
    return <div className="App">Fruit shop</div>;
  }
}

export default App;
사과 구매 함수 작성하기
buyApple() {
  this.state.shopInstance.buyApple({
    from: this.state.myAccount,
    value: this.state.web3.toWei(10, "ether"),
    gas: 900000
  });
}
우리가
Shop.sol에 작성한buyApple함수를 호출합니다.구매자(
from)는 앞서 만든myAccount입니다.가격(
value)은10 ether입니다.value는ether보다 작은 단위인wei이기 때문에toWei함수로10 ether를wei로 환산합니다.gas는900000로 설정합니다.
사과 판매 함수 작성하기
우리가 Solidity 로 작성한 sellMyApple 함수에서 uint 형 파라미터를 받던거 기억 하시죠?:
// Shop.sol 의 sellMyApple 함수
function sellMyApple(uint _applePrice) payable external
Web3.js 에서 파라미터를 넘기면서 호출해주면 됩니다:
sellApple() {
  this.state.shopInstance.sellMyApple(this.state.web3.toWei(10, "ether"), {
    from: this.state.myAccount,
    gas: 900000
  });
}
sellMyApple은 트랜잭션을 실행해야 하므로 이더리움을 누구에서 전송해야 할지 알려줘야 합니다. 따라서from정보도 함께 넘겨줍니다.gas는900000로 설정합니다.
컨트랙트에서 내 정보 받아오기
먼저 내 사과 개수를 보관할 myApples 를 state 에 새롭게 추가해야겠죠?:
constructor(props) {
  super(props);

  this.state = {
    shopInstance: null,
    myAccount: null,
    myApples: 0,  // myApples 추가
    web3: null
  };
}
구매와 판매 기능은 작성했지만 현재 내가 몇 개의 사과를 가지고 있는지 모릅니다. 다행히 우리는 Shop.sol 에 getMyApples 함수를 작성했습니다:
// Shop.sol 의 getMyApples 함수
function getMyApples() view external returns(uint16)  {
      return myApple[msg.sender];
}
Web3.js 로 이 함수를 호출하고 state 에 내가 가진 사과의 개수를 저장합시다. 이때 객채로 전달되는 result 에서 우리는 사과의 개수만 필요하므로 toNumber 를 사용합니다:
updateMyApples() {
  this.state.shopInstance.getMyApples().then(result => {
    this.setState({ myApples: result.toNumber() });
  });
}
내가 가진 사과 개수를 업데이트 하기 위해 updateMyApples 함수를 적절한 시점에 호출해야합니다.
instantiateContract 에 코드 한 줄을 추가해주세요:
this.state.web3.eth.getAccounts((error, accounts) => {
  if (!error) {
    shop.deployed().then(instance => {
      this.setState({ shopInstance: instance, myAccount: accounts[0] });
      this.updateMyApples();  // 여기서 updateMyApples 호출하기
    });
  }
});
- 이제 페이지에 접속하면 내가 가진 사과의 개수를 업데이트합니다.
이제 프론트엔드를 작성합시다!
프론트엔드 만들기
사실 저도 React.js 를 이제 막 사용했습니다. 그래서 최대한 간단히 만들겠습니다.
우리가 필요한 컴포넌트는 다음과 같습니다:
- 사과의 가격 (텍스트)
- 내가 가진 사과 개수 (텍스트)
- 내가 가진 사과의 판매 가격 (텍스트)
- 구매 (버튼)
- 판매 (버튼)
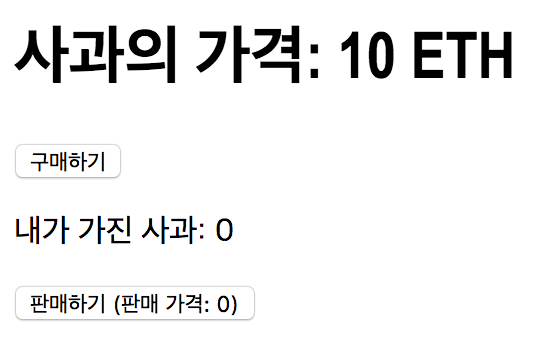
render 함수를 수정해주세요:
render() {
  return (
    <div className="App">
      <h1>사과의 가격: 10 ETH</h1>
      <button onClick={() => this.buyApple()}>구매하기</button>
      <p>내가 가진 사과: {this.state.myApples}</p>
      <button onClick={() => this.sellApple()}>
        판매하기 (판매 가격: {10 * this.state.myApples})
      </button>
    </div>
  );
}
실습하기
크롬 브라우져를 실행하고 MetaMask 로 우리가 띄워놓은 Ganache 에 접속합시다.
MetaMask 를 설치 및 실행하고 크롬 익스텐션에서 여우 모양 아이콘을 눌러주세요:
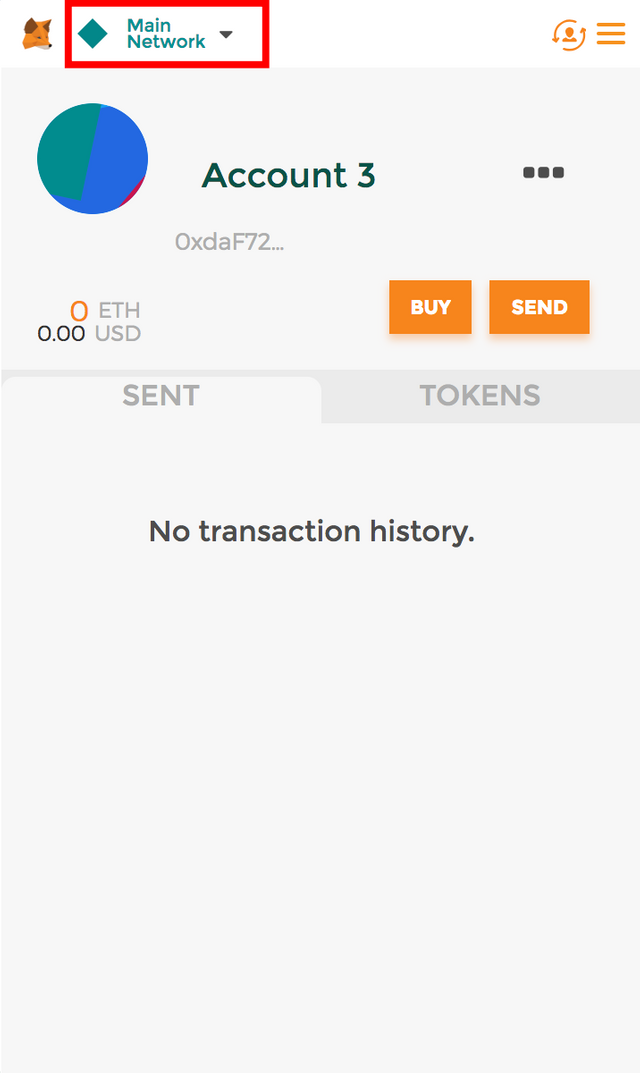
- 드랍 다운 메뉴를 눌러주세요
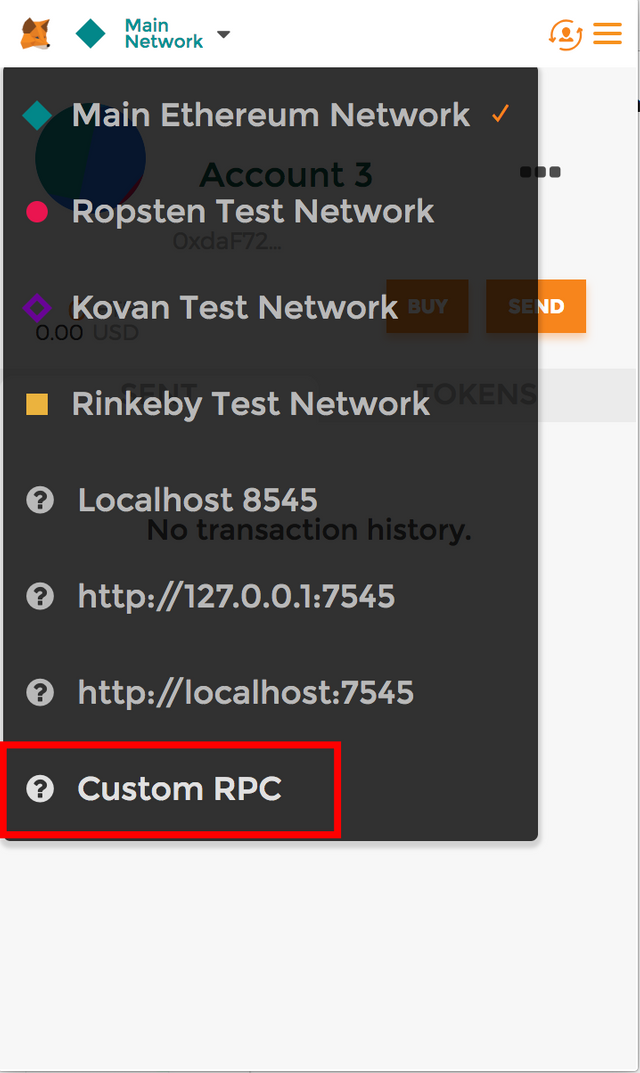
Custom RPC를 눌러주세요.
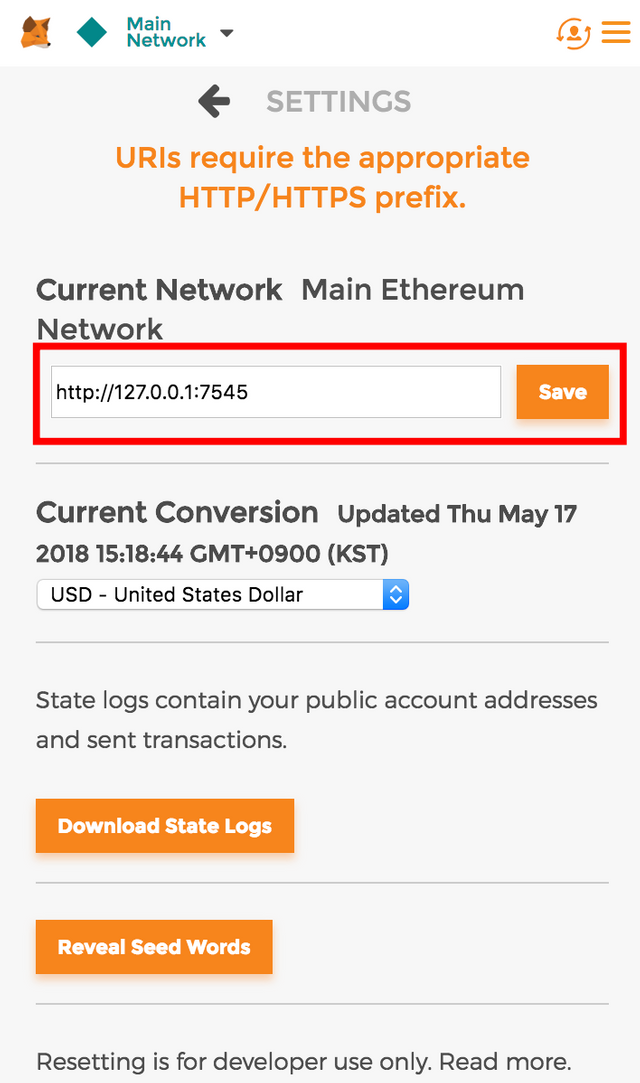
http://127.0.0.1:7545를 입력하고Save를 눌러주세요.
Ganache 의 첫번째 계정 Private Key 를 받아와 MetaMask 계정에 추가합시다:
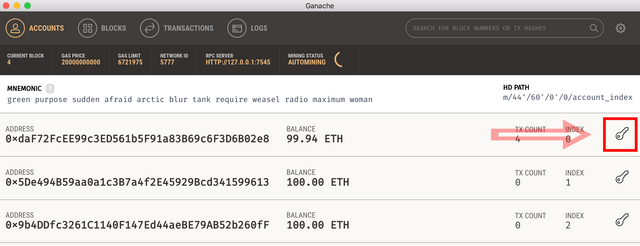
Ganache를 열어 첫번째 계정의 열쇠 모양 버튼을 눌러주세요.Private Key를 복사해주세요.
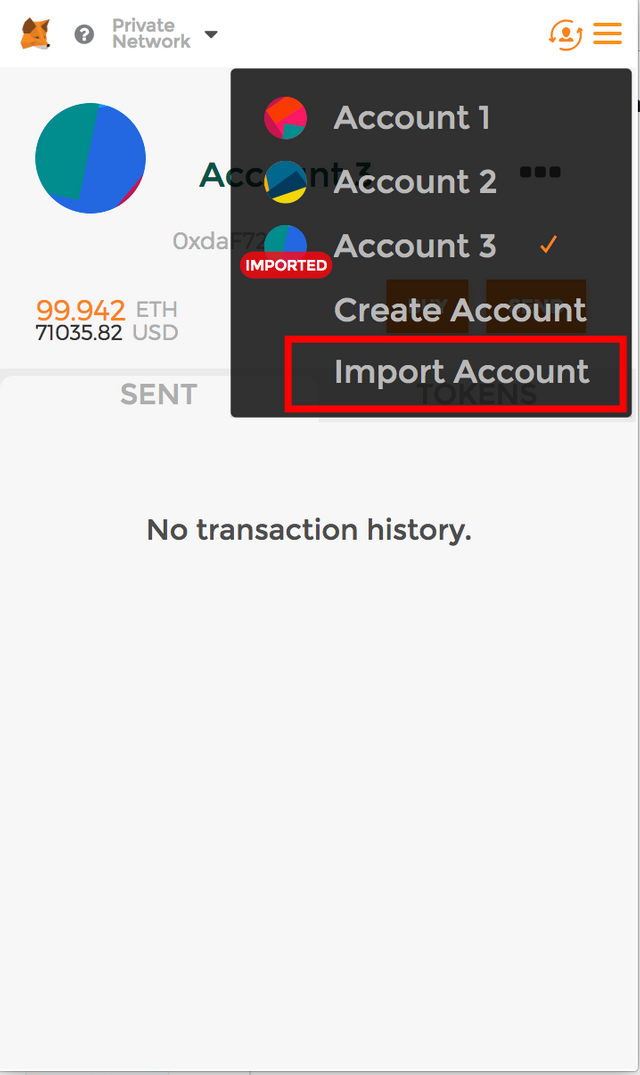
Import Account버튼을 눌러 복사한Private Key를 입력해주세요.성공적으로 계정을 불러오면
IMPORTED라는 빨간 태그가 있는 계정이 생성됩니다.
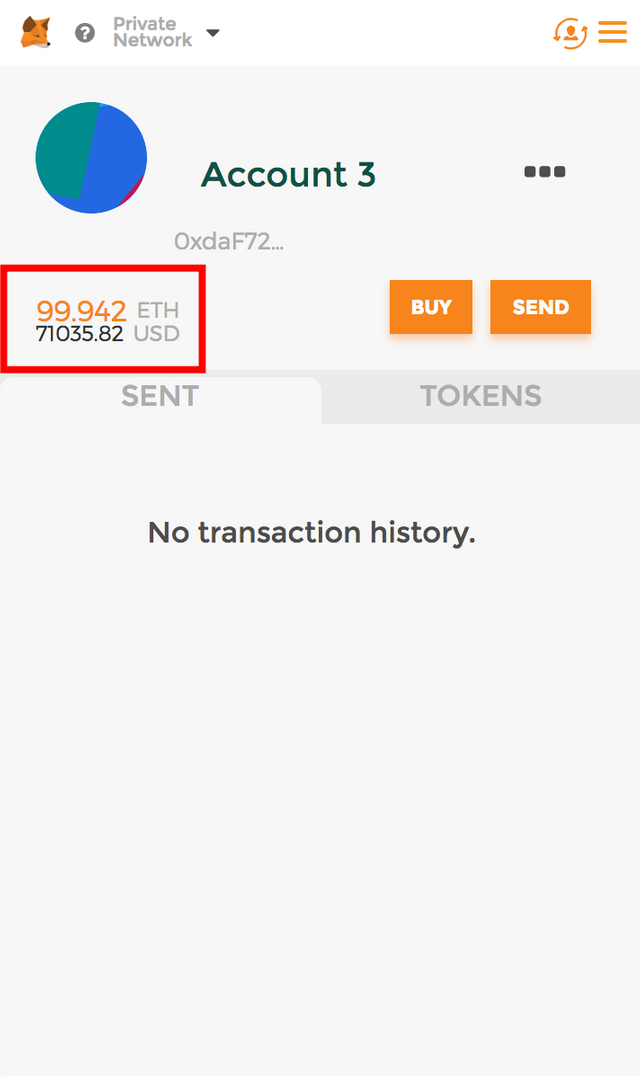
Ganache의 첫번째 계정과 같은량의 이더리움이 들어있겠죠?
이제 사과를 직접 구매하고 판매해봅시다!
서버를 실행시켜주세요:
> npm run start
http://localhost:3000 에 접속합니다.
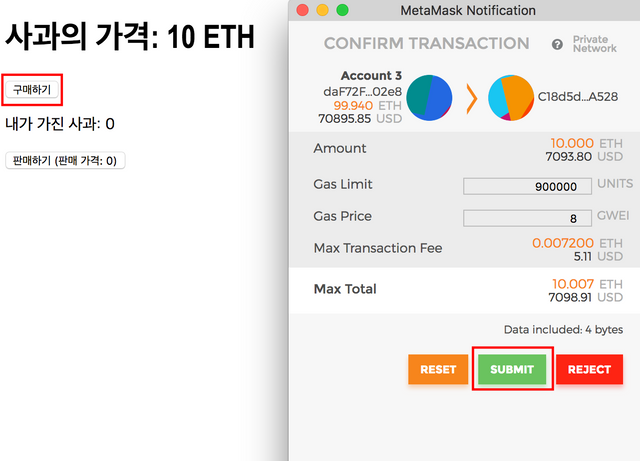
구매하기버튼을 눌러 트랜잭션을 진행합니다.
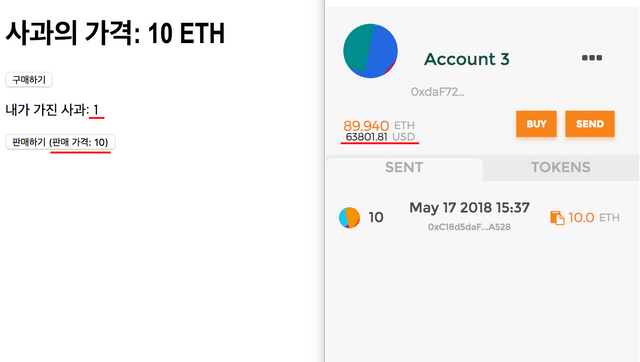
- 사과의 개수와 이더리움이 차감된게 보이시나요?
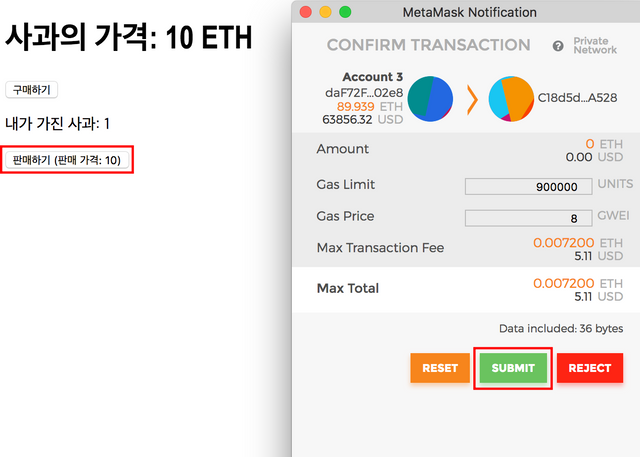
판매하기버튼으로 우리가 가진 사과를 과일 가게에 팔아봅시다.
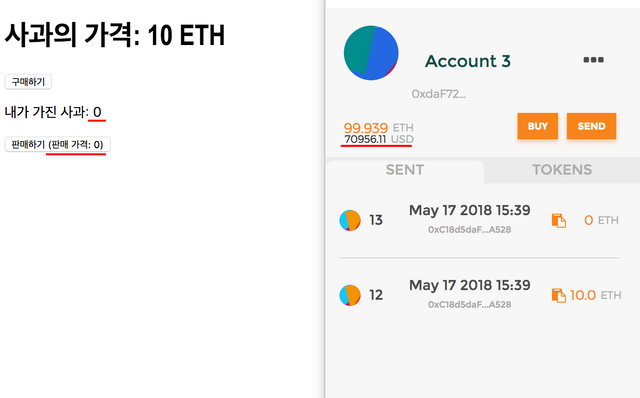
- 사과가 모두 팔리고
10 ether가 다시 들어왔습니다!
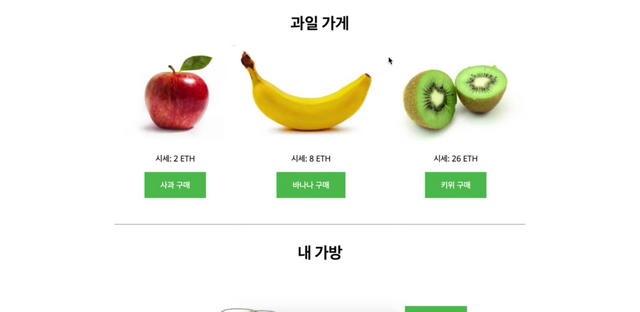
짱짱맨 호출에 출동했습니다!!
잘봤습니다
예제를 따라하던 중 web.js의 파일이 어디에 존재해야하는지 궁금합니다.