Electronics project - Push button controlled LED
OBJECTIVE
The LED should light up when the push button is pressed and when the push button is released the LED should turn off. As this is a basic project, we want to achieve it without the use of Arduino board.
COMPONENTS THAT YOU NEED
2 x AA battery with a battery holder
Breadboard
LED
Push button switch
220Ω resistor
bunch of jump wires
BUILDING THE CIRCUIT
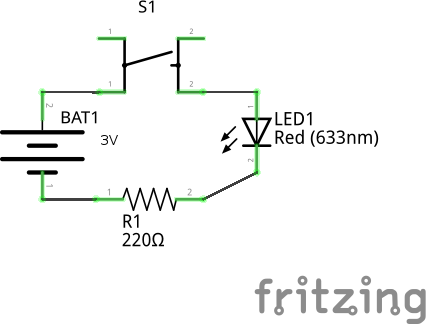
Fig 1 shows the schematics for the circuit. It has the 2 AA batteries, the 220Ω resistor, the LED and the switch connected in serial. The reason why we have the resistor is to limit the amount of current. An LED offers very little resistance, so if we directly connect the LED to the battery, when the switch is turned on close to infinite current will pass through it burning out the LED.

Fig. 1 Schematics Circuit Diagram
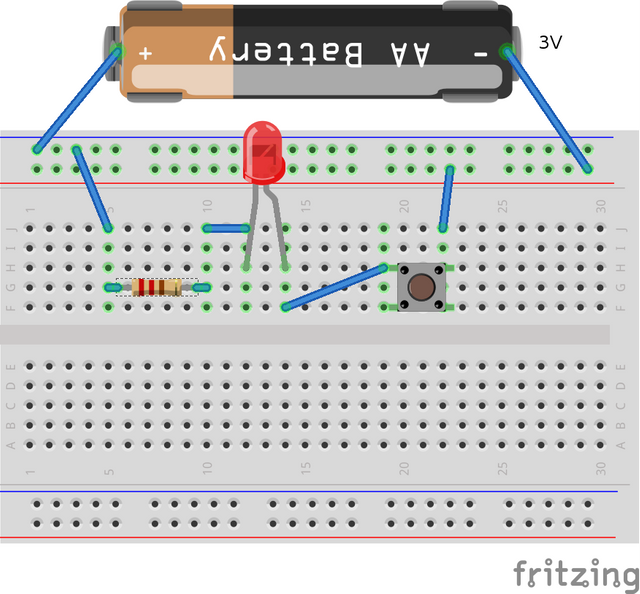
Fig. 2 shows how it can be assembled on a breadboard. The +ve and the -ve terminals of the battery are connected to the bus lines. Through the bus lines, the +ve terminal is connected to the switch and then to the anode of the LED and the -ve terminal is connected to the 220Ω resistor and then to the cathode of the LED. If you require a refresher on how breadboard works, you might want to read the Component Overview: Breadboard.

Fig. 2 Breadboard circuit
This way when you press the switch the circuit is complete and the current will from anode of the LED to the cathode of the LED, lighting it up.
WHICH RESISTOR TO USE?
According to the Ohm’s law as long as we know the voltage and the current we should be able to calculate the resistance value.
R = \frac{(V_{supply} - V_{forward})}{I_{forward}}
If, like me, you have a generic LED and the component details will not be available to you. In this case we will work with generalization. Below are the typical forward voltage and the forward current values that we can work with.
LED color Forward Voltage Forward Current
Red LED 2.0V 15mA
Green LED 2.1V 20mA
Blue LED 3.2V 25mA
Yellow LED 3.2V 25mA
Table 1. LED color and their faverage orward voltage and currents
We also know the supply voltage is 3V. So putting all the numbers in the equation, we get the minimum required resistance as 66.67Ω. If you do not have the exact resistor value you can put the next available resistor, which in my case was 220Ω. The LED will not be lighted up with the maximum efficiency, but it will be lighted up with 220Ω.
WHAT DID WE LEARN?
Relationship between voltage, current and resistance.
How components like resistors, LED and breadboard works.
How to calculate the resistor value required in the circuit.