SLC S21 Week1 || Creating Dynamic Interfaces with Python and Qt5
Hello Steemians
Welcome to the first week of the Steemit Learning Challenge Season 21 where we will explore event-driven programming with Qt5 Design for intermediate Python developers. This course aims to introduce you to how to create graphical interfaces starting with the installation of PyQt5 and the necessary tools in Thonny. Once installed, we will learn how to use Qt Designer to design visual interfaces, an essential step before tackling event-driven programming concepts. You will be able to create interactive and visually appealing applications, while improving your Python skills.
This introduction will allow you to combine theory and practice from the beginning, by designing visual exercises for each concept studied. In addition to simple code manipulation, this approach aims to make learning easier and more interactive, thus facilitating a better understanding of the principles of event-driven programming. By the end of this first week, you will be able to use Qt5 to create your first graphical interfaces, paving the way for creating richer and more dynamic Python applications.

Installation Designer QT5
1.Install QtDesigner Editor:

Go to this link to download Qt Designer. Choose the Qt5 version when downloading. The reason for this choice is that Qt5 is widely used in Python projects with PyQt5, ensuring optimal compatibility with the PyQt5 library that we will use in this course. Qt5 also offers stability and solid documentation, making it ideal for GUI development projects.

2.Download Thonny (if not installed): Go to the official Thonny website and download the most recent version compatible with your operating system (Windows, macOS, or Linux). Install Thonny by following the instructions.
3.Launch Thonny: Open Thonny once installed.
4.Install PyQt5 :
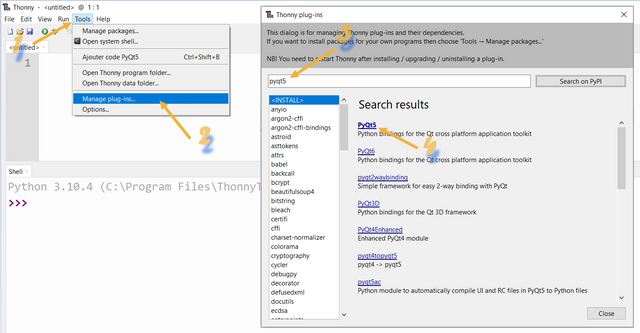
In Thonny, go to Tools then select Manage Packages.
A package management window opens, type PyQt5 in the search bar.
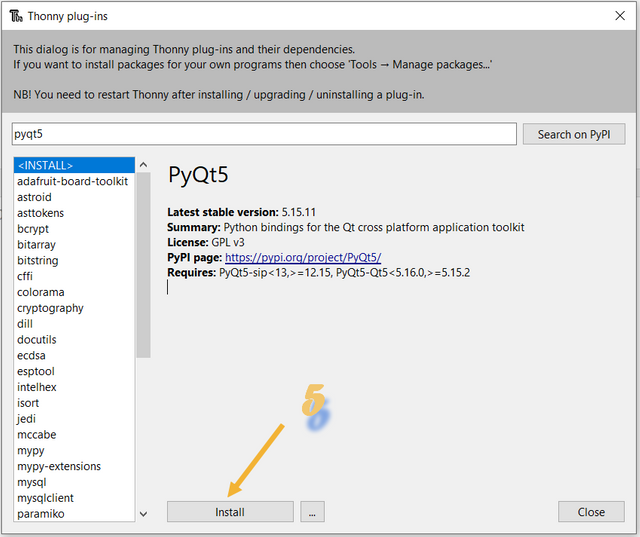
Click on Search, then select the PyQt5 package and click on Install.
Wait while PyQt5 is installed. This is the main package for using Qt5 with Python.
5.Install PyQt5-tools :
- Go back to Manage Packages.
- Search for pyqt5-tools in the search bar.
- Install it in the same way. This package contains in particular Qt Designer, a tool that allows you to create graphical interfaces without writing any code.
6.Verifying the installation :
- Open Thonny and create a new Python file.
- Import the PyQt5 libraries into a script by typing:
from PyQt5.QtWidgets import QApplication, QLabel
app = QApplication([])
label = QLabel('Hello, Qt5!')
label.show()
app.exec_()
- Run this script to verify that PyQt5 is working properly. A small window should open with the text “Hello, Qt5!”.


Using Qt Designer:
- Once PyQt5-tools is installed, you can access Qt Designer.
- To launch Qt Designer, you can browse for the executable file in the installation location or launch
designer.exedirectly. - In Qt Designer, you can create your graphical user interfaces (UI) by placing buttons, windows and other widgets.
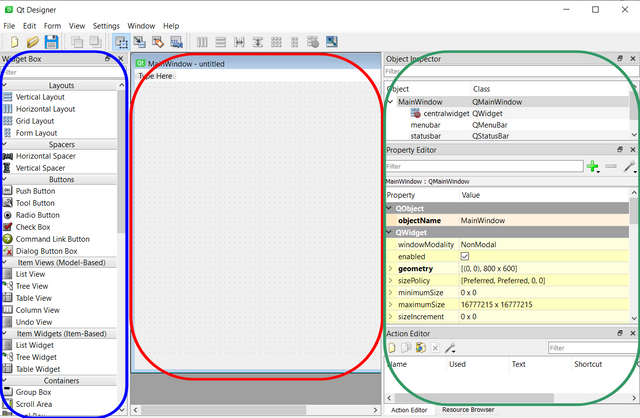
Qt Designer interface
In this Qt Designer interface:
Red framed area: This is the application interface where you will add the graphical objects of your application. This is the main design area.
Blue framed area: This is the list of objects or widgets that you can add in your application, such as buttons, labels, text boxes, etc. You can drag and drop these widgets into the red area.
Green framed area: It displays the properties of each selected object. You can modify attributes such as size, color, or the name of a widget to customize its behavior or appearance.
①Creating the interface using Qt Designer:

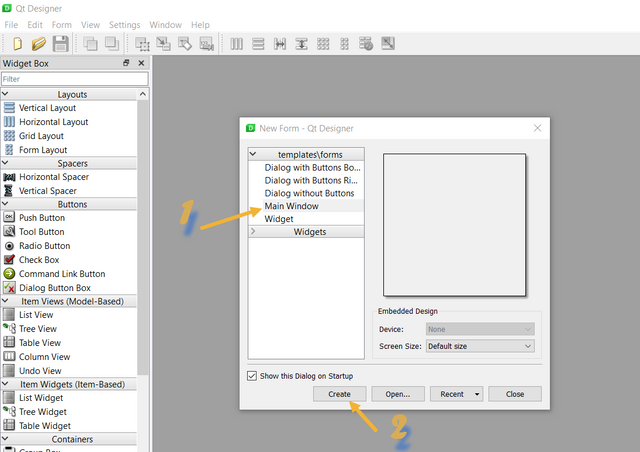
1.Create a new project: In Qt Designer, go to the File menu and select New. Choose Widget as the interface type.
2.Add objects: Once the Widget window is created, use the object list (framed in blue) to drag and drop widgets (such as buttons, labels, etc.) into the application interface (framed in red).
3.Rename objects: Click on each added object, then in the properties area (framed in green), change the objectName field to give each widget a unique name. This will make them easier to manipulate in code.
4.Save the file: Go to File -> Save As. Create a folder named QT and save the file as interface.ui.
You can then use this file in your Python project by converting it to a Python script with the PyQt5 tool.
②Importing the interface with Python:

This code allows to load a user interface created with Qt Designer (interface.ui file) and display it as a graphical window via PyQt5 in Python.
③Using Widgets in a Python Script:
 )
)
Label:
- Modify the text of a label:
win.title.setText('A Title') - Retrieve the text of a label into a variable:
ch = win.title.text() - Clear the content of a label:
win.title.clear() - Set a number in a label:
win.title.setNum(18.5)
Line Edit:
- Retrieve the text from a "Line Edit" into a variable:
ch = win.input_field.text() - Modify the text of a "Line Edit":
win.input_field.setText('Some text') - Clear the content of a "Line Edit":
win.input_field.clear() - Append to the end of the input field content:
win.input_field.insert('more')
A signal is emitted every time the text is edited, and processing 1 is executed:
def processing1():
    ………
win.input_field.textEdited.connect(traitement1)
Note: There is also textChanged: Detection of changes in the input field either by editing or by variable assignment.
A signal is emitted every time the "Enter" key is pressed in the input field, and processing 2 is executed:
def processing2():
    ………
win.input_field.returnPressed.connect(traitement2)
PushButton
A signal is emitted every time the button is pressed, and processing 3 is executed:
def processing3():
    ………
win.button.clicked.connect(traitement3)
Note 1: There are also the signals pressed() and released().
Note 2: You can close the application using:
win.button.clicked.connect(win.close)
You can also clear the content of the input field:
win.button.clicked.connect(win.input_field.clear)
Python script example1:
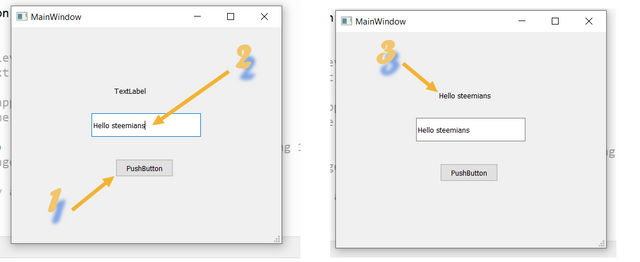
(Enter text in the input field and click the button to reproduce it in the title label)

This script creates a simple interface where the user enters text into an input field, presses a button, and the entered text is displayed in a label. Additionally, it demonstrates how to handle button click events, allowing you to either perform specific tasks, close the application, or clear input fields.
Python script example2:
Develop a GUI in Python using PyQt5 to calculate the Least Common Multiple (LCM) and the Greatest Common Divisor (GCD) of two positive integers.
Instructions
1.GUI :
- Create an interface containing two input fields to enter the numbers, a label to display the result, and four buttons to perform the following actions:
- LCM (LCM): to calculate the LCM of the two numbers.
- GCD (GCD): to calculate the GCD of the two numbers.
- Reset: to reset the input fields and the label of the results.
- Quit: to close the application.
2.Features :
When the user clicks on the LCM button, the application calculates the LCM of the two numbers and displays the result in the label.
When the user clicks on the GCD button, the application calculates the GCD of the two numbers and displays the result in the label.
If one of the input fields is empty or contains an invalid value (non-integer or integer <= 0), a dialog box should be displayed with an error message asking to enter two positive integers.
If the user enters 8 and 9 and clicks on LCM, the application should display LCM(8,9)=72.
- If the user enters 8 and 9 and clicks on GCD, the application should display GCD(8,9)=1.
- If the user enters 0 or another invalid number, an error message should appear prompting the user to enter two integers > 0.
Code python:


This code creates a GUI using PyQt5 to calculate the GCD (Greatest Common Divisor) and LCM (Least Common Multiple) of two positive integers.
- Main functions:
verifier: Checks if the input is a positive integer.ppcm: Calculates the LCM of two numbers.gcd: Calculates the GCD of two numbers.CALCUL_LCMandCALCUL_PGCD: Get the values of the input fields, check their validity, calculate the LCM or GCD respectively, and then display the result.RESET: Clears the input fields and the result.CLOSE: Closes the application.
The interface is loaded from a .ui file created in Qt Designer. The buttons on the interface are connected to functions to perform calculations, reset fields or close the application.

Homework :
Task1: (1points)
Develop detailed documentation to guide a user through the installation of the working environment including Thonny and Qt5 Designer. This guide should be structured and contain the precise steps you followed to install these tools, so that a beginner can reproduce the installation without difficulty.
Task2: (3points)
Create a GUI in PyQt5 to display prime numbers between two values a and b provided by the user.
Instructions
1.The interface must include:
- Two fields for the values a and b.
- A Descending order box to sort the numbers in descending order.
- A Display button to display the prime numbers in the interval.
- Reset buttons to clear and Quit to close the application.
2.Features:
- Display the prime numbers between a and b in the chosen order.
- Validate that a and b are positive integers, with a < b.
3.Example: For a = 12 and b = 27, display 13, 17, 19, 23 or in descending order if the box is checked.

Task3: (3points)
Develop a GUI in PyQt5 to perform the prime factorization of a positive integer greater than 1.
Instructions
1.GUI:
- Include an input field to enter the number to decompose.
- Add a Decompose button to start the decomposition.
- Display the result as a product of prime factors.
- Include Reset buttons to reset the interface and Quit to close the application.
2.Functionality:
- When Decompose is clicked, the application calculates the prime factorization and displays the result.
- For example, for 51, the result should be displayed as 51 = 3^1 × 17^1.
3.Validation:
- Ensure that the user enters an integer > 1. Otherwise, display an error message.

Task4: (3points)
Develop a GUI in PyQt5 to calculate the number of combinations of p elements among n (notation ( C(n, p) )), where n > p > 0.
Instructions
1.GUI :
- Include two input fields for the values n and p.
- Add a button Number of combinations to calculate and display the result of ( C(n, p) ).
- Add the buttons Reset to reset the interface and Quit to close the application.
2.Functionality :
- When clicking on Number of combinations, the application calculates and displays the number of possible combinations.
- For example, for n = 18 and p = 12, display C(18, 12) = 18564.

3.Validation :
- Check that n and p are positive integers and that n >= p > 0. In case of error, display a message asking for valid values.

Note: Please use Thonny and Designer Qt5 to complete all tasks and present videos or gifs for completed tasks.
Image resource


Contest Guidelines
Post can be written in any community or in your own blog.
Post must be #steemexclusive.
Use the following title: SLC S21W1 || Creating Dynamic Interfaces with Python and Qt5
Participants must be verified and active users on the platform.
The images used must be the author's own or free of copyright. (Don't forget to include the source.)
Participants should not use any bot voting services, do not engage in vote buying.
The participation schedule is between Monday, October 28, 2024 at 00:00 UTC to Sunday, - November 03, 2024 at 23:59 UTC.
Community moderators would leave quality ratings of your articles and likely upvotes.
The publication can be in any language.
Plagiarism and use of AI is prohibited.
Use the tags #dynamicdevs-s21w1 , #country (example- #tunisia) #steemexclusive.
Use the #burnsteem25 tag only if you have set the 25% payee to @null.
Post the link to your entry in the comments section of this contest post. (very important).
Invite at least 3 friends to participate in this contest.
Strive to leave valuable feedback on other people's entries.
Share your post on Twitter and drop the link as a comment on your post.

Rewards
SC01/SC02 would be checking on the entire 17 participating Teaching Teams and Challengers and upvoting outstanding content. Upvote is not guaranteed for all articles. Kindly take note.
At the end of the week, we would nominate the top 4 users who had performed well in the contest and would be eligible for votes from SC01/SC02.
Important Notice: The selection of the four would be based solely on the quality of their post. Number of comments is no longer a factor to be considered.
Best Regards,
Dynamic Devs Team



I cannot find the Designer Qt5 at the provided link https://build-system.fman.io/qt-designer-download. And when I am downloading it from here then it is directly downloading the file and there is no any option to chose the version like Qt5. Please guide me. Is it ok to have Qt Designer or provide direct link to download Designer Qt5.
My current Qt Designer has version 5.11.1.

https://drive.google.com/file/d/1vk4NdwbCJ5agVBkOarV7vFLfwBRj7e1Q/view?usp=drivesdk
Try with this version of thonny, it contains all the libraries we need: pandas, matplotlib, numpy, pyqt5, ... ==> Full version (windows 10 or more)
Good work to all.
Thank you for this. Currently I am using that I installed as it is working completely fine. And next time I will go through this.
Good job!
Yeah thank you.
Hello sir, in Thonny, when I searched PyQt5, the result was not shown. I see this interface.
What can I do to installed this.
You should install Qt designer firstly.
I already installed Qt
https://drive.google.com/file/d/1vk4NdwbCJ5agVBkOarV7vFLfwBRj7e1Q/view?usp=drivesdk
Try with this version of thonny, it contains all the libraries we need: pandas, matplotlib, numpy, pyqt5, ... ==> Full version (windows 10 or more)
Good work to all.
Alright I try with this.
I am still Facing this problem.
Its not upgraded
Install pyqt5-tools also.
On PyQt5-tools
If you’re on a restricted network (such as a school or corporate network), firewall settings may block SSL verification. In such cases, check with your network administrator.
Here is my entry: https://steemit.com/dynamicdevs-s21w1/@mohammadfaisal/slc-s21w1-or-or-creating-dynamic-interfaces-with-python-and-qt5
I like this post. I would like yo learn how to create interfases with phython
https://steemit.com/dynamicdevs-s21w1/@akmalshakir/slc-s21w1-or-or-creating-dynamic-interfaces-with-python-and-qt5
My entry
https://steemit.com/dynamicdevs-s21w1/@josepha/slc-s21w1-or-or-creating-dynamic-interfaces-with-python-and-qt5