6. Custom Weather Station: Wind Speed Sensor
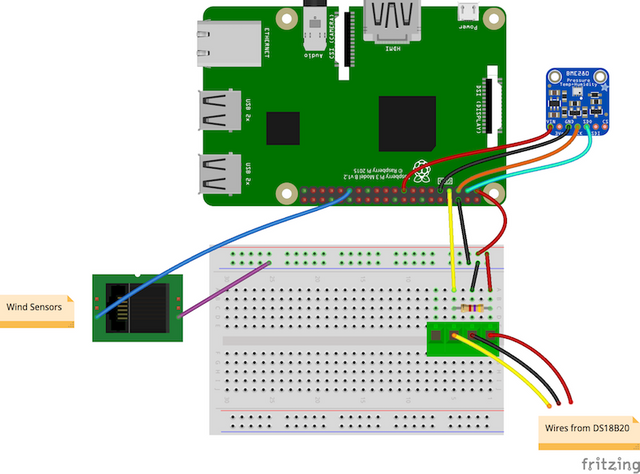
Welcome back, this post is going to cover connecting and integrating the wind speed sensor from the wind / rain sensor assembly.
Connecting
Started off by cutting off the connector the sensor came with and adding my own connector that was easier to plug wires into. I have been using the following guide as a reference for most sensors. The sensor was only two wires so connecting it was relatively non complicated. CAUTION: I found out later the two wires for this sensor are bridged through the wind direction sensor, you can connect the wind speed sensor to the direction sensor first then change the connector on the direction sensor.

The initial example code wind.py worked fine as long as it was run as sudo.
Enabling GPIO for use without sudo
I ran into some trouble when merging the example code into a ROS node since the ROS node can not be run as sudo. The main problem was I needed access to /dev/gpiomem in user space and /dev/gpiochip* which it took awhile to figure out. To solve this issue initially I created a new user group and added a dev rule for access to the gpio.
sudo groupadd gpio

sudo usermod -a -G gpio user_name
After a few failed attempts to change all the right settings I took the advice of this post.
sudo nano /etc/udev/rules.d/90-local_mem_group.rules
Add the following to the udev file save and reboot
SUBSYSTEM=="bcm2835-gpiomem", KERNEL=="gpiomem", GROUP="gpio", MODE="0660"

SUBSYSTEM=="gpio", KERNEL=="gpiochip", ACTION=="add", PROGRAM="/bin/sh -c 'chown root:gpio /sys/class/gpio/export /sys/class/gpio/unexport ; chmod 220 /sys/class/gpio/export /sys/class/gpio/unexport'"

SUBSYSTEM=="gpio", KERNEL=="gpio", ACTION=="add", PROGRAM="/bin/sh -c 'chown root:gpio /sys%p/active_low /sys%p/direction /sys%p/edge /sys%p/value ; chmod 660 /sys%p/active_low /sys%p/direction /sys%p/edge /sys%p/value'"
Finally I initially called my udev rule 10-local_mem_group.rules, the numbers in udev file names denote priority 0-100 and the level 10 priority was actually being over written by system settings. I just upped the number right to 90 and it worked, its possible there is a more appropriate lower number.
Adding Ros2
Added in the sensor as a new node in the project wind_speed_sensor.py. The node reports the wind speed every 5 seconds in miles per hour and reports on ros topic /wind_speed. In the future gusts will be calculated off stored data and reported from another area.
Check out the third blog for information on downloading and using the code.
I will be adding this sensor along with the wind direction and rain gauge to the master launch file later, for now launch with ros2 run mimir wind_speed_sensor
Please like and subscribe.
Thank you for using the recommended tag/s. This post has been manually rewarded with BUILD tokens in the form of an upvote. You can buy, stake, and exchange our "BUILD" tokens for steem on steem engine or SteemLeo.
Build-it is a DIY (do it yourself) platform where you can find tons of how-to's, ideas, and advice to create or build something all by yourself. The platform leverages a robust digital token, called the BUILD. The recommended tags required when creating a DIY article are #diy, #build-it. #how-to, or #doityourself. Please subscribe to our HIVE community here and earn extra 'HIVE' tokens.
Chat with us on our discord and telegram channels Discord, Telegram.