3. Custom Weather Station: Temperature, Pressure, Humidity Sensor Install
Welcome back, in this post I will cover connecting, testing and integrating the BME 280 sensor with the raspberry Pi3 and Ros2.
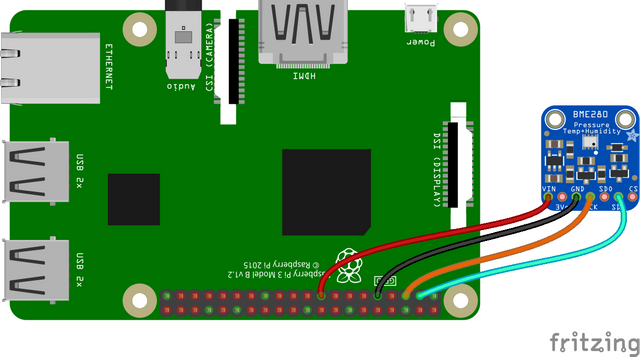
Connecting and Testing
Started off by following an already existing guide for wiring up and initially testing the software. The BME280 needed the connector to be soldered on, then I got some female to female wires to connect the sensor to the raspberry pi board as shown in the guide. Initially tested using the code provided but needed to use sudo due to lack of permissions on the /dev/ic2 bus (more on that below). Despite my mediocre soldering skills this worked with few issues.
Adding Ros2
Created a new ros project and added the node BME280_sensor.py. There is nothing overly complex here just the same code that already works from the guide encapsulated in a node that publishes, the temperature, humidity and pressure to different topics.
Ros2 however is not meant to be launched with sudo so I had to solve the /dev/ic2 issue. For that I followed this guide and basically just gave my account permissions on the ic2.
Downloading and Using the Code
Make sure you have ros2 installed covered here.
Make sure you have created a ros2 workspace
Make sure you have the BME280 Python Library
sudo pip3 install RPi.bme280Make sure you have the other required packages
sudo apt-get install -y mariadb-server mariadb-client libmariadbclient-dev
sudo pip3 install mysqlclientNavigate to workspace:
cd ~/(Your Workspace)/srcClone the code repo:
git clone https://gitlab.com/Robotjini/mimirBuild the code:
cd .. && colcon build --symlink-installSource the build:
source install/setup.bashRun the code:
ros2 run mimir BME280_sensorIn a separate terminal run
ros2 topic listyou should have /bme280_humidity, /bme280_pressure, /bme280_temperature in addition to whatever else ros related you have running.You can view output of a given topic by using the command
ros2 topic echo /bme280_humidity
.png)
You can find links to the previous blogs below, please like and subscribe:
Thanks for sharing your creative and inspirational post!
This post got curated by our fellow curator @tibfox and you received a 100% upvote from our non-profit curation service!
Join the official DIYHub community on steem and show us more of your amazing work!