DIY Wooden Willis Tower Model
I have always loved the Chicago skyline, and out of the 100+ skyscrapers that stand tall over Lake Michigan my favorite is and always has been the Willis Tower (which as far as I am concerned is still called the Sears Tower and will be referred to as such in this piece). The square tube design of the building not only makes this building easily recognizable but it makes it incredibly easy to build a good looking model of the building that doesn't require a lot of materials or tools.
Materials
around 20 ft. of 2x2 lumber
1 ft. of 1/4 in circular rod
wood glue
large C clamps
saw (a simple miter saw will work great)
1/4 in drill
wood stain (optional)
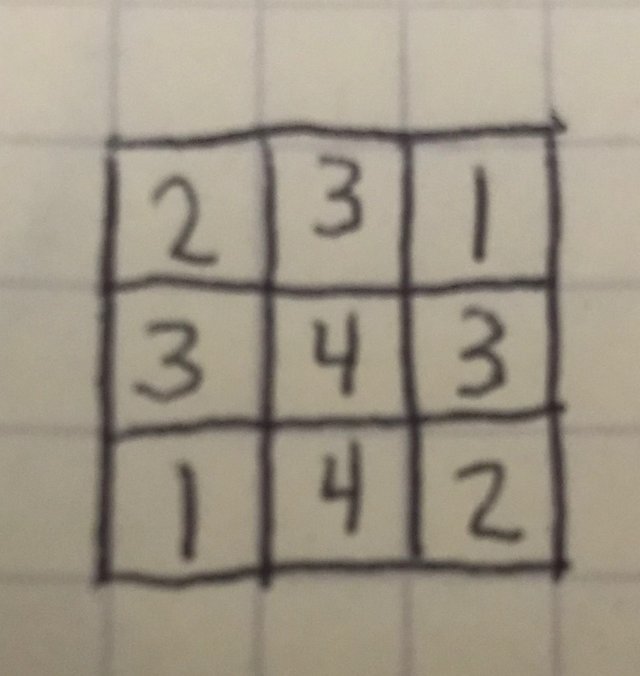
Before getting started it is necessary to understand how the tube system of the sears tower works. There are a total of 9 square tubes that are arranged in a 3x3 pattern that rise up to 4 different heights. The 2 lowest tubes reach the 50th floor, the next 2 tubes reach the 66th floor. For the next level there are three tubes that reach the 90th floor and the final 2 tubes go all the way to the top of the building. Using the west side entrance as the front of the building they are arranged as such, with 1 representing the lowest tube height and 4 representing the highest tube height.

Setting the scale
I wanted my model to be as accurate as possible so scaling the model properly was very important. I decided that each tube of the building would be made of 1 square of the 2x2. On the Sears Tower each tube section is 75 ft. wide. With a 2x2 actually having the width of 1 3/8 in I set the scale to be 75 ft = 1 3/8 in
Using this scale the model will end up being about 31 inches tall with the included height of the antenna.
Step 1 Cutting the 9 tubes
Using the 75 ft to 1 3/8 in scale these are the lengths of wood required
2 pieces at 12.06 in
2 pieces at 16.02 in
3 pieces at 21.74 in
2 pieces at 26.60 in
Step 2 Gluing
Following the pattern shown above the next step is to glue the pieces of wood together. After glueing 2 pieces together I clamped them together and let them sit for a few hours before adding another piece to the tower.
Here you can see 2 pieces of wood being clamped together while the glue dries
Step 3 Adding the Antenna
Once all the glue had dried the next step was to add in the 2 tall antenna to the top of the tower. However, since technically the antenna are not considered the architectural top of the tower the way a spire is, this step is optional.
I first drilled 2, 1/4 inch holes in the top of the tower, one at the center of each tube that reaches the top. Each hole was made to be 1 inch deep. Using the same scale as the rest of the tower the heights of the model antenna were calculated to be 5.39 in for the west side antenna and 5.33 in for the east antenna. Since the hold on the top of the building was 1 inch deep I made each antenna an extra inch longer so they could be pushed into the holes and come out to be the correct height.
Step 4 Staining
Using a small sample size of wood stain you can easily cover the entire model and make it look good for years to come!
I hope you can add your own piece of the Chicago Skyline into your own collection with this super simple model.