Quest: Moldred the Lich king (MAIN VALLEY) (part seven)
@Happyme is sending a messenger to the Trebuchet in the small vally on a fire mission.
he and Diamond moving farvard and attacking a wolf and one oger. the two of them did good damage to the targets before moving back

and ball of fire is comming over the mountains its going a bit short and missing the oger but it lands on undeads and undead wolfs. a large fireball is seen then they are all gone.
@mastergerund and Timothy has moved up and is ready to strike. @hhayweaver is comming up he is killing the wolf ho was wonded by @happyme he is alshow falling also
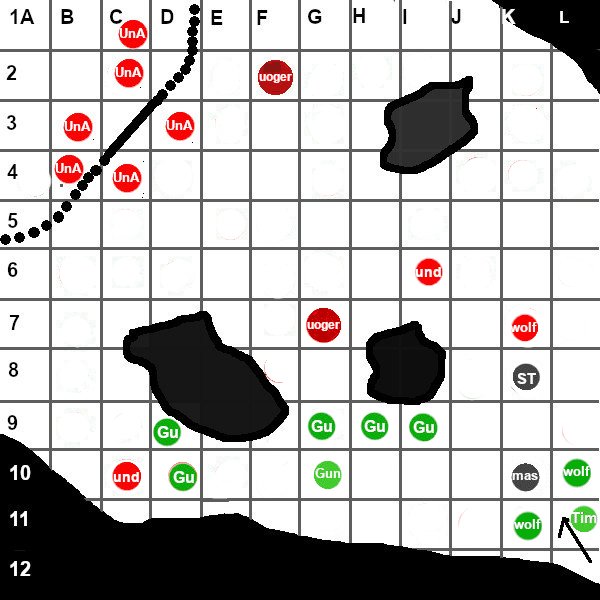
@stever82 i entering the map he ses the wondead oger on the flank and going at him his spike club Do short process of the oger on his last efford he killing and undead next to him. but he find himself in front of the wall the undead archery on top of the wall and next to is ready up to fire. one undead wolf is coming at him. the reinforcements is going to the front.
David has summond two new wolfs. they are moving up to attack. gunnar is trying to blind and oger in front of him. he finaly manage to do it. the guards is clareing up one of the flanks but the fire from the wall has started. one unlucky guard finding him self in line of fire he get killed. @stever82 gets hit many times times he is barley standing
"no snike attack you are all in combat"
you can move maps it take one action you will ending up in L12
●▬▬▬▬▬▬▬▬▬▬▬▬▬▬▬▬▬▬▬▬▬▬▬▬▬▬▬▬▬●
wood gate 50 of 50
Stone wall 100 of 100
●▬▬▬▬▬▬▬▬▬▬▬▬▬▬▬▬▬▬▬▬▬▬▬▬▬▬▬▬▬●
Potions take one turn to use you can give it to somebody else and your self but it you are unconscious somebody need to give you one of their oven:
health potion 4 hit points
armor potion 8 armor recovery
berserker potion 5 to hit one turn
greater healing potion 20 hit points and armor
rock potion boosting the armor by 30 two turns
Overview over all Colones and Quest Rules.
https://docs.google.com/spreadsheets/d/1yVIjhPnBVNHxymHEYQU-8-VolVaiTn8Us9iJWmcHaqU/edit?usp=sharing
●▬▬▬▬▬▬▬▬▬▬▬▬▬▬▬▬▬▬▬▬▬▬▬▬▬▬▬▬▬●
@stever82(boar fangs amulet)(bear cub)(moose sausage)(ale) 9
weponds(+6 iron spike club/gem 8 dam)(+4 cross bow 8 dam)
4 hit points (2 of 20 armor)(wounded)
Spells: Rage (increase hit chance by 5 and damage by 2. one action. damage the armor by 5
D20 touch en be put on your self or and ally)
potions 4 of 4:2 greather healing, 1 health potion, 1 berserk potion
Abilities (barbarian armor set): 4 actions per turn . +2 Charge attack range 5 squares)(Rage spell) +1 potions. (dam from the cub and sausage has been added to the weponds)
Player
●▬▬▬▬▬▬▬▬▬▬▬▬▬▬▬▬▬▬▬▬▬▬▬▬▬▬▬▬▬●
@mastergerund(Ring,ale,amulet) 9
weponds(+8 Scimitar (Rogue) 4 dam)(+4 bow 2 dam)
4 hit points (13 of 15 Rogue Armor set)(wounded)
potions 4 of 4: 1 health potion,1 rock potion. 2 greater healing potion
Abilities (Rogue armor set)+2 movement speed 1-4 on hide (+10 on hide) +1 potions)
Player
Timothy (ale,ring,amulet, ranger helmet) 7
weponds(+8 Hunter bow (Ranger) 4 dam)(+6 heavy spear (short range)(Ranger) 7 dam)
4 hit points (20 of 20 Armor)
potions 3 of 3: 1 health potion, 1 rock potion. 1 greater healing potion
Player 
●▬▬▬▬▬▬▬▬▬▬▬▬▬▬▬▬▬▬▬▬▬▬▬▬▬▬▬▬▬●
@enosh(ring.ale,ranger helmet) 8
weapons(+4 sword 2 dam)(+8 Hunter bow (Ranger) 4 dam)
4 hit points (20 of 20 armor)
potions 1 of 3: 1 Greater Healing potion
Player
●▬▬▬▬▬▬▬▬▬▬▬▬▬▬▬▬▬▬▬▬▬▬▬▬▬▬▬▬▬●
@Happyme(Ring,Eye of accuracy,ale,Moose sausage) 8
weapons (+7 bow 7 dam)(+5 iron sword 6 dam)
4 hit points (44 of 44 Armor)
potions 3 of 3: 3 Greater Healing potion
hit/damage added to the bow
Player
Diamond(amulet.bone amulet,ale,Moose sausage) 8
weapons(+6 Battle Axe 2-handed (ogre)(10 damage)
20 hit points (31 of 38 Armor)(wounded)
potions 3 of 33 Greater Healing potion
hit/damage added to the axe
Player
●▬▬▬▬▬▬▬▬▬▬▬▬▬▬▬▬▬▬▬▬▬▬▬▬▬▬▬▬▬●
@hhayweaver (bear amulet,ale.ranger helmet) 9
weapons(+8 Bow 4 Dam)(+5 heavy spear (short range)(Ranger) 7 dam)
4 hit points (17 of 17 Armor)
potions 3 of 3 1 Armor Potion,1 Health Potions,1 greater healing potion
hit added to the bow
Player
David (ale,ring,spell book) 8
weapons(+5 Cleric Staff 4 Dam)(+4 Bow 4 Dam)
4 hit points (25 of 25 armor) (heal self to full he/armor)
potions 3 of 3 2 Greater Health Potion, 1 Rock Potion.
Spells: heal (D6 armor and hp and armor, line of sight)
Touch heal (D20 armor and hp next to the target)
summon wolf (D20 summoning up to 3 wolfs to fight for you)
Player
●▬▬▬▬▬▬▬▬▬▬▬▬▬▬▬▬▬▬▬▬▬▬▬▬▬▬▬▬▬●
the outpost
soldiers (ale,ring,amulet) 9
weapons (+5 spear 5 dam)(improved iron shield)
4 hit points (24 of 24 armor)
soldiers (ale,ring,amulet) 9
weapons (+5 spear 5 dam)(improved iron shield)
4 hit points (17 of 24 armor)wounded
location: D9
soldiers (ale,ring,amulet) 9
weapons (+5 spear 5 dam)(improved iron shield)
4 hit points (20 of 24 armor)wounded
location: D10
Player
Gunnar (Ring of healing,Amulet,ale) 8
weapons (+7 master long sword 6 dam (Cleric)(Holy shield)
4 hit points (28 of 35 Cleric armor set)(wounded)
potions 8 of 8 4 Greater Health Potion, 2 berserker potion , 2 Rock potion
Spells: touch heal ,heal, blind,magic missile
ability +2 spells +1 hit +3 potions)
Player
●▬▬▬▬▬▬▬▬▬▬▬▬▬▬▬▬▬▬▬▬▬▬▬▬▬▬▬▬▬●
undead 5
weapons (+3 hands 2 dam)
4 hit points
-2 movement speed
Player
undead ogers (ring,amluet,ale) 9
weapons (+6 Battle Axe 2-handed 7 dam)
20 hit points (20 of 20 armor) (blinded) (he can move or attack last one turns)
location: F2 (Fortress map)
undead ogers (ring,amluet,ale) 9
weapons (+6 Battle Axe 2-handed 7 dam)
20 hit points (20 of 20 armor) (blinded) (he can move or attack last two turns)
location: G7 (Fortress map)
undead ogers (ring,amluet,ale) 9
weapons (+6 Battle Axe 2-handed 7 dam)
20 hit points (20 of 20 armor)
Player
undead archery (Ring,Eye of accuracy,ale) 8
weapons (+5 cross bow 6 Dam)
4 hit points 15 of 15 armor)
location :(fortress map)
Player 
undead wolf (+12 teeth 3 dam)
8 Hit points
(+2 movement and +2 charge range)
Player 

Timothy moves to H11 to get better visibility on his targets, and then shoots an arrow on the Ogre in G7 (15 to hit)
Edit: Two hits from Timothy, two hits from me, total of 16 damage to Ogre on G7. With the previous 6 from the wolves, its armor is shredded and we are drawing blood.
Shake shake shake, you roll the 20-sided die.
You rolled a 12.
Arrow sinks in for 4 damage and Timothy releases another arrow close after.
@rolld20
Meanwhile I move over to H10.
Shake shake shake, you roll the 20-sided die.
You rolled a 9.
Seeing Timothy's second arrow sink deep into the binded Ogre's armor, I charge the Ogre.
@rolld20
Shake shake shake, you roll the 20-sided die.
You rolled a 7.
As my scimitar connects with a satisfying swoosh I take another swing for my final action.
@rolld20
Shake shake shake, you roll the 20-sided die.
You rolled a 7.
Shake shake shake, you roll the 20-sided die.
You rolled a 1.
I see everyone move up the valley so I decide to move to the next map.
Action 1: Move to next map
Action 2: Shoot the enemy at C10 @rolld20
Shake shake shake, you roll the 20-sided die.
You rolled a 1.
My arrow finds its target and the enemy drops to the ground. I look around to find some cover behind one of the rocks but see that there is not much room left at the two closest boulders. I spot a good spot to the north.
Action 3: Move to cover at J3 and try to hide @rollthedice
Shake shake shake, you roll the 6-sided die.
You rolled a 1.
David sees Stever82 take several hits from the enemies, he may need help. His two wolves are ready to attack he can't keep them at bay.
David Action 1: Move up to next map.
Update: David heals Stever82 for 13 Hp and is hidden at J9. The two wolves do 6 damage to the Ogre at G7 and are currently next to David behind the rock.
David Action 2: Touch Heal Stever82 @rolld20
Shake shake shake, you roll the 20-sided die.
You rolled a 13.
Stever82's armor is mostly repaired and should be in good shape.
David Action 3: Hide behind the rock at J9 @rollthedice
Shake shake shake, you roll the 6-sided die.
You rolled a 4.
Through force of will David manages to regain some control over the wolves and commands them to fall back to cover behind the rocks. Both wolves reluctantly move back to a position next to their master out of site of the archers. David reaures them they will get their chance soon.
The two wolves can not contain themselves and attack the ogre at G7. They work together in unison tearing at the blind ogre unaware they are being targeted by the archers.
Wolves 1 &2 Action 1: Move to H10 and prepare to charge the ogre.
Wolf 1 Action 2: Charge attack the ogre @rolld20
Shake shake shake, you roll the 20-sided die.
You rolled a 12.
Wolf 2 Action 2: Charge attack the ogre @rolld20
Shake shake shake, you roll the 20-sided die.
You rolled a 1.
Pulling arrows from my armor I wonder If I made a mistake waiting in the open but then a wave flows over me and I feel the support of my teammates. They never let me down. I grip my weapon and charge attack the Orge at G7 @rolld20
Shake shake shake, you roll the 20-sided die.
You rolled a 13.
My club strikes him hard and I know I can finish him if I focus so I swing it again @rolld20
Posted using Partiko iOS
Shake shake shake, you roll the 20-sided die.
You rolled a 16.
I swing but he moves even hurt they can be fast so I swing again. @rolld20
Posted using Partiko iOS
Shake shake shake, you roll the 20-sided die.
You rolled a 20.
I am at a loss as I missed again he looks and me and I know I can’t fight him in the open so I move to j3 and try to hide @rollthedice
Posted using Partiko iOS
Shake shake shake, you roll the 6-sided die.
You rolled a 4.
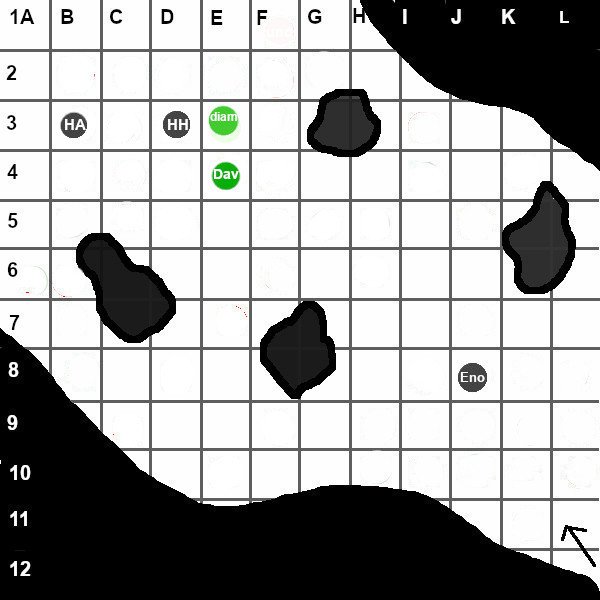
Happyme moves maps (action 1) and moves to hide behind the rock at F10 (action 2).
Last action (action 3) is to fire an arrow at the ogre at G7.
Summary: Both Happyme and Diamond move maps. Happyme shoots and misses the blinded ogre but Diamond works her magical battle skills, killing the wolf at K7. Both of us take cover behind the rock at F10.
@rolld20 for the attack.
Shake shake shake, you roll the 20-sided die.
You rolled a 19.
I was so excited that my arms were trembling... I missed my target. I need to calm myself down. I think I would feel safer with Diamond beside me. I wave for her to advance.
Diamond advances to the next map (action 1)
then charge-attacks the wolf at K7 (14+2 for charge=16 to hit, 10 damage)(action 2).
@rolld20 for the attack.
Shake shake shake, you roll the 20-sided die.
You rolled a 2.
The wolf is dead and Diamond moves (action 3) next to me at position F10, out of sight of the archers.
I see a fire ball come from over the valley wall and explode up by the fortress killing a large group of undead. now is the time to move up to the fortress and takeout this lich king.
Update: Killed the UND at I6 and am now hidden at E10
hhayweaver Action 1: Move to next map.
Action 2: Shoot UND at I6 @rolld20
Shake shake shake, you roll the 20-sided die.
You rolled a 6.
The UND is dead.
Action 3: Move to J8 and hide behind the rock @rollthedice
Shake shake shake, you roll the 6-sided die.
You rolled a 5.
We are making progress!
the oger is attacking the guard next to him @rolld20
Shake shake shake, you roll the 20-sided die.
You rolled a 3.
@rolld20
Shake shake shake, you roll the 20-sided die.
You rolled a 10.
@rolld20
Shake shake shake, you roll the 20-sided die.
You rolled a 14.
OOC: Just to be sure... when we shoot at the archers behind the wall, we need to take 2 off our chance to hit due to the protection of the wall, and melee weapons cannot attack beyond the wall at all (the archers inside the wall are safe from Diamond)?
yes -2 and no melee correct
A messenger has been dispatched to the trebuchet crew to fire another round, but this time targeting the gate of the fortress (C3 of our map, F12 of their map).
Wrong comment.
Summary: Both Happyme and Diamond move maps. Happyme shoots and misses the blinded ogre but Diamond works her magical battle skills, killing the wolf at K7. Both of us take cover behind the rock at F10.