TUTORIAL ON HOW TO INVEST USING MYBIT GO
WHAT IS MYBIT GO?
MyBit Go is an investment platform that offers users the ability to invest in Internet of Things (IoT) devices from anywhere in the world without the need for a middleman or broker.
IoT devices are machine assets, such as Bitcoin ATMs, 3d Printers, Smart Lock enabled devices and real estate, etc., that connect to the internet and generate revenue by providing a good or service. IOT devices are quickly overtaking many functions of the human labour market, creating the necessity for MyBit GO to create access to investment in machine assets.
MyBit GO doesn’t use brokers which means that:
- Anyone is eligible to invest in his/her asset of choice without having to fulfil accredited investor requirements as seen in traditional funds.
- There will be much lower fees incurred when attempting to make an investment.
- There will be no single counterparty risk as all investment will be handled through a smart contract.
- The investors will be able to get real-time revenue distributions paid from anywhere to anywhere in the world.
GETTING STARTED.
Before using the MyBit Go platform to invest, there are a couple of things you need to set up.
- MetaMask Wallet.
MetaMask is a lite Ethereum based wallet which acts as a bridge allowing a user to run Ethereum based decentralised apps (like MyBit Go platform) right in one’s browser without running a full Ethereum node.
This is the most important requirement because it acts as your wallet for keeping the funds that you will use to buy assets as well as hold ownership of the asset and its distributed revenue.
You will never have to fill in your personal information when signing up for the platform or enter payment information when attempting to make a purchase. Everything will be linked to your MetaMask account.
MetaMask is also a very secure wallet as it will keep your private keys safe from phishing attacks by hackers.
In order to download the extension into your browser, visit https://metamask.io on your browser and click on the download button specifically for your browser.
After downloading the wallet, set it either by importing your ether address or by creating a new ether address. You will use this address to deposit ether and also receive revenue.
- Ether.
Before investing, you need to have the ETH you wish to invest in your MetaMask wallet.
INVESTING
A. Visit https://app.mybit.io, you will be directed to the onboarding page where you will be prompted to ‘Connect your MetaMask account to get started’. Below the prompt message, you will find cards containing a welcoming message and summarised information about the MyBit Go platform and how it operates.
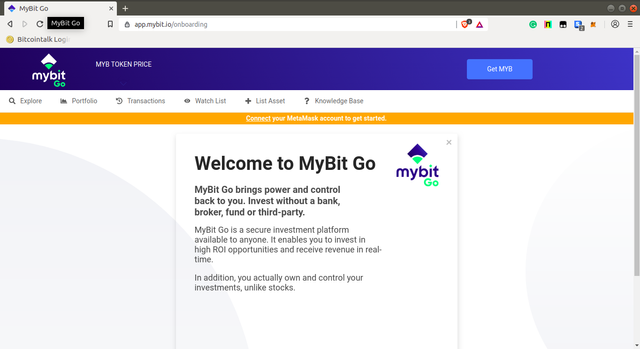
You can read the information on each card by pressing the next button below each card or if you are an experienced user, you can simply click the close button at the top of the information card which will redirect you to the explore page.
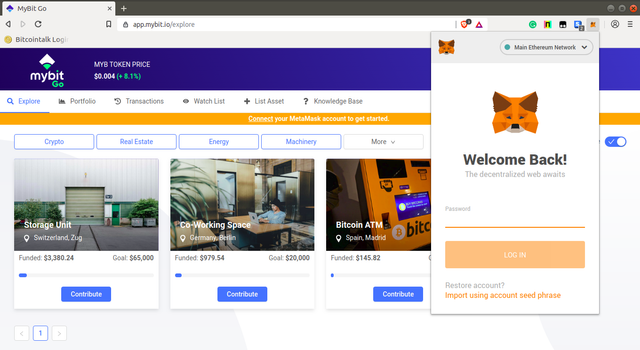
B. Connect your MetaMask account by clicking on the MetaMask extension button on the extension bar. A MetaMask window will open prompting you to enter your password or restore your account using a seed phrase.
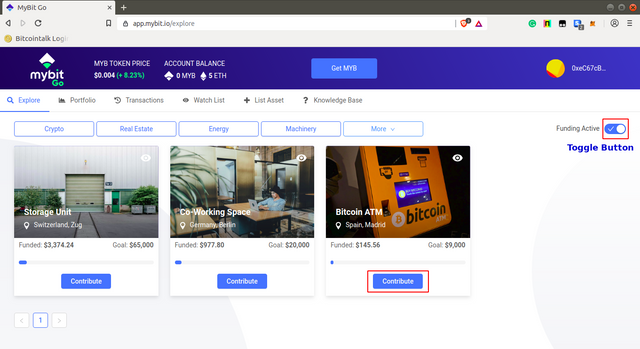
C. Once you have logged into your MetaMask account, the explore page will automatically reload showing your account balance in Ether and MyBit tokens.
To toggle between investments of which the funding process has ended and those which are still active, click on the toggle button marked in a red rectangle on the screenshot below. Otherwise, investments still actively being funded will show up by default on the explore page.
You will also see a Watchlist. This section is where you add assets that you want to keep a close eye on before investing in them.
The Transactions section shows all your transaction history including your ether contributions towards the asset and your revenue transactions.
In the explore page, look through the asset you would like to invest in and then click on Contribute button below your asset of interest.
D. This will provide a detailed description of the asset and other details relating to its management. Carefully read through the details to be sure of what you are about to invest in.
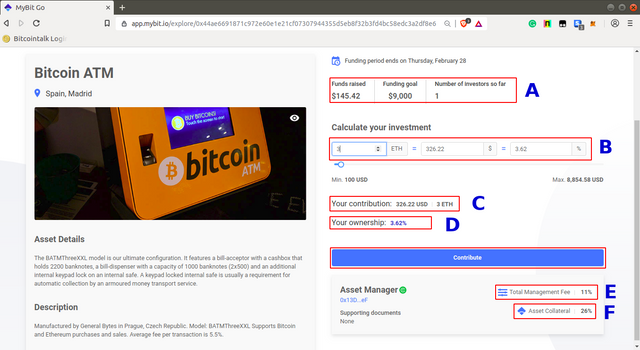
- Area A represents the progress in terms of funds that have been raised so far, the funding goal of the asset, and the number of people who have invested in the asset so far.
- Area B is the where you can enter the amount of Ether you would like to invest into the asset and also be able to view the percentage of the asset you will be able to own if you invested a given amount.
- Area C will show the amount of your contribution both in US Dollars and Ether.
- Area D will show your percentage ownership of the asset according to the amount you have invested in it.
- Area E will show the total management fee in percentage; This is a fee that is charged by the asset manager for looking after investors’ and organizations’ assets and trying to obtain the best possible return or profit for them.
- Area F will show the asset collateral in percentage; This is an insurance that the Asset Manager must stake (in MYB) when setting the percentage of the asset’s revenue they will receive when listing an asset on the platform. This collateral limits risk for investors because if the Asset Manager does not fulfil his duties, their collateral will be burnt.
After looking at the details and entering the desired amount you are going to spend on the asset, Click on the Contribute button.
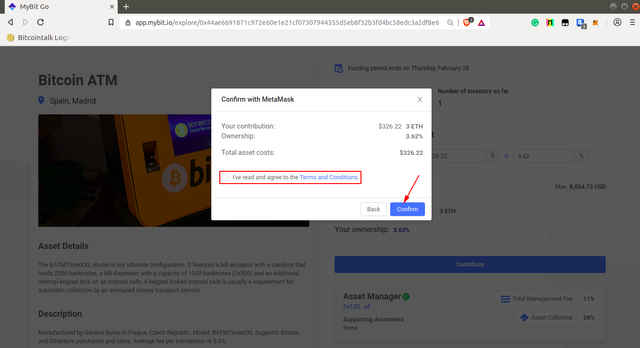
E. A dialogue box titled “Confirm with MetaMask” will pop up. Mark the checkbox confirming that you have read and agreed with the terms and conditions then click Confirm.
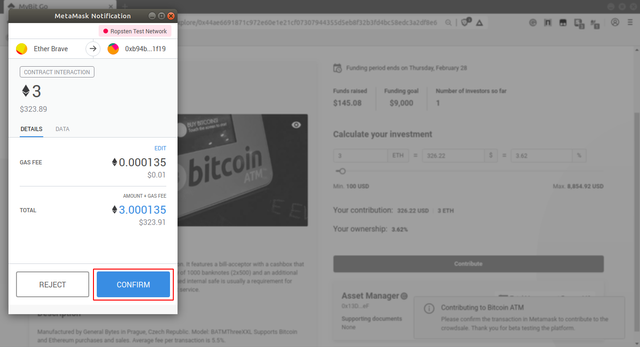
F. A MetaMask confirmation window containing transaction details and gas fee will then pop up. Click Confirm.
G. After the previous step, wait for the transaction to be confirmed on the Ethereum network. It usually takes about a minute and on rare instances, it can take hours depending on the network congestion and the gas fee you used for the transaction.
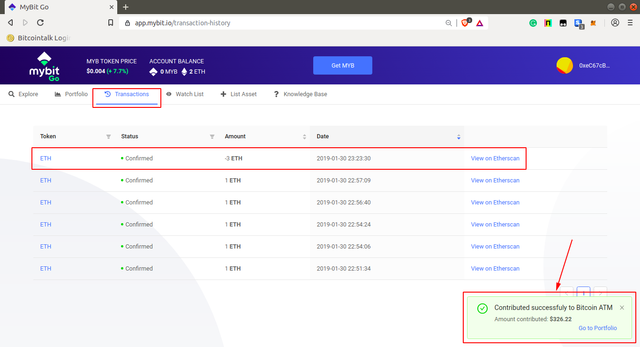
Meanwhile, you can click on the transactions tab to see your transaction history and also find out if your transaction has been confirmed.
Once your transaction has been confirmed, a text box will appear at the bottom right of the page informing you that your contribution has been successful.
H. After this, head over to your Portfolio page.
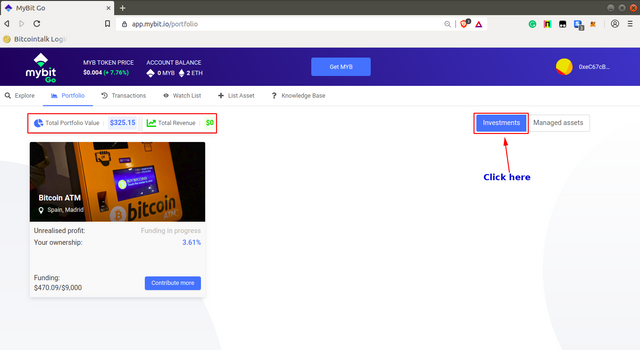
You will be able to see the asset you have just contributed to clicking on the Investments button as indicated in the next screenshot.
It’s important to note that the funding period for each asset is limited to a thirty day period. This means that if the investment target is not reached by that time, funds are automatically returned to investors via the Ethereum smart contract which governs the process.
If the investment goal is reached before the funding period ends, the asset is closed off from additional investors and the funds are automatically transferred to the asset partner (in this scenario, an IoT asset manufacturer). They work with the Asset Manager to deliver, install and otherwise make the asset fully functional in a defined location. After this is complete, the asset will go online and revenue will begin to be distributed to investors as it is generated.
At this point, your total portfolio value and total revenue generated will be shown in the area marked by a red rectangle. You will use this area to keep track of revenue generated by your assets over a given period.
That concludes an overall summary of how to get started using MyBit GO. For more information or if you have any further questions, join our Telegram and check out our website.
Congratulations @jerometash! You received a personal award!
Click here to view your Board
Hello @jerometash! This is a friendly reminder that you have 3000 Partiko Points unclaimed in your Partiko account!
Partiko is a fast and beautiful mobile app for Steem, and it’s the most popular Steem mobile app out there! Download Partiko using the link below and login using SteemConnect to claim your 3000 Partiko points! You can easily convert them into Steem token!
https://partiko.app/referral/partiko