Why change your ISP's default DNS and how to do it! [Complete guide]
To know how to change the DNS that is given to you to access the Internet from your Internet Service Provider and why you want to change it, you first need to know what the DNS thing is, its work and why it is necessary. If you do not know what the DNS is, then stop here. First, let's read the following article.
What is the DNS and why? What is the importance of the I#nternet?
If you read the above article, then you know exactly what the DNS and how it works. But there is no writing about it, why would you want to use another DNS by changing the default DNS from your ISP. There is no mention of the convenience and disadvantages of using any other DNS. Here's what we're saying here.
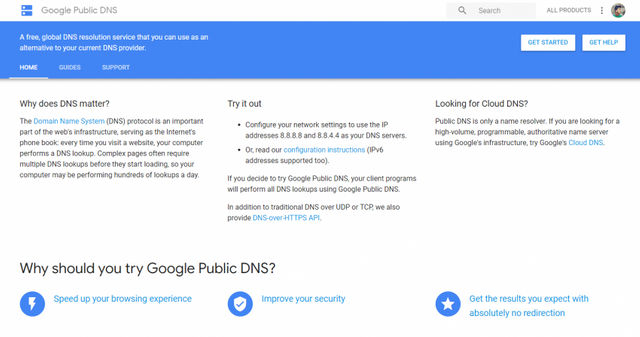
In the previous article, I told you that the DNS helps you find the IP address of the website you are trying to access. Because if you do not get IP address you can not access that site. I also said that there are some public DNS besides your ISP's DNS server. For example, Google Public DNS, CloudFlare DNS
Now, this Google's DNS server or CloudFlower's DNS server is updated faster than your ISP's default DNS server, and database of these third-party DNS servers is much larger than your ISP's DNS. So if you use these DNS, you can get the IP address of the website more quickly while visiting a website.
As a result, you can access the website faster for a reason. This does not mean that your internet speed will increase a lot. However, when you go to access a website's address and access it, the website can load faster (since it takes less time to find an IP). For example - you may have already heard that CloudFlare's new 1.1.1.1 DNS server is the fastest DNS server.
Not only that, if you do not use a reinstalled ISP connection or use a local ISP connection, then it may be relatively easy for DNS swfing or DNS hackers on their DNS servers compared to Google's DNS or cloudfire DNS. So if you use third party DNS, even if your ISP's DNS server is also a victim of spoofing, then you will still be safe. Since you are not using their default DNS
It is certain that you should use Google or CloudFlare third party DNS instead of the default DNS for your ISP. Let's know how to use custom DNS instead of default DNS on your devices or how to change DNS settings -
Windows PC / Laptop
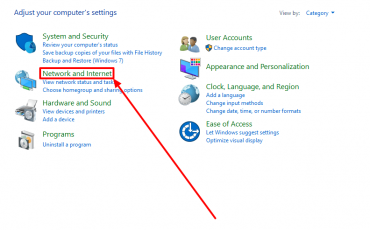
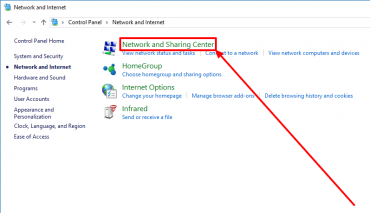
- To change DNS settings on Windows 10 PC, when you are connected to the Internet, from your Windows Control Panel, go to Network and Internet Options -
- Then click on the Network and Sharing Center options at the top of the screen-
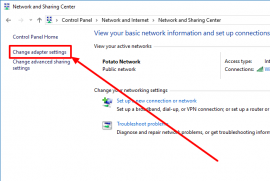
- On the left side of the screen, you will see another option called Change Adapter Settings. Click this option-
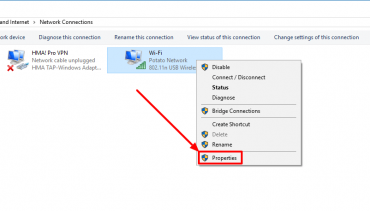
- Here you will see all the networks connected to your PC. Right click on your WiFi network from here and click on Propeties option-
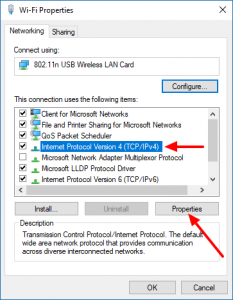
- Now after opening a small window, locate the Internet Protocol Version 4 (TCP / IPv4) option and select it with the mouse cursor and click on the Properties option below-
[source](
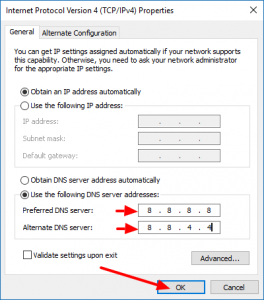
After clicking Properties, another small window will be seen open. Below there are two options available. From there, select the Use the following DNS server addresses option. Next, find two text boxes below. Here we will basically set up our custom DNS. In the first box here we will have to put Primary DNS and Alternate DNS to be installed in the second box. If you want to use Google's DNS, then put it in the Primary DNS box 8.8.8.8 and put it in the Alternate DNS box 8.8.4.4.
And if you want to use CloudFlare's DNS, Primary DNS will be 1.1.1.1 and Alternate DNS 1.0.0.1. After installing Dns, just press OK from the bottom and close all windows. I have used Google's DNS here, but I personally would like to use CloudFlare #DNS. Because, as far as I know, CloudFlare's DNS is the fastest one.
Notice the chart below:

After changing DNS, open your PC command prompt in admin mode and clear your DNS cache with# ipconfig / #flushdns command.
And yes, if there is any #problem after changing the DNS, then again go back to that previous place and remove the check mark from the Use the following DNS option, ie, by disabling it, the above option means 'Obtain DNS server address automatically automatic' option. Then it will be okay.
Android
To change DNS on Android, just go to your WiFi settings and press Long on your connected WiFi network (if you're a stock Android user). Then click Modify Network to expand Advanced Setting options. After selecting the Static IP from the IP Settings, you will also get the option of setting DNS down below the custom IP address placement option. There, in the text field of DNS1, set Alternate DNS to Primary DNS and DNS2's text field and applying settings. Then, after the WiFi Reconnect, your DNS settings will be changed.
However, all the settings on Android are not the same. For example, if you use Samsung's UI, it will be the same if you use the MIUI, and if using the EMUI it will be the same. But in all cases, you will get the option of setting this custom DNS just after entering the advanced settings of your WiFi settings. You will get these options if you take a few hours with your phone's WiFi settings.
Router
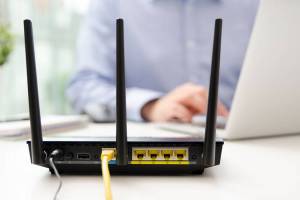
The most reliable solution to change DNS is to change the default DNS from your WiFi router. As a result, all the devices connected to your router are connected, the DNS will all be changed. You do not need to change each device individually. That means, changing the router, you do not have to follow any step above. So I would suggest that DNS change from your router.
To change the DNS of the router, you must enter the router's control panel. Most #routers' control panel addresses are usually addressed in 192.168.0.1 or 192.168.1.1 addresses. If your router is of TP Link, then you will get 192.168.0.1 in this IP while you are connected to the router. If you can not access it, then by entering your router's name and IP beside it you will be able to get your router's control panel IP. For example - Netis Router IP You will also be able to login to the control panel and get the username and password.
Log in to the control panel with them (if you have not changed the username and password). If you go to the router's control panel, you will get the option of setting DNS settings somewhere. Do not change anything, and do not change anything else. After finding the option to set up DNS, enter it in the Primary DNS and DNS2's room at DNS1's room and apply alternate DNS settings. Then just reboot your router. And yes, before doing all this, it's a good idea to keep a backup of your default settings in the router.
And yes, if you do not have good ideas about router settings, then there is no need to enter the router's control panel. If you do not have a good idea, then if you make a mistake, you can not fix it easily. So if you do not have good knowledge about router settings, then change your DNS manually on Windows PC and Android device as shown above.
Thanks for the instructions!
Not only is Cloudflare's the fastest, but we don't gather and sell your data like other companies out there.