An Amateur's Perspective on Comic Making, Part Two
Welcome back to my little comic-making informative!
Today we will discuss comic paper and coloring tools.
All links provided go to YouTube, Steemit, Amazon, Google Docs and JetPens.
Unfortunately, JetPens is American owned, so the prices will be 1) in USD and 2) more expensive for those outside of the US (due to shipping costs). Moreover, their items have already been imported from Japan and Europe.
If you know of an online store in Europe that carries the items mentioned,
please, feel free to leave a comment with a link below!
Click here for Part One of this informative, where I talk about beginner's drawing tools for comic-making.
By comic paper I mean the type you draw on and get scanned later,
not what the finished comic book will be made of.
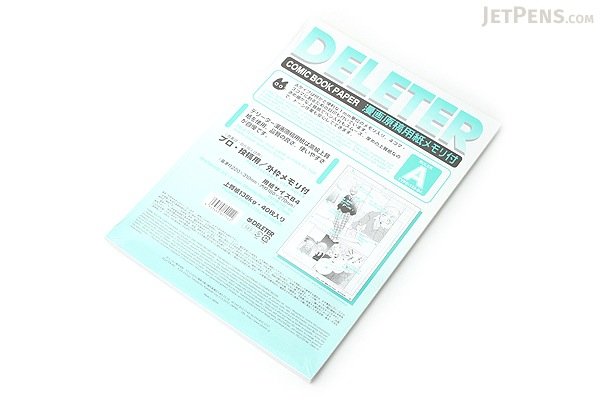
There is a vast selection of comic papers, but here I will talk about a specific type,
Deleter B4 Type (A) paper, 135 kg. In the link I've shared, it sells by 40 sheets.
Deleter is a major manufacturer of comic supplies in Japan and thus has a good reputation.
You will notice that the paper is "135 kg". 135 kilograms is 297.624 pounds, but this does not mean that you are buying 297.624 pounds of paper.
Paper weight is measured in reams; for American writing paper, it is standard to measure per 500 sheets. The most common printer paper weighs 20 pounds, which means each sheet of printer paper is 0.04 pounds (20 lbs/500 sheets).
Unfortunately, when I emailed a company (JetPens) that sells Deleter products, they did not know how many sheets Deleter puts into its reams of paper, nor the dimensions of the paper they used. Because of this, I do not know how much heavier this comic paper is than a sheet of printer paper.
Click here if you want to look at the original email.
"B4" refers to the paper size. B4 measures 8.27 x 11.69 inches. It is commonly used amongst manga professionals and is required by professional publishers. It is desired for its larger size, which allows for more detailed artwork.
Do not be alarmed by the sizes, which are way too big for a comic book; the pages are shrunk upon printing.

"A4" is slightly smaller, measuring 9.8 x 13.9 inches. Due to the size difference, it is about three dollars cheaper. If you want to get your hands on A4 paper instead, you can get it here. A4 is more commonly used for “Doujinshi”/self-publishing.
Type (A) paper has light blue guidelines (below). The lines consist of boxes that will dictate where it is okay to put important details (like words) and four scales along the edges (basically, rulers printed out in centimeters). Guidelines are very important if you are planning to publish in the future.
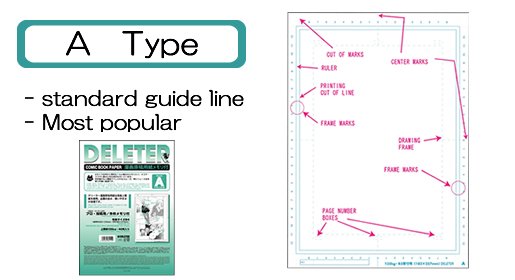
After the paper is scanned, the lines are easily removable (and sometimes don't show up at all), as discussed later.
Type (B) has no guidelines. Drawing your own guidelines can be a hassle, so the use of Type (B) paper is not recommended. Avoid Type (B) paper at all costs if you do not know how to measure out guidelines.
*Do not confuse the letters in Type (A) and Type (B) with the letters in A4 and B4. They do not have any connection to each other. One strictly relates to guidelines and the other only to dimensions.
Note: Sometimes, Type (A) is called “with scale”, “with [guide]lines”, or "A Type".
By the same token, Type (B) can be called “without scale”, “without [guide]lines”, "B Type", and at times “plain”.
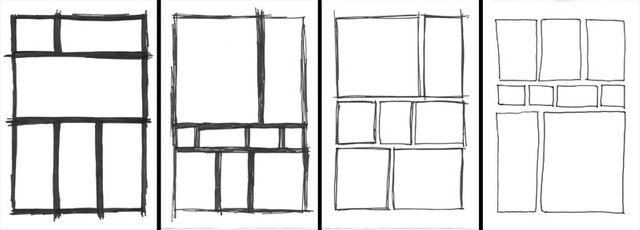
Type (A) paper makes the creation of borders/frames/panels (below) a lot easier.
Once you have your paper, you will need to know how to use it. Whether you have Type (A) or (B) paper, you will need to use its guidelines properly; or at least format it correctly.
For example, writing words in the very corner of a comic page is risky, since those words can potentially get cut off in the printing process.
You will want to learn more about guidelines using
this video by the YouTuber My Mangaka Life.
It is easier to learn from Lizbeth (the Youtuber) than from my own explanations because the video has visual aids that will help guide you. If you don't want to listen to the segment that explains paper sizes and why we use guidelines, you can skip ahead to 3:08, or click here.
Lizbeth is super helpful and has published her own manga, so she has many other videos regarding the topic. There is a wealth of knowledge on her channel at My Mangaka Life.

*For the curious: “Mangaka” is the Japanese word for “manga artist”.
After drawing your pages, you'll want to color them. You can do this digitally or traditionally.
If you want to go digital, you will scan the pages after inking. I have mentioned blue mechanical pencils and blue guidelines. Both are easily removable in Photoshop. Here is a tutorial by the DeviantArt user oomizuao. Be sure to click the dark blue image to zoom in; otherwise you won't be able to read it.
Once you have finished removing the blue lines, you can color in your inked pages! Since I specialize in traditional methods of art only, I can’t help you out with that. But I am sure there are many other sources out there that can aid you in the process.
If you want to go traditional, you will scan them (if at all) after coloring. The light blue lines from Type (A) paper and possible mechanical pencil marks will probably get covered up in the process of coloring. To be safe, though, if you used a blue mechanical pencil I’d erase those marks anyways.
For coloring comics, markers are the way to go. I have two recommendations; two brands that are already very well-known:
Copics. These are pricey. They are double-ended, come in 358 colors and are refillable. Because they are so expensive, it is safer for beginners to buy Copic Ciaos (one of the four product lines) since they are smaller. Also, their nibs are replaceable, and their ink does not smear.
Copic Ciaos have a chisel tip and a brush tip, as shown below. Note that Ciaos do not come in all 358 colors; if you want a marker that needs less refills and all the color options, buy Copic Sketch markers (which are more expensive).

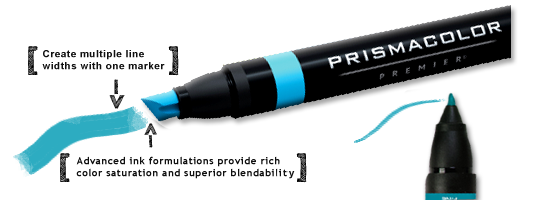
Prismacolors. These are also expensive, and are non-refillable, but are generally easier to find than Copics. These are also double ended; however, you have a choice. Each marker has a fine nib on one end, but you get to choose a brush or chisel tip for the other end. However, unlike Copics, the nibs are not replaceable.
There are around 156 Prismacolor markers; less than half the selection of Copics. Note that people tend to gravitate towards Copics for better skin tones. Also, Prismacolors have an odor that is more noticeable (than Copics), and their ink dries at a slower rate.
In America, your average Prismacolors are as expensive as Copic Ciaos. However, Prismacolors are regarded to be cheaper than Copics in general. Here, up against Ciaos, I believe that it is their difference in size/liquid capacity that demonstrates this.
In any event, try to buy markers in bulk or in sets. You can get better deals this way on sites/at places like Amazon, Jerry’s Artarama, Michael’s, Hobby Lobby and Dick Blick.
As a general rule with chain stores, I usually wait for coupons before buying. So hold out for a few days to snag that 40% off coupon at Michael’s, or wait for the next Jerry’s Artarama catalog to make sure you’re not getting ripped off.
Amazon's marker sets are usually cheaper. Why? I have no idea. To avoid getting fake products I would advise you to buy items that are “Fulfilled by Amazon”. This means that Amazon is responsible for the shipped item. That way, customer service will be more reachable if you notice that something is wrong.

For example, take this Basic 12-Color Set. It’s a set of Sketch markers (not the Ciao line), but it gets the message across, since the list price is $95.88, but it sells for $62.00. Jerry’s Artarama has a similar, maybe lower price for such a set, but if you have Amazon Prime then you should take advantage of the free, two-day shipping.
Both are alcohol-based and thus can be blended with each other, so it’s not as if you should only stick with one brand. Since there are many more brands besides Copic and Prismacolor, you should explore other markers too. Remember, these are only recommendations!
For more information of comic-making, follow this account for future posts just like this.
If you haven't already, click here for Part One, where I introduce various tools to draw comics, or follow me for more parts of this series.
Thanks for sharing. Copic markers with the brush-like tip are quite nice. I wish they were not so expensive though. I have used them to color my comics over the years too.
I just realized that I should be providing links to the images I used. Since it is too late to edit the post I will list them here:
(remove any spaces you see; they are there so that the actual link and not the image will show up)
Image 1: Obviously jetpens.com, probably on the product page (link in article)
Image 2: https: //img-proxy.blog-video.jp/images?url=http%3A%2F%2Flivedoor.blogimg.jp%2Fokuman103%2Fimgs%2Fc%2Ff%2Fcfbd81ef.gif
3: http: //deleter-mangashop.com/ori/30033/goods_img/goods_270_1.jpg
4: http: //www.getsivizion.com/images/posts/abcolab/abcolab_02.jpg
5: http: //www.sacredthemanga.com/YOUTUBE%20BANNER.jpg
6: http: //www.parkablogs.com/sites/default/files/copic-ciao.jpg
7: http: //www.prismacolor.com/Style%20Library/PrismaColor/media/img/products/markers/about/about-new-premier-double-ended-art-markers-0.png
8: http: //cdn.blog.cpcstrategy.com/wp-content/uploads/2014/07/FBA.jpg
I'll try to keep this from happening again, whoops!