EOS Through (Google Chrome + MetaMask)

Good day! As many already know (and if someone else does not know, he will certainly find out soon =) - June 26, 2017 started the distribution of EOS tokens - the most anticipated project of this year according to Onotole-)
EOS is the "operating system" of a consensus on the block, providing databases, account permissions, planning, authentication and communication for Internet applications, in order to significantly improve the efficiency of the intellectual business, using parallelism that provides scalability to millions of users and millions of transactions per second
EOS with the Official web interface "EOS Token Distribution" with support for the MetaMask extension in Google Chrome ( the officially recommended EOS team to participate in the distribution of tokens).

I recommend that everyone use the official EOS token distribution web interface, because It especially simplifies the interaction with the smart contract Ethereum through an intuitive interface, facilitates the whole process and allows you to participate in the distribution with a minimum probability of errors (especially important for beginners)
How to participate in the distribution of EOS tokens via the web interface?
So, let's start, because we will use the plug-in for the Google Chrome browser, it's obviously worth starting with the launch of the browser (either downloading it and installing it if it was missing from you).
We need to install an extension for Google Chrome - MetaMask, which is the purse of Ethereum.
Links to Google Chrome and MetaMask. You will find in the section of the site https://eos.io/instructions, devoted to the distribution and instructions for the purchase of tokens.
.png)
Install the MetaMask extension
We agree to the terms of use, set the password to lock the purse and securely store the generated code phrase. Copy the address and transfer the desired amount to ETH in the wallet to MetaMask.
.png)
Go to https://eos.io click GET EOS
.png)
Next we celebrate and continue to insist.
.png)
Lower below, and in the section How to participate click on the button
EOS TOKEN DISTRIBUTION APP
.png)
We are waiting for the interface to load, if the interface does not load - see If you unlocked MetaMask and / or reloaded the page
.png)
If MetaMask is not installed, or not enabled / disabled, you can see the following error:
.png)
IMPORTANT: Interaction with increased load on the web interface EOS recommends using a special EOS RPC server.
Let us dwell in more detail on setting up the recommended RPC.
Open MetaMask, click on the network selection, click on the Custom RPC, add the address https://rpc.eos.io and click Save
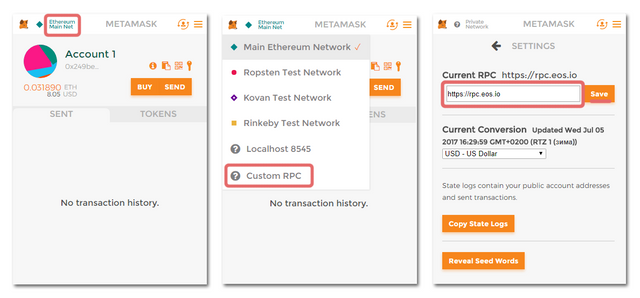
Bingo! Reboot the interface, now wow all works =)
After downloading, we will see the web interface for acquiring tokens eos.io/distribution/
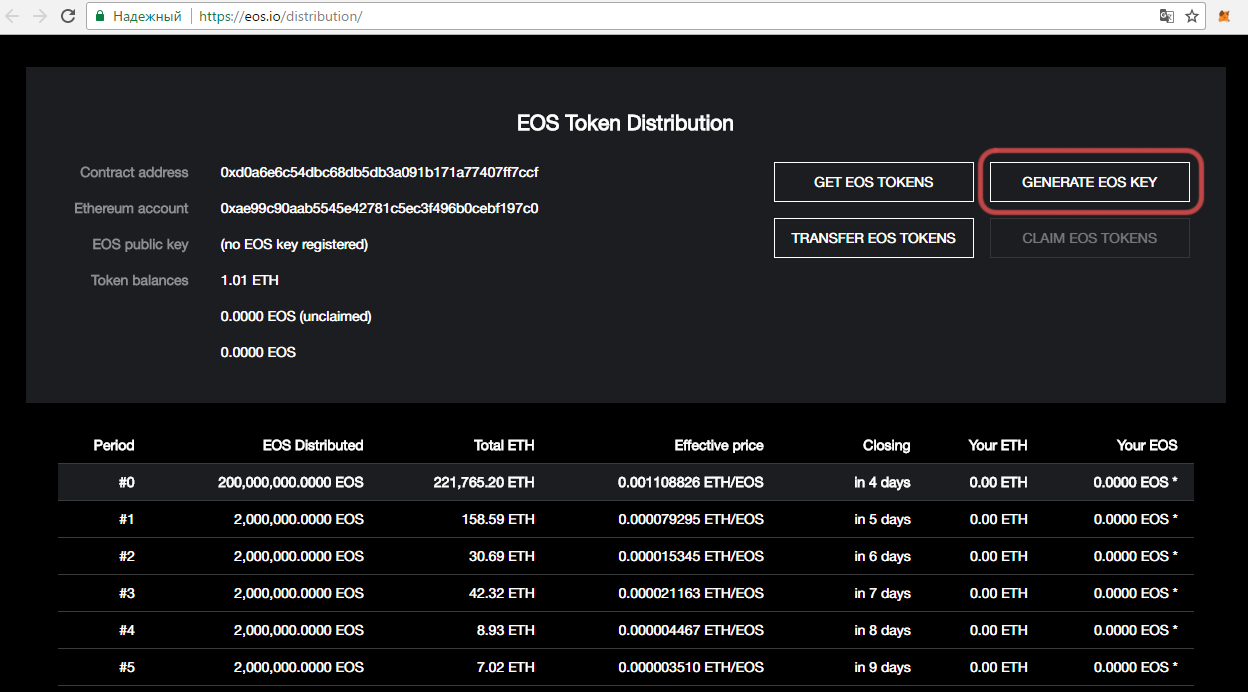.png)
Your Ethereum address from MetaMask will automatically bind to the interface, the room, which it displays the available balance in ETH.
In principle, you can already proceed directly to the acquisition of tokens, but I recommend starting with one important step - generating a pair of EOS keys and binding the public key to your Ethereum address.
- The binding of the public key to the Ethereum address can be made any time before July 1, 2018, when the ERC20 tokens become non-relocatable for snapshot and transfer of balances to the EOS network. If you do not bind the key to this point, your tokens will not be transferred to EOS blocking system and will be permanently lost.
Press the GENERATE EOS KEY button
.png)
The system will generate a key pair for you
Public key (Public key)
Private key (Private key)
Next, you need to securely save a pair of keys (special attention should be paid to backup a private key) and duplicate it (private key) on the confirmation line
- IMPORTANT: If you lose your Private Key, you will NOT gain access to your EOS tokens after you have transferred the balances to the main network!
After you securely saved the keys, you can confirm this by clicking on the button
I safely maintained my personal key
In the near future, a pop-up window will prompt you to confirm the transaction for key registration. In theory, the limit and the price of the gas should be automatic, but if the purse suddenly displayed an overvalued value, as in the screenshot, you can reduce it manually, for example by 100,000, after which you should click on the confirmation - ACCEPT
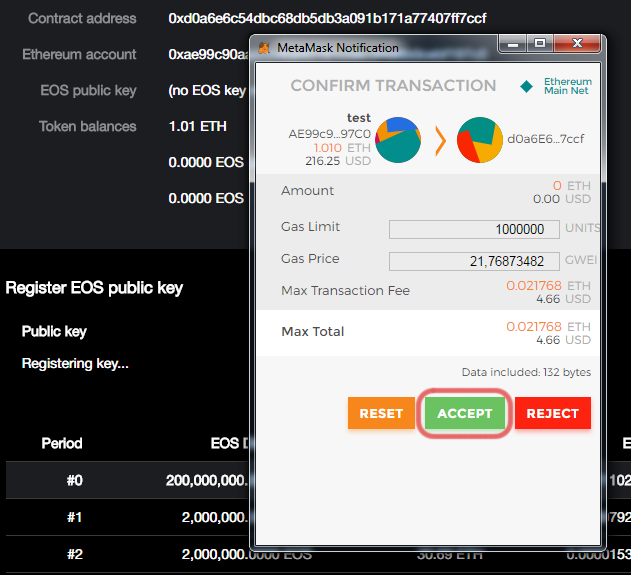.png)
After a short time, you will see that your public key is now linked to your Ethereum address.
.png)
Now you can press GET EOS TOKEN and proceed to procedure for purchasing tokens.
The procedure itself is extremely simple - you will be offered to choose a window (period) for investing - do not be surprised, this interface will really allow you to invest in any of the available windows for investment. It will also be necessary to enter (in ETH) at the output, buy tokens and click
Send ETH
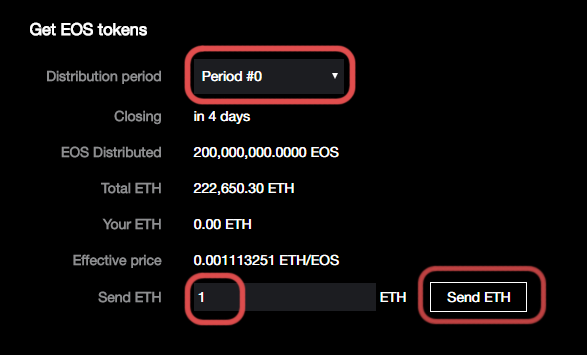.png)
After that, you can play with the gas in the pop-up window and confirm the transaction
ACCEPT
.png)
A little waiting and ... you almost became a lucky owner even if ERC20 but still tokens EOS.
After a while you will see your investment in ETH and the current value of EOS in the list (I remind you that the price of tokens is not fixed, and your value will change, and if to be precise decrease until the closing of the window with each new investment). You can request your tokens at the end of the current window.
.png)
EOS - positive balance in the EOS line (unclaimed)
.png)
To receive them on your balance, they must be requested by clicking the CLAIM EOS TOKENS button
After that, confirming the transaction in the pop-up window

We will see that the process of obtaining tokens is in progress
.png)
We will see that the process of obtaining tokens is in progress
.png)
By the way, that you did everything right, and tokens really came to your address right in MetaMask.
To do this, go to the TOKENS tab, click on the "┿" sign from the bottom, enter the following token data and click Add
Token Adress 0x86fa049857e0209aa7d9e616f7eb3b3b78ecfdb0
Token Symbol EOS
Decimals of Precision 18
.png)
Now we see the balance of EOS, unfortunately, at the moment the functionality of MetaMask can not directly translate the ERC20 tokens, but in the next post we'll look at how to get around this.
You can do everything with tokens, for example, transfer them to 3 people or send them to the exchange; In the next post we will consider in more detail the process of their transfer.
I want to note a number of advantages that you can use this web interface in comparison with MyEtherWallet:
- Official approval from the EOS team
- Easy to set up and use
- Intuitive interface
- Easy to add / change keys
- Convenient monitoring of the status of your accounts
- Ability to invest in any payment window in advance
- Convenience of working with tokens (claying, translation)
Service for monitoring the current price of the token, the amount collected, the remaining time - I recommend for decision-making http://eosscan.io
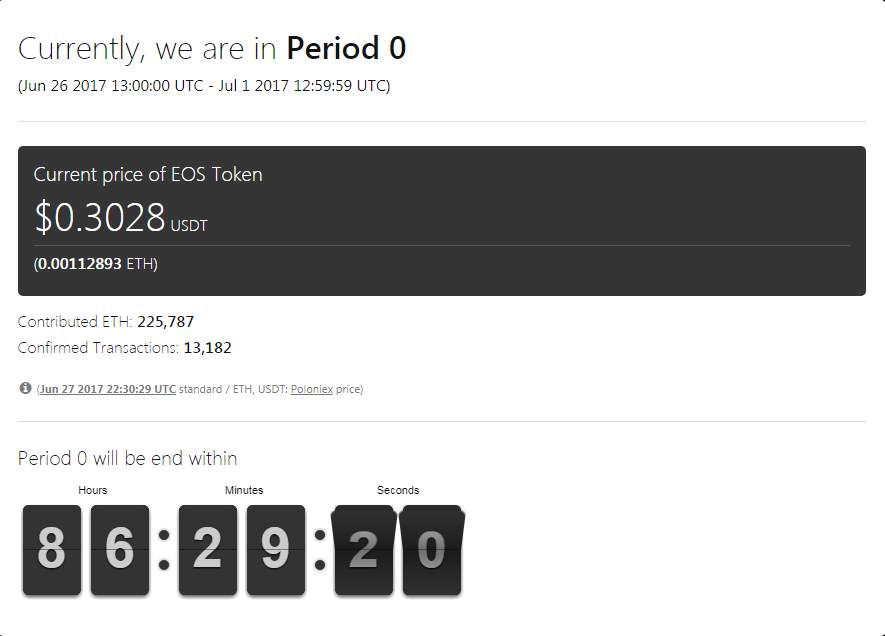.png)
Also, I would like to remind you that you should not rush to buy EOS tokens, you need to think and calculate everything competently.
!!! This post is written on the basis of information EOS.io, to familiarize all participants of this project. Responsibility for any personal decisions that you will come to receive data, you personally carry. If you are not sure of anything, it is better to refrain from those steps that can lead to a negative result. !!!
THANK YOU FOR ATTENTION !
Metamask has proven to work really well for me so far. Thanks for this.
How that is what I call a comprehensive post. Upvoted.
Yep, this is a serious effort post with a lot of detail. Nice work!