How to Grow Cannabis Indoors: The Beginner’s Guide
So you’re interested in cultivating your own cannabis plants indoors for the first time and wondering how to go about it? Well, the bad news is that it can be quite a challenging process for newbies, and the extensive volume of information that is available on the subject can be rather overwhelming. So what’s the good news? It could just be one of the most rewarding things that you will ever do!
For just about any newbie, the hardest part is actually getting started. You need to think about finding a quality place to cultivate, obtaining the correct growing equipment, which includes the actual cannabis plants or seeds themselves, and be in a position to set aside the finances and time to maintain the plants to ensure that they stay healthy and strong during the flowering process.
Also, keep in mind that growing pot is still illegal in many states in the U.S, which means that you will need to be sure that you are operating within the law. It’s important to make sure that home cultivation is allowed in your area before you set up any kind of operation.

Step 1: Choose the ideal cannabis grow room
First off, the most important step when in the process of setting up an indoor cannabis grow room is actually to find a room to grow it in. Now, this room or space doesn’t need to be your typical full-size room. Believe it or not, your average cannabis DIYer will use something like a small tent, a designated space in a spare room, a cabinet, or maybe even a corner in an unused section of the house.
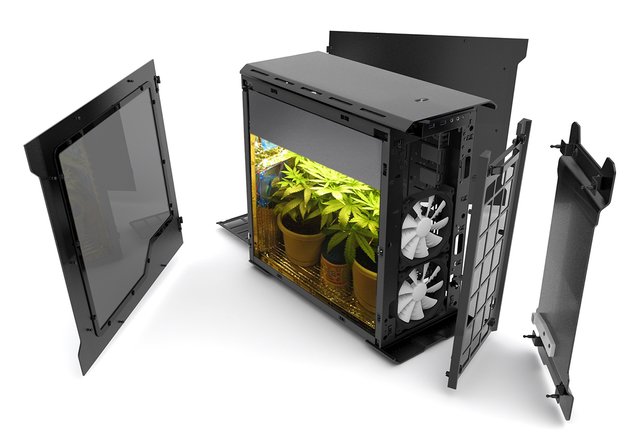
![[Photo Source]](https://sensiseeds.com/blog/wp-content/uploads/2016/07/microgrow-in-computer-cabinet-1.jpg)
Here are some things that you need to keep in mind when choosing your cultivation space in order to ensure that you won’t have to abandon the project and your plants before you even really get started.
A clean space is essential.
It’s critical that you have a thoroughly sanitized cultivation space, and a clean area all around, when growing cannabis indoors. While there are certain things that you have no control over when growing outdoors, you don’t have any excuse not to keep your indoor project tidy, neat, and free from any prospective hazards and contaminants.
A good way to keep a clean space for cultivation is to plan a bi-weekly cleaning routine and stick to it. Cleaning doesn’t mean spraying your plants with Lysol or something like that. You should simply use a wet microfiber rag to wipe all the areas surrounding the plants.
Cannabis plants are bioaccumulators, which basically means that they suck up anything and everything in both the soil and air around them. This is why it’s essential to ensure that the surrounding growing space is always as clean as possible, to avoid any contamination.
Start out small
When taking on your first few grow projects, you should start small for a number of reasons. A common mistake made by first-timers is that they choose a grow space that is much bigger than they actually need. Starting small means that your set up costs will be cheaper; it’s also easier to monitor a few plants than a large number, and your mistakes as a first-time grower are less costly if you start small.
As a beginner, you should start growing from a small plot and take small steps - “small” meaning no more than a few plants at most. In fact, it’s advised that you start out with just one or two plants. Even experienced cannabis growers make mistakes and run into challenges. The fewer plants you have, the less plants you ruin.
Think big
It won’t be long before you get the hang of things and start producing some beautiful, budding cannabis plants. In other words, while you should start small, you also need to make sure that you have enough room for your plants and for expansion. If you are familiar with mature, full-sized female Cannabis sativa plants, then you will know that they are not small.
What you don’t want is to have your plants well on their way to maturity, and then run out of growing room. Also, remember to leave enough space for your equipment and for yourself to work in.
Keep your grow space light-tight
Another essential consideration for your grow room is that it should be as “light-sealed” as possible. If light leaks in during dark periods, it will confuse your plants and may cause them to produce male flowers. You need to ensure that your grow space is sealed off from any surrounding light sources.

Many first-time growers don’t realize that periodic darkness is just as important as light when it comes to producing “yieldable” buds. Yes, light is very important for the growing process, but complete periodic darkness is also crucial. Cannabis plants, just like most living things, need their rest time.
Successful indoor growing requires these important things:
Lastly, you should consider these few factors when choosing where to grow your cannabis, to ensure that you achieve the most from your cultivating experience:
- Choose a place that is secure and safe from any “unwanted visitors ”. As well as ensuring that your plant is protected from both human and animal intruders, this will also allow you to monitor your plants every day.
- Humidity and temperature concerns will always be an issue. Therefore, you should try to choose a spot that is well sealed off from air from the outdoors.
- Convenience is as important as anything else. Ensure that your spot is easy to get to, safe, and easily accessible at any time.
Step 2: Choose and make use of your cannabis grow lights
If you’re wondering what the number one environmental factor in the quantity and quality of your cannabis yields will be, it’s the quality of light that you use in your grow room. It’s generally recommended that you spend as much of your budget as possible on a good lighting set up. In the end, it will be worth it, especially if you have a long-term growth plan.
These are the most well-known types of cannabis grow lights that are currently being used.
LED grow lights
The only drawback to light emitting diode (LED) lights is that they are expensive. They cost nearly ten times more than an HID setup. However, they are highly efficient light fixtures that use little energy and generate very little heat. So, while the initial setup is costly, the running costs of using LED lights are substantially less than that of HID lights. Since LED lights contain more wavelengths across the light spectrum, they often lead to greater yields and higher quality plants.
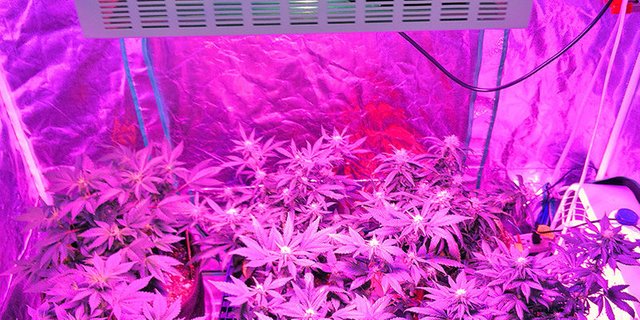
If you’re serious about getting into the growing game and don’t mind spending a little extra cash, LED lights are the way to go. They last for much longer and use far less electricity. However, there are a lot of “cheap” options out there that aren’t quite the same quality. So, do your homework and find a reputable brand.
HID grow lights
High-intensity discharge (HID) grow lights are the industry standard and probably the most commonly used lights by DIY cannabis growers. In terms of efficiency, cost, and ease-of-operation, they are typically the best value for money.
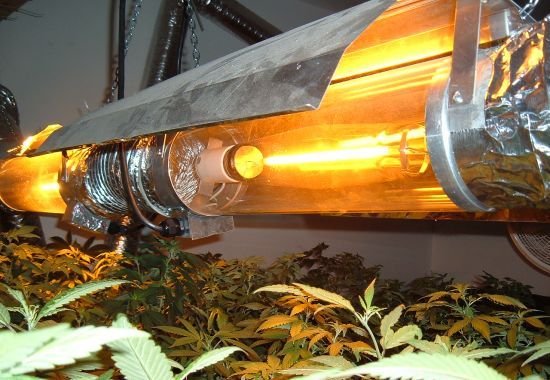
But, there is of course a drawback, and that is that they require quite a few accessories to run properly, meaning that the total cost can escalate pretty quickly depending on how much you willing to spend.
For instance, the two main types of HID bulbs used by growers are metal halide (MH), which is typically used during vegetative growth, and High-Pressure Sodium (HPS), which is the preferred choice for the mature flowering stage. However, it’s not a necessity to use both types of bulbs. If you want to save money and only buy one of these bulbs, then the HPS option is best since they are slightly more efficient on a watts-used-to-light-produced scale.
Additionally, because HID lights produce a significant amount of heat, you will need to invest in a reflector and ballast for each light. This is crucial for keeping the temperature in the grow room under control. Also, the reflectors are required to be hooked up to ventilation to flush out excess heat and keep a normal ambient temperature.
Fluorescent grow lights
Fluorescent grow lights are particularly popular with small-scale growers who are growing as more of a hobby. They’re a much cheaper and easier option than other grow lights and are therefore great for newbies who are unsure about whether they will stick with the whole indoor cannabis growing gig on a long-term basis.

They don’t produce much heat, which means that they don’t have to be hooked up to any sort of external ventilation system. While they are a little less efficient than other options, they’re great for novices who are only looking to play around with a single plant or two.
Induction grow lights
Also known as electrodeless fluorescent lamps, induction lamps are an old-school choice that companies have recently been adapting them for the cannabis industry. In terms of cost and efficiency, induction grow lights represent great value for money. They’re a more efficient option than fluorescent lights, but cheaper than LED, and even some HID setups.
Pros and cons of grow lights
Every option of grow lights has its own pros and cons. Be sure to weigh up your options when looking into your grow light setup. Ultimately, your light source quality determines the quality of your plants as well as the potency of the buds. Don’t be against using as much of your budget as possible on grow lights.
Step 3: Fresh air is essential for growing healthy cannabis plants
Plants need fresh air to grow, and carbon dioxide (CO2) is crucial in the process of photosynthesis. Now, since your grow space is indoors, we obviously aren’t referring to actual outside air. But, you need to have a steady flow of air that ventilates through your grow room. How you achieve this will depend on the size of your grow room. You could simply place a portable fan on one side of the grow room (usually on the floor), and on the other side of the room you will need an exhaust fan facing up towards the ceiling.
Here’s a breakdown of how this works, in case you’re wondering. Since warm air rises, the exhaust fan sucks out all of the stagnant, hot air, while the portable fan will provide a good supply of cooler, CO2-filled fresh air. This method won’t only allow for a constant supply, but it also helps to keep temperatures in a manageable region.
Step 4: Create a control system and keep track of the growing process
Once you have an appropriate grow light system in place, your next step is to set up some sort of self-monitoring system to control it all since we doubt you can spend 24 hours each day in your grow space. Here are the main requirements for the control system and monitoring process:
- Adjustable thermostat: With the adjustable thermostat, you will be able to set your exhaust fan to switch on as the temperature reaches a certain degree, which allows for a relatively stable humidity level and temperature range while saving energy and money.
- 24-hour timer: When the cannabis plants are in vegetative growth, you should keep the light supply on for around 16-20 hours per day. Once they have matured and reached the flowering stage, you should change it up to about 12 hours light and 12 hours dark.
- pH meter: This is not essential, but it will help you to check on the quality of your soil and water regularly. If you’re using soil to grow, then you should try to keep the pH level between 6 and 7. If you’re growing in water, then try to keep the pH level between 5.5 and 6.5.
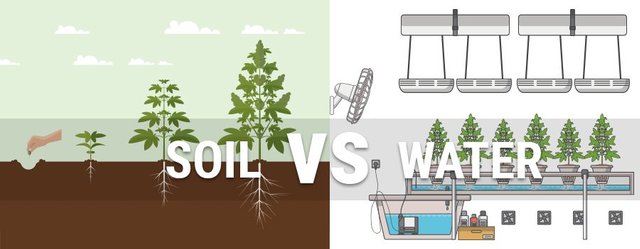
Step 5: Be an artist! [And choose a cannabis “growing medium”]
Once your lighting operation is set up and you have figured out how to sync it to an automatic 24-hour timer, you need to decide what medium to grow it in. Growing your cannabis indoors means that you have two viable options; either growing in traditional soil or in a hydroponic tray. Since regular soil is cheap and more straightforward to use, it’s usually recommended for newbies over the more complicated hydroponic system.
Let’s discuss each of the two options in more details.
Soil vs. Soilless (And other things to consider about hydroponics)
While regular soil is recommended for first-timers, it’s important to remember that all soils are definitely not created equally, which is why it’s important to be picky and know what you are doing when it comes to selecting an acceptable growing mixture for your plants. Your run-of-the-mill soil will work fine as long as you regularly add nutrients to it along the way. But, a good quality and pre-fertilized soil is the preferred choice since it takes most of the guess-work out of the equation and will ultimately set you up with a medium that lasts until the plants are ready to harvest, and the best part is that it requires little maintenance along the way.
The conventional medium for growing cannabis indoors is organic growth, which works well if done properly. All that is required is quality soil with a proper nutrient, optimized growing mix which consists of things like mycorrhizae bacteria and bat guano, along with other organic compost nutrients.
If you opt for many of the “all-in-one” automated hydroponic setups on the market, you are sure to experience faster growth and more abundant yields - assuming everything is done properly. If it isn’t done properly, you are just wasting your money.
Essentially, a hydroponic system delivers all the necessary mineral salt nutrients to cannabis plants in water by a process known as osmosis. There are some experts who choose to do this manually and hand-select their own minerals/nutrients etc., but this takes a lot of experience and a lot more time.
If you are adamant on choosing the hydroponic system over traditional soil, there are quite a few different kits out there that are straightforward and pretty foolproof. Of course, you should expect to pay at least ten times more than you would for a good, nutrient-rich soil.
Step 6: Choose a container to grow your cannabis in
Your next step, after deciding on whether you are going to use soil or hydroponics, is figuring out the type of container that you will grow your cannabis in. This usually depends on the system, the medium you use, and the size of your plants. You could grow a few large plants in a 5-gallon bucket, or any other regular household container, however, keep in mind that cannabis plants don’t like waterlogged conditions. This means that you will need to perforate the bottom of the bucket to make sure the water is able to drain out when needed.
If you don’t have anything around the house to use, you can get some great pre-filled soil kits that are specifically designed for increased airflow. Good airflow is crucial when you are growing high quality cannabis.
Step 7: Show your cannabis plants some love (by giving them lots of nutrients)
Aside from light source, being familiar with the kind of minerals, nutrients, and other food materials to feed your plants, as well as when to feed them, is the next most important factor in growing high-quality cannabis.
You have probably heard some people say stuff along the lines of, “dude, it’s weed - just put it in some soil and shine light over it.” Believe it or not, there is some truth to this statement since weed is extremely hardy and resilient. However, your end goal is always vigorous, high-quality buds - and you can’t achieve this without the proper expertise and care. Yes, all those beautiful buds that you often find at marijuana dispensaries are the result of hard work.
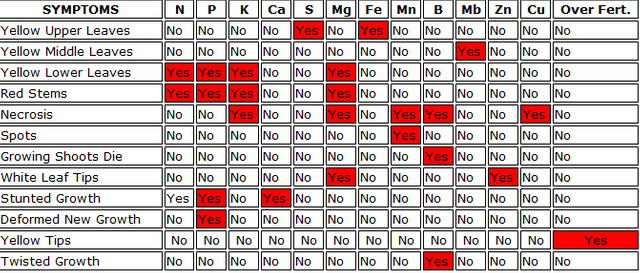
It doesn’t matter whether you’re growing in hydroponics or organic soil mix, cannabis plants require what’s known as “super seven” macronutrients. These include the following:
- Nitrogen (N)
- Calcium (Ca)
- Copper (Cu)
- Iron (Fe)
- Potassium (K)
- Magnesium (Mg)
- Phosphorus (P)
If you’re using an unsupplemented soil mix, you can buy pre-packaged macronutrients in either liquid or powder form, but most organic “super soils” already contain them in adequate amounts.
Lastly, some strains need more calcium than others in order to produce vigorous, healthy nugs, which is why it’s important to do some research on the strain that you will be growing. This will ensure that you are aware of the kind of food that it needs and wants most.
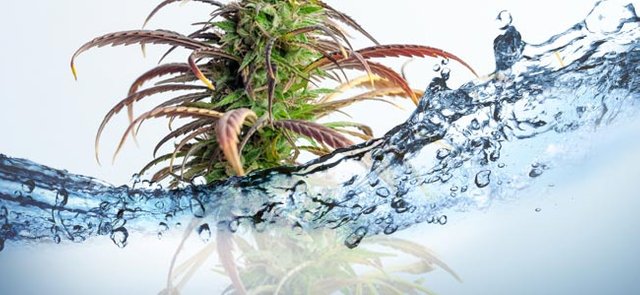
Step 8: Cannabis plants LOVE water!
Contrary to popular belief, there is such a thing as “too much water.” Most newbies think that the more water you give your plants, the better. While this is true to some degree, overwatering your plants could be detrimental to their productivity, and, in fact, could actually kill them.
When thinking about how often to water your plants and how much water to give them, should be determined by simple things like the size of the plant and what stage of development it’s in, since cannabis plants that are in the vegetative stage won’t need as much watering as mature plants that are in the flowering stage. But, in reality, there is no exact science behind how much water you need to be giving your cannabis plants on a daily basis.
However, always be mindful of not overwatering your plants. Cannabis plants are very open to fungal root diseases when the conditions are too wet. Overwatering is a common mistake of first-timer growers. Many people only water their plants when they notice that the leaves start drooping. It’s a good idea to drill holes into your growing container to allow the water to drain out. When watering, you should try to only moisten the soil instead of full-on saturating it.
The last thing to consider is that tap water is not always a good idea. If there is too much chlorine or unfiltered minerals in the water, it could harm your plants. It may be best to use a distilled option, or at least filter the water out before adding it to the soil. Tap water that is ladened with minerals could actually cause an unwanted buildup in the cannabis plants root system, which often causes detrimental root diseases.
Step 9: Make time to care for your plant (every single day!)
It goes without saying that DIY growers, or any growers for that matter, don’t have time to look after and care for their plants 24-hours a day. After all, this is why you set up an automated timer and operation system. The good news is that it doesn’t take that much time to show some quality “cannabis care” to your plants.
Even if you are the busiest person in the world with not much time to spare during your day, you are bound to find a few minutes here and there each day to check on your operation and ensure things like humidity, water levels, pH, and temperature are sufficient.
Another thing to look out for is male plants in your crop. If you’re looking for high-THC buds, you should only have female plants, ensuring that there are no male plants in the vicinity. Male plants that reach maturity to the point that the pollen sacs burst will pollinate the females, and this will cause them to grow seeds rather than buds. Although the plants themselves won’t actually die, they will be ruined since they will be unable to produce consumable buds.
There are some in-depth guides out there on how to tell the difference between male and female cannabis plants. But if you’re growing from seed, you will be unable to tell if it’s male or female until after the vegetative stage. When the plants start reaching maturity, they develop reproductive parts at the nodes, and this is the point at which you can take the male plants out and get rid of them, or even better, make something like a cannabis tea or smoothie out of them. The male plants have what looks like a cluster of peas which are the pollen sacs, and the female plants have sharper, pointier early-stage calyxes.
While it is important to be on the lookout for male plants and to know the difference between male and female, you will probably be growing from pre-purchased feminized seeds or female clones, which means that you won’t really have to worry about male plants popping up in your crop. However, it’s still necessary to keep an eye out for males, even when using feminized seeds, because they have been known to sneak their way into some of even the most reputable brands’ packages.
Step 10: Cut those cannabis plants down — Carefully!
So, you’ve found your perfect grow spot, set up your lighting system, found a good container to grow your plants in, and planted your seeds. Now the time has come to finally harvest the buds and make good use out of them.
Granted, you’re a first-timer and a novice, so cutting a few buds off one or two, or maybe a handful, of plants isn’t exactly classified as harvesting. However, there are still a few things to know and understand before you start to cut your cannabis off with a pair of scissors straight out of your kitchen drawer.
Many newbies assume that the nugs just pop out completely separately on the branch, and are then just plucked off, ground up, and smoked. But, as you may have guessed, there’s a lot more to it than this.
The nice big nugs on a “pre-harvested” and healthy plant will typically be mixed pretty well in between a large number of sugar leaves and fan leaves. To get to the nugs, you will need to do quite a bit of snipping and trimming away with a good pair of scissors. While this is often quite a tedious and lengthy process, it’s a job that you will probably be more than happy to do after putting in so much time and effort into growing the plants. Many people actually find this process enjoyable and relaxing.
The first step when harvesting your plants is to cut off this big water leaves, also known as fan leaves. Although these are the iconic “weed leaves,” they have a very small amount of THC in them and are usually just tossed out. If you’re not happy with just throwing them out to try, there a few things you can do with the fan leaves to ensure that you put the entire plant to good use.
Once you have cut all the big fan leaves away, you will be left with a good amount of sugar leaves and nugs. There is quite a noticeable difference between the small sugar leaves and the long, green fan leaves, as the former will be covered in resinous glands which give the appearance of sugar.
There are people who don’t bother snipping the sugar leaves away, and they will simply grind them up and smoke them alongside the calyxes/buds. But if you’re looking to do the job right, and you should, it’s necessary to trim the sugar leaves away until you’re left with nothing but the nugs. Always make sure to keep your sugar leaves though; add them to a separate pile because they are full of THC and can be used to make wax, butter, hash, etc.
Once you are finished with the trimming and have given the buds a good “haircut,” you are pretty much done. The only thing that you still have to do at this point is to hang them out to dry. This is actually a very important process, but we will leave that discussion for another day.
Another thing to be mentioned is that the scissors that you use to harvest will gunk up quite a bit when you do your cannabis plant cuttings. This is absolutely normal, and many people actually scrape off the “gunk” and smoke it straightaway. This is called “scissor hash,” and it’s said to be super tasty and potent.
At the end of the day, harvesting cannabis and hemp is a wonderful experience and one that is recommended for cannabis lovers who have a passion for every aspect of the plant. During the process, you will learn so much about weed and the biology/botany behind it. In fact, we learn something entirely new each and every time we participate in a new grow. There’s no denying that there is quite a learning curve involved, and you will certainly make some mistakes as you go, but it will all be absolutely worth it.
We hope that this basic guide explaining how to grow cannabis indoors has been somewhat helpful and that it will set you out on the path to an exciting and productive cannabis cultivating experience. In the end, it’s all about having fun.
Thank you for reading! Follow us and leave a comment with what topic you want covered in the next post!
Read more:

hhhmmmm tasty :P upvoted and resteemed!
Im just new to steemit so haven't created much content yet, still getting my head around how everything works.
I intend to have content about drug law reform, addiction and education on pharmacodynamics of both marijuana and other drugs. If this sounds like your cup of tea, please give me a follow il try not to disappoint :)
Nice guide! This can help some people getting started in growing their own medicine.
Thanks for sharing such informations.
I upvoted your post.
Mabuhay, keep steeming.
@Filipino
Posted using https://Steeming.com condenser site.
Legit info. I grew hydroponically for 15+ years, succinct. Only thing I don’t subscribe to are the little tent and or pc size grow box set ups, too small. It’s best if you can dedicate a room or walk in closet to. Other than that, right on.
Posted using Partiko iOS
Amazing stuff as usual <3.
Best marijuana steemit blog out there!
Your post had been curated by the @buildawhale team and mentioned here:
https://steemit.com/curation/@buildawhale/buildawhale-curation-digest-09-20-18
Keep up the good work and original content, everyone appreciates it!
Resteemed to over 19400 followers and 100% upvoted. Thank you for using my service!
Send 0.200 Steem or 0.200 Steem Dollars and the URL in the memo to use the bot.
Read here how the bot from Berlin works.
#resteembot #bestofresteembot #winwithresteembot #resteembotvip
Become one of our VIPs for 1 month free resteems and upvotes.
Byteball is doing a airdrop on Steemit, where you can get 10 $ - 160 $ for free. More infos here.
@resteem.bot
Why is my rep so low? Thanks to @resteem.bot because I offer FREE Resteems!
Re: @resteem.bot - watch out for this thief!! More info.. 📖
https://steemit.com/resteem/@marcocasario/re-marcocasario-re-resteembot-re-cribbio-joke-of-the-day-daily-free-resteem-bot-leave-your-link-in-the-comments-open-for-3days-18-sep-20180918t212938392z
To listen to the audio version of this article click on the play image.

Brought to you by @tts. If you find it useful please consider upvoting this reply.
Congratulations @medicalmarijuana! You have completed the following achievement on the Steem blockchain and have been rewarded with new badge(s) :
Click on the badge to view your Board of Honor.
If you no longer want to receive notifications, reply to this comment with the word
STOPCongratulations @medicalmarijuana! You received a personal award!
Click here to view your Board