photography tutorial
Adobe Lightroom is very popular for photographers. Recent information suggests that many people who used Photoshop were heading towards the lightroom. From this, it can be understood that there are definitely some advantages that can be more useful than Photoshop.
Let's just see the matter. Photographer took a lot of pictures. So they have to work hundreds of photographs. Photoshop does not allow more photos to be used. One has to work with a picture. This feature is available in the lightroom.Photographer needs to fix photo lighting. Reduce somewhere, increase somewhere. They do not have to work with so many layers, or do not need to paint. So simple software compared to lightroom photoshop.
Photoshop itself is extremely powerful software. Moreover, there are unnatural plugins. There are plugins for all types of work, from noise downstream to special effects. Most of these plugins can be used in the lightroom. Then what is the need for Photoshop?And most importantly, Photoshop costs much more than the lightroom. So, the photographer chose the lightroom. Lightroom software is a little different from traditional softwares. You can open a photo in Photoshop, change it, then save it. If necessary, save the algorithm by keeping the previous one correctly. Lightroom has been made to work with a lot of pictures, and it has been preserved that you keep the original images intact.Take it right. Such as where your original images will be, where the converted images will be. Never have the potential to damage your original image. You can open the image after copying the camera's memory card or harddisk. You can add metadata at the time of opening.
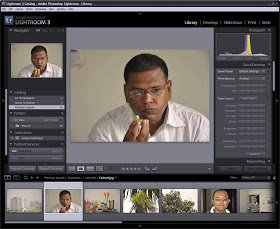
Lightroom interface If you open the lightroom, you will see such an interface. The interface is relatively simple, yet there are several important parts to look at here. Writing the software name on the left. Library on the right, Develop, Slideshow, Print, Web Write Module Picker The name implies that their work is done to manage file management, photo changes, photo slideshow, print and use on the internet.The picture that you work with will be seen in the middle. A picture can be viewed in large detail, or a number of photo previews can be seen. You can select how to look at the bottom of the photo. Photo zoom control can be used using the slider on its right. There are two panels on the side of the main screen. These vary according to the selected modules. If you select Library, folders on the left,Options such as catalogs, and right hingograms, quick developments, metadata etc. can be found. If you select Developer, there will be options on the left, preset, snapshot, etc. Various types of change options can be found on the right. It can be opened by clicking on the name of any option or the triangular symbol next to it.At the bottom is filmstrip. The preview of the imported images can be seen here. Clicking on any of them will be available as an active image in the middle window. You can make bigger thumbnails size larger by using the WidgetSpread window divider.

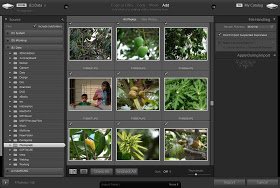
Import If you turn on the first lightroom, you will not get any image. You need to import them to use the image. Here are some things to look for. You can import almost all the bitmap images in the lightroom, all formats, CMWay and video formats in the new version (3.0).· Select the modules to import. Then click the Import button at the bottom of the left panel (or enter the command from the menu). Drive / connected memorycards will be seen as a source on the left panel. · Select Drive. Select the folder that contains the images. Previews of inside images will be seen. You can use subfolder images by clicking on options or you can use a specific folder to close it.
If you look in the preview window, a check mark will appear on each image. Tick the photo to remove any image from the import job. You can also make the image larger by using the loop view rather than the grid view. There are 4 options on how to import, over the preview window. Copy to DNGThe options will copy each file first to another folder and convert them into DNG. If you select Copy, copy them all to new folders, select Move, move all images to other places (eg from memorycards to harddisk) and select Add to import directly without making any changes to the folder. · Check the panel on the right panel once. Render PreviewThere are 4 options in the section. Basically change this option to fix the preview value. Using good values will require more time. If Do not Import Suspected Duplicates is selected, the possibility to import the same image twice will be canceled. When everything is done, click the Import button at the bottom right. Selected images will be imported.

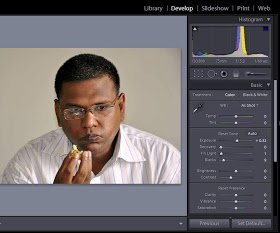
Basic Editing After importing, go to the module to edit any picture. Select from the below filmstrip. Open Basic Tab from the panel on the right. Sliders can be found here to change everything such as Temperature, Color, Exposure, Recovery, Fill light, Blacks, Brightness, Contrast, Clarity etc. Anything changes will be seen in its preview.· You can change the Tone Curve, HSL, Effect etc. tab and change it there. You must know what to do here.
Export After making the necessary changes to the picture, use the File - Export command from the menu to get the final picture. You can specify the format of the output image, size, etc. along with the name of the folder in the Export menu.
Like korlam this post 😉😉😉
Nice job carry on....@saharia (36)
tnx bro