Raspberry Pi Operating Systems - A Simple Guide for Beginners
In this guide, I will take you through the steps on how to install Raspbian for the Raspberry Pi.
This is a straightforward process and is perfect for anyone looking to install a clean version of the operating system.
This method differs to the NOOBs installation guide so if you’re more interested in using an installer that allows you to install multiple operating systems.
If you stumbled on this page and have no idea what Raspbian is then here is a brief explanation.
Raspbian is an operating system that is based on Debian, but unlike Debian, it has been optimized for the Pi. It’s considered the default and likely the most popular operating system for the Raspberry Pi.
It contains everything you would expect an OS to contain such as basic utilities and support for most peripherals. There are two different versions of Raspbian that I will go into more detail below:
Recommended Equipment
Raspberry Pi
Micro SD Card or an SD card if you’re using an old version of the Pi.
Ethernet Cord or Wifi dongle
Micro SD Card Reader
A Linux, Mac, or Windows PC
Optional
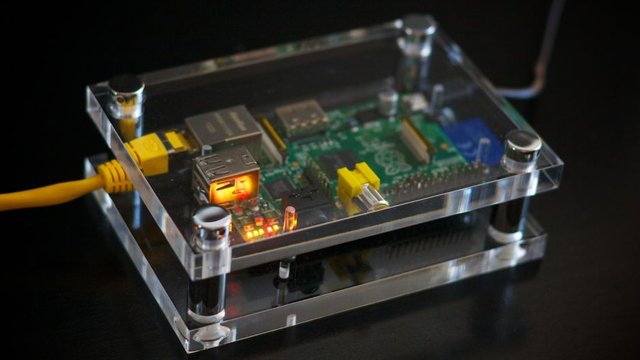
Raspberry Pi Case
USB Keyboard
USB Mouse
The Steps on How to Install Raspbian
The process of installing Raspbian is super easy and won’t take you long to get it up and going. There are two different flavors of Raspbian you can install which I will briefly just mention below.
Raspbian: This is the full version of the operating system and is the version that most people will use. It comes preinstalled with an extensive range of apps and is very easy to get going with. It also comes with the desktop software preinstalled.
Raspbian Lite: This is the light version of the Raspbian operating system and contains the bare basics to get going. If you know exactly what you want to do, then this may be the better version to install.
Raspbian Lite doesn’t have the desktop software pre-installed so you will only be able to use the command line. This version is ideal if you’re trying to save on system resources and know you will unlikely need the desktop graphical user interface (GUI). It makes it great if you want a headless server. (eg. Connecting the Pi to a screen will just give you the terminal).
First, download the version of Raspbian you wish to install.
Once downloaded, unzip the zip file, so you’re left with just a .img file. If you’re having trouble unzipping the file you may need to install something like 7zip
Now you will need to download & install the software that will write the image to the SD card. A good one to use is called Etcher, and it works on all platforms (Linux, Mac, and Windows). You’re able to download it from over at their website.
Once you have downloaded Etcher, follow the prompts to install it.
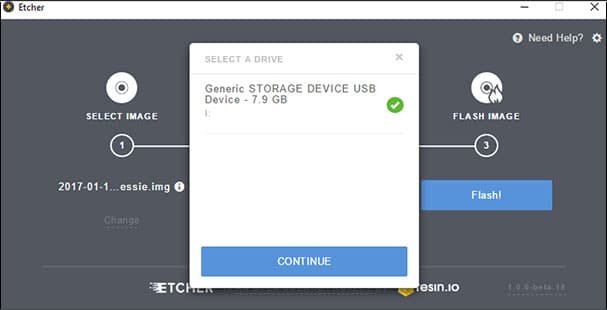
Open Etcher and select the chosen Raspbian image.

- Select the SD card that you wish to install Raspbian on. Double check to make sure it’s the correct drive as this will wipe it clean.
- Once you have confirmed the image and the drive you can then proceed to flash the SD card, select Flash.
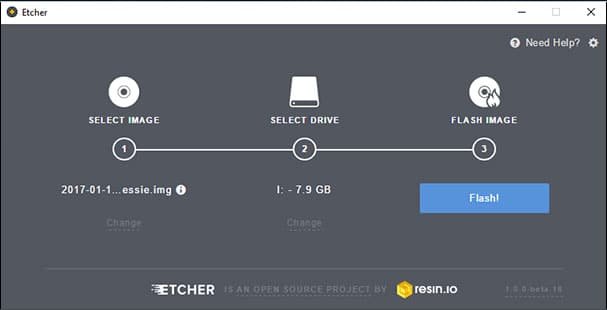
Once it’s finished, you can safely remove the SD card from the computer.
Insert into your Raspberry Pi and any other extra cords such as power, mouse, keyboard, and the HDMI cord.
Basic Raspbian Setup
Depending on which version of Raspbian you installed there is minimal set up you will need to do to be able to get going. It’s important that when you learn how to install Raspbian that you also learn how to configure it correctly. Below are a few recommendations of what you should change. Please note that these are my personal recommendations.
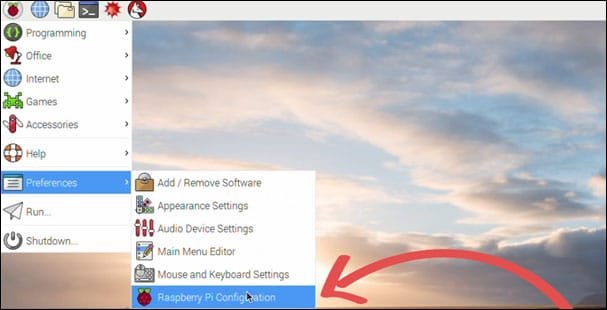
Open the configuration menu by going to the menu icon -> preferences -> Raspberry Pi configuration. Please note the location of some menu items may change over time. You can also open up a similar menu in the terminal by entering the following command.
sudo raspi-config
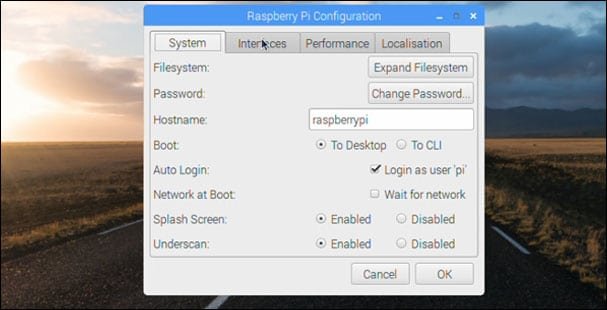
System
Firstly, you will want to expand the file system, so it takes up the entire SD Card. Simply select this in the options, and it will expand the file system. (You can find this option in the terminal by using sudo raspi-config)
Since the default password is raspberry and the default username is pi, this makes it extremely easy for someone to access your Raspberry Pi. So you should change the default password for the user pi, this can easily be changed in the systems tab.
You can also change it in the terminal by using the following command.
passwd
If you installed the full version of Raspbian but want to login to the command interface rather than the GUI then you can change this in the settings. You can start the interface by running the following line.
startx
You may also want to turn off auto login if you don’t want someone to turn on the pi and have access.
If you have black bars around your screen, then turn off underscan to get rid of them. If this doesn’t remove them, then you may need to tinker with your monitor settings directly.
Interfaces
You can keep all these options off unless you know you will need them on. For example, if you’re going to be connecting to the Pi using SSH then make sure you switch SSH on.
Performance
You can keep all the options in here as the defaults unless you have been instructed to change them for a specific tutorial.

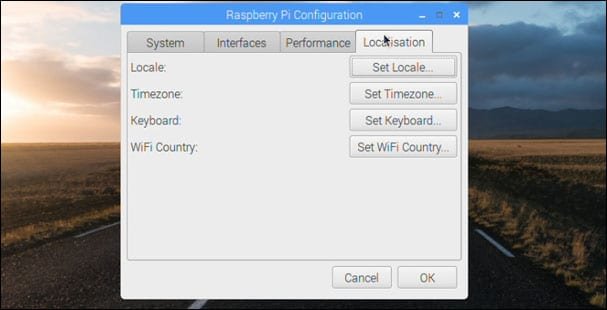
Localisation
You will probably need to change all the settings in this the localisation menu, simply set these to wherever you live. The most important one you will want to change is the keyboard, there is nothing worse than going to type and having the wrong symbols pop up.
You’re now able to start doing a Raspberry Pi project or using it just like you would use a regular computer. Its range of applications makes it easy enough to do most typical computing tasks.
I hope that this tutorial has shown you how to install Raspbian and that you haven’t run into any issues. If you have some feedback, tips or have come across any issues that you would like to share, then please don’t hesitate to leave a comment below.
Congratulations @thesociallyviral! You have completed the following achievement on the Steem blockchain and have been rewarded with new badge(s) :
You can view your badges on your Steem Board and compare to others on the Steem Ranking
If you no longer want to receive notifications, reply to this comment with the word
STOPDo not miss the last post from @steemitboard:
Congratulations @thesociallyviral! You received a personal award!
You can view your badges on your Steem Board and compare to others on the Steem Ranking