How to manually install Wordpress on your host? A Step-by-Step Tutorial
Wordpress is a great platform to kickstart your new website. It's quite easy to get into and you can do almost anything with it. The problem for most beginners is that it can be a hassle to install without proper guidance. Since this is the case, there are two ways for you to install Wordpress on your website: the easy and the hard way.
The easy way is to simply get a hosting service that facilitates your website installation, like Siteground and Bluehost. While these services may provide a great custommer support, a good deal and an easy Wordpress installation, you may find a better deal elsewhere without this quick setup.
Enter the hard way: setting up Wordpress yourself
Don't worry, this is not as hard as it seems. You may need to do some extra steps, and it might take a bit longer, but you will do it!
How to install Wordpress manually
This is what you'll need in order to start:
- Your Domain;
- A Host with your Domain already Parked;
- Wordpress files | Download
Disclaimer: This tutorial will be based on a cPanel interface since that's the nature of the host available to me. In case you have a Plesk based interface, the steps needed to install Wordpress should be similar, even though the interface is not the same.
1- Configure a Database for Wordpress
Before we get to install Wordpress on your host, we need to make sure that we have everything we need. And to ensure that, we need to have a database dedicated to it and a user connected to the database since Wordpress will ask for it later.
So that's what we will do.
1.1- Create a Database
Start by logging in on your host. In my case, it's a cPanel.
Once you are there, look for "MySQL Databases" and click there.
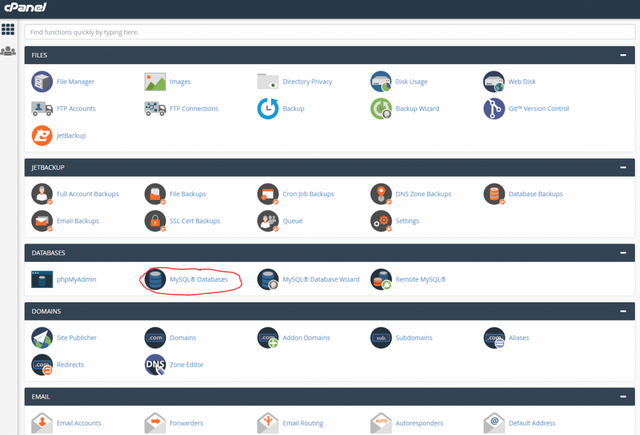
cPANEL Overview
Next, create a new database, by putting giving a name for it under the option "Create New Database".
Be sure to save the name somewhere, with it's prefix!
Example: prefix_databasename

CREATE NEW DATABASE OPTION
1.2- Create a user for your Database
Secondly, you will have to create a new user to access the database. So, let's do that.
On the same page as the Database creation functionality, keep scrolling down until you see the option to Add New User. Go ahead and fill those fields, then click Create User.
Be sure to save the username (with the prefix) and password somewhere you can access quickly as you will need them shortly.

ADD NEW USER
1.3- Add your user to the Database
Finally, under the option Add New User, you should have the option Add User to Database. Here, simply choose the user you just created and the database and click Add and select all the options available to you on the popped up window.

ADD USER TO DATABASE
Great! All done on this section!
2- Upload your Wordpress files to your host
To do this, simply go to the root of your cPanel and click on File Manager.
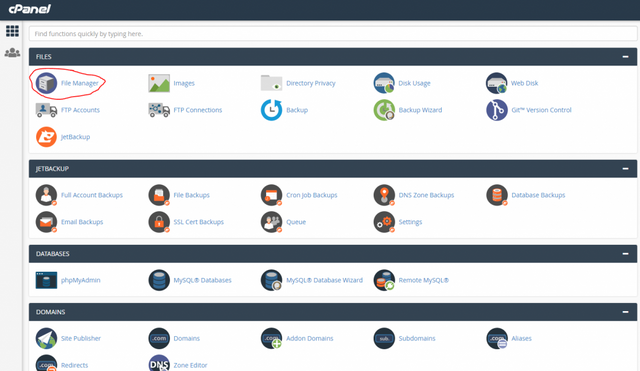
cPanel - Click on File Manager
Next, on the sidebar, enter on the public_html folder. This is the default folder that is responsible to connect your website's files to your domain.
Now we'll need to upload your Wordpress files into public_html. So, go ahead and click upload on the upper bar.

File manager
On this page, simply drag the Wordpress zip you downloaded previously into the "Drop files here to start Uploading" section (if you didn't previously, here you go).
Wait until the upload is complete.

File Upload
Now click to go back to your public_html folder, find your Wordpress zip file and then right-click on it an select Extractto extract the zip's files.

Extract Files
Next, you'll be prompted to decide where you want to extract your files.
Just hit Extract File(s).
Now you should have a folder named wordpress on your public_html.

public_html after extraction
Note that every wordpress file is on that folder, and we don't want them to be there.
Here is why.
Let's say your domain is something.com. The folder public_html is like the root of your domain, which is equivalent to accessing something.com
Now, public_html doesn't have any file directly on it (the .zip file doesn't count for this matter). So in order to access the Wordpress files, you'd need to access something.com/wordpress, and you don't want that.
So what we want is to move every file on the wordpress folder into the public_html root folder.
To do this, double-click on the Wordpress folder and go ahead an select every file on that folder, using the option Select All.
Then right-click and select Move.
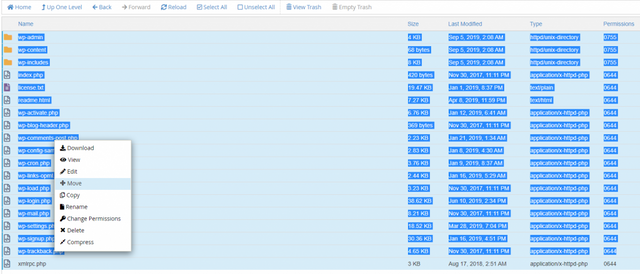
Selecting and Moving Files
A window will pop-out, asking you where do you want to move your files. Simply delete wordpress at the end of the string, leaving the following path:
/public_html/
Now your files should be on the root of the public_html folder!
Additionally, you can go ahead and delete the wordpress folder and wordpress zip file by right-clicking on them and selecting delete, selecting Skip to trash and permanently delete these files.
4- Run the Wordpress Setup
To start installing wordpress, you'll simply need to write your domain on your browser (e.g. something.com).
The first window you should see is the Wordpress language selection.

Wordpress language window
Go ahead and choose the language you wish for Wordpress to be on and press Continue.
After this, Wordpress will advise you to get your database ready in order to proceed. We already did this so just click "Let's Go!".
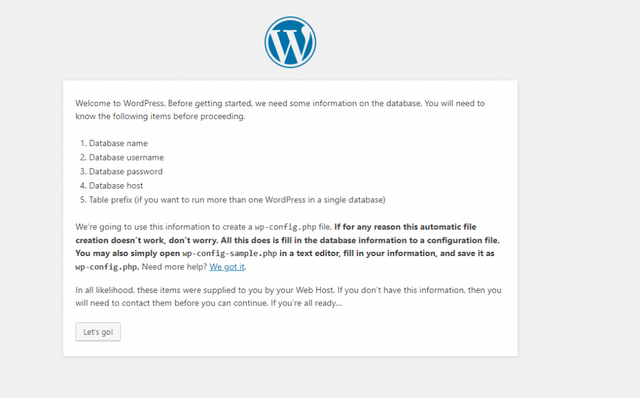
Wordpress Setup - Vefore getting started window
Next, you'll need to establish a connection between your database and Wordpress. Go ahead and provide the database name you created previously with the prefix, the username, also with the prefix and the password.
As for the Database Host and Table Prefix, you can leave them be.

Example on how to fill the database connection details
If you did everything correctly, you should get this window.

Part of the Wordpress installation complete
Go ahead and Run the installation!
Now, Wordpress will ask you to fill some information in order to proceed. Here you'll need to provide your site's name, your administrator username and password, as well as your administrator e-mail.
Also, you will find an option on this page to Discourage search engines from indexing this site. This means that your website won't be found by Google, Yahoo, etc. If you want people to find your site organically, don't check this option. Otherwise, do it.

Administration Information Setup
After this, you should get this window.

Installation Completed Window
Awesome! Everything is well configured!
After click Log In, you'll be redirected to the administration login window. To access this page whenever you want, you can simply type something.com/admin or something.com/wp-admin.

Wordpress Backoffice Login
To login on the administration panel, use the administrator's username and password that you just created.
And that's it, you are in your website's backoffice.
5- Have fun
Congratulations!
Your website is all set and your administration panel is at your disposal. Now the fun part begins.
You can start by exploring new themes by clicking on Appearance -> Themes and also get to explore plugins.
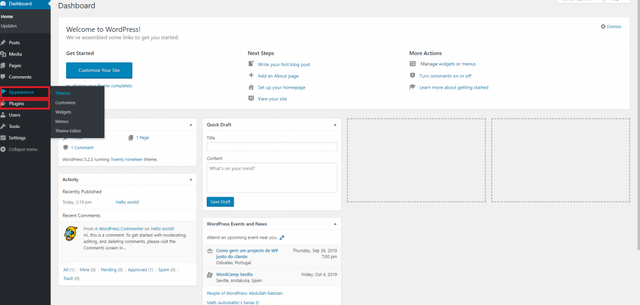
Wordpress Backoffice
Enjoy!
Conclusion
Wordpress is really easy yet powerful tool to help you build your website, but the installation process can be challenging.
Even though there are easier ways to install Wordpress, I believe this solution it's quite interesting since it allows you to install this platform on any host.
I really hope this tutorial on how to install Wordpress manually was helpful to you and that you learned a thing or two about host management.
What do you think of this tutorial? Should I do more of these? What do you want to read next?
Let me know in the comments!
Until next time!
Some articles to consider reading next
Posted from Creator's Keep | https://creatorskeep.com/how-to-install-wordpress-on-your-host/
This post had received 5.00% upvote from @steemitportugal account!
Our website has lots of news and tutorials you can visit right now at www.steemitportugal.com
Click here to vote

Delegation for daily voting: 10SP-25SP-50SP-100SP-250SP-500SP-1000SP