How to Setup Bitcoin Cold Storage
In this guide we will walk you through setting up your very own cold storage wallet. Before diving into the process, you may be wondering what is cold storage?
In simple terms, cold storage refers to keeping your bitcoin completely offline. Cold storage, also known as a cold storage wallet, is the opposite of a hot wallet where your bitcoin is kept online. Since Bitcoin is a digital asset, keeping them online increases your risk or attack surface for having your bitcoin stolen when kept online using a custodial service. By keeping your bitcoin in cold storage, your attack surface is greatly diminished.
Getting started
The first step to getting your bitcoin into cold storage is creating an offline Bitcoin address. This address will have both a public and private key-pair which never goes online (until you’re ready to spend it). With this guide, we will show you how to make a free cold storage wallet using the paper wallet method.
Setting up a paper wallet
Setting up your cold storage paper wallet is fairly simple and requires very little technical knowledge. The first step will be to go to the Bitcoin.com paper wallet tool here: https://tools.bitcoin.com/paper-wallet
Before doing anything else, while on this page you will want to save it locally to your computer. To save a web page to your local machine, press Ctrl-S and save the file as a complete webpage (to your desktop for example). After saving, simply close out the open Bitcoin.com paper wallet tool page. Then disconnect your computer from the internet; don’t worry, you only need it offline temporarily for this task.
After disconnecting from the internet, open the saved file (on your desktop). Move your mouse around on the page and/or type some random characters into the text box to create extra entropy (randomness). By doing this, you create a random Bitcoin address that has both a public and private key-pair. Since you saved the file locally and are not connected to the internet, the Bitcoin address you created was done completely offline.
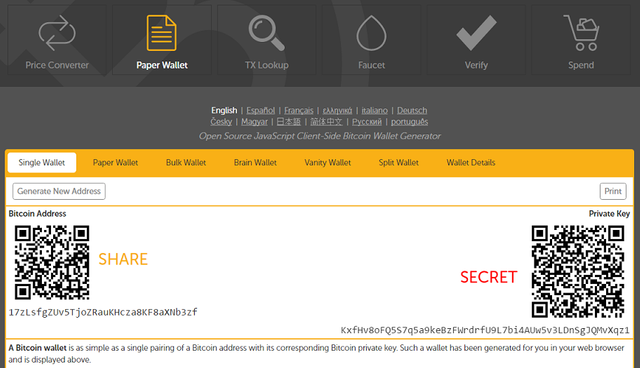
 The final paper wallet page should look similar to this example page
Print the page
The next step is making an offline copy of your Bitcoin address which you can later load with Bitcoin for a complete cold storage solution. While on the locally saved paper wallet page, while still disconnected from the internet, click on the Print button. Warning: before printing the page, make sure your printer is also offline (not connected to the internet through wifi for example). Once you are sure, print the page. Congratulations, the hard part is over! You have now created an offline Bitcoin address and made a hard copy of it locally for safekeeping. On the printed page should be the public Bitcoin address and QR code with the corresponding private key and QR code. We strongly recommend that you store the paper wallet somewhere secure, such as a fireproof safe. You can now safely connect back to the internet.
How does this work?
The Bitcoin.com paper wallet tool is a client-side address generator, which generates public and private Bitcoin key-pairs locally through your browser. The benefit of this technique is you can load the JavaScript locally and trust that the JavaScript did not change after being loaded. The tool is open source and the code can be reviewed at any time. Also, make sure you never share your private key with anyone or online.
Adding funds to your cold storage wallet
The next step is you want to add bitcoin to the wallet. Just like with any other bitcoin transaction, using a wallet you may have online, scan the public cold storage wallet QR code or copy the address, and send funds to your cold storage. You can check the status of the funds at anytime using a Bitcoin block explorer.
Redeeming bitcoin from cold storage
When you are ready to spend from your cold storage wallet, you will need to import the private key to a Bitcoin wallet that is online. Any wallet that supports importing private keys will work. For example, if you download the Bitcoin Unlimited wallet (which is a full Bitcoin client) you can import the private key. To do so, simply follow these steps:
- Open the client and click on Help
- Select the Debug Window and click on the Console tab
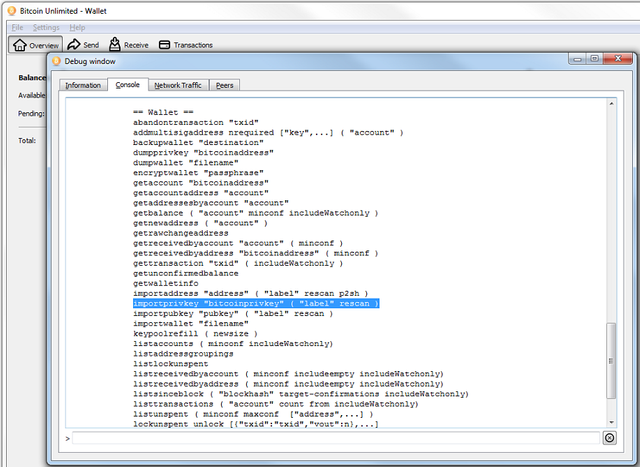
- Type in the field “importprivkey <bitcoinprivkey>” (replace <bitcoinprivkey> with your private key and remove quotes)
- Hit enter to import the private key; this will require a rescan of the blockchain which may take a few minutes to sync
 In this screen, you can see the “importprivkey” command in the Console. Type “help” in the Console to get a full list of wallet commands.
Another alternative online web wallet that supports importing private keys is Blockchain.info. To import your private key on this wallet, simply follow these steps:
- Open the online wallet
- Click on Settings and then click on Addresses
- Click on Import Address
- Copy and paste the cold storage private key and click Import/transfer
- You can safely archive the old address and transfer the funds to your wallet
Once you have successfully moved your cold storage funds online, they are ready to spend. Note: Never reuse cold storage wallets. Once you have redeemed them online, follow the process outlined above to create a new one when necessary.
Very helpfull I needed this.
Thank you.
Edit: word
Congratulations @adeyemi! You have completed some achievement on Steemit and have been rewarded with new badge(s) :
Click on any badge to view your own Board of Honnor on SteemitBoard.
For more information about SteemitBoard, click here
If you no longer want to receive notifications, reply to this comment with the word
STOPBy upvoting this notification, you can help all Steemit users. Learn how here!