Pelican Blog를 AWS CodeBuild를 이용하여 S3에 자동으로 배포하기
사용하는 AWS Service
- S3
- CodeCommit
- CodeBuild
- CodePipline
- IAM
개요
간단하게 정적 웹사이트를 만들기위해서 Jekyll과 Github Page를 많이 사용한다. Github Page에서 자동으로 Jekyll 프레임워크를 이용해서 정적 웹사이트를 생성해주기 때문에 편리하게 사용할 수가 있다.
하지만 많은 부분을 건드려야하는 것은 아니지만 Ruby라는 익숙하지 않은 언어를 사용해야하고 소스가 모두 공개되어야 한다는 부담감이 있다.
AWS를 이용하면 소스를 비공개로 사용할 수도 있고 Cognito를 이용하여 웹사이트에 로그인 기능을 추가할 수도 있다.
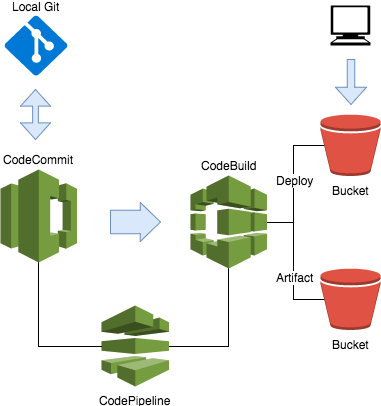
사용자의 PC에서 블로깅할 Markdown 파일을 생성하고 Git을 이용하여 CodeCommit으로 업로드하면 CodePipeline이 CodeBuild를 실행하여 S3에 배포하도록 한다.
CodeCommit
CodeCommit를 이용하면 Private Repository를 사용할 수가 있고 AWS Service를 쉽게 이용할 수가 있다.
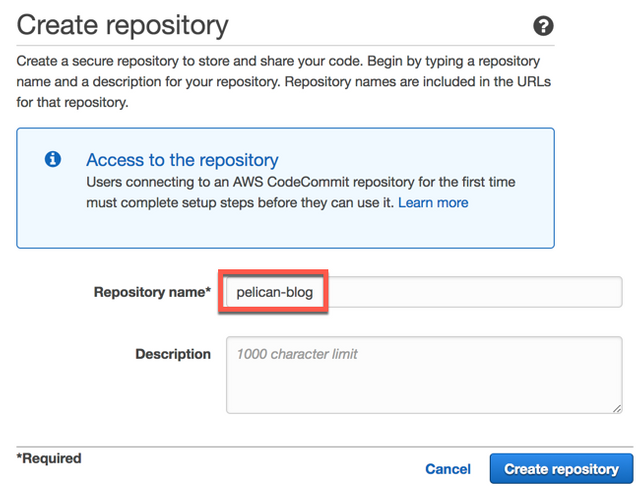
레파지토리 생성
AWS Service > CodeCommit으로 이동한다.
[Create Repository]를 선택하여 pelican-blog 레파지토리를 생성한다.
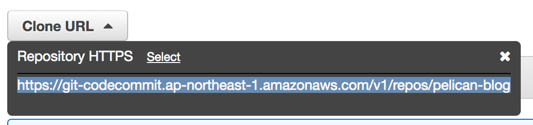
생성된 레파지토리의 HTTPS 주소를 기억한다.
HTTPS Git credentials 생성
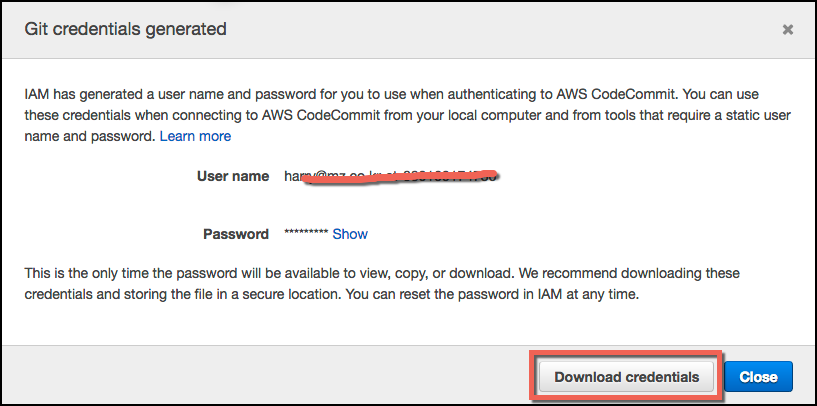
AWS Service > IAM > Users 에서 [자신의 아이디]를 선택하여 [Security crendentials]으로 이동한다.
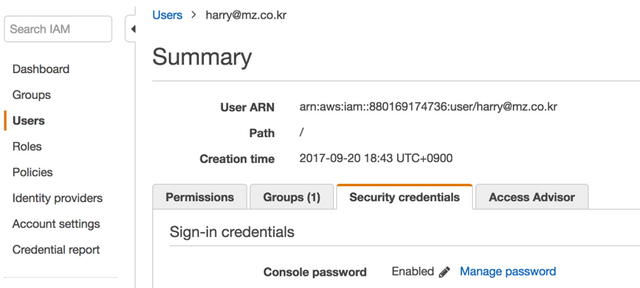
HTTPS Git credentials for AWS CodeCommit 항목에서 [Generate]를 눌러서 Username과 Password를 기억한다.
레파지토리 복사
AWS에 생성된 레파지토리의 주소를 이용하여 자신의 PC에 복사한다.
$ git clone https://git-codecommit.ap-northeast-1.amazonaws.com/v1/repos/pelican-blog
Cloning into 'pelican-blog'...
Username for 'https://git-codecommit.ap-northeast-1.amazonaws.com':
Password for 'https://[email protected]@git-codecommit.ap-northeast-1.amazonaws.com':
warning: You appear to have cloned an empty repository.
Pelican
Pelican은 Python으로 만들어진 정적 웹사이트 제너레이터다.
전세계적으로 Jekyll에 이어 두번째로 많이 사용하고 있으며 문서와 테마, 플러그인도 풍부하다.
환경설정
virtualenv 설치하고 python 가상환경을 만든다.
$ cd pelican-blog
$ sudo pip install virtualenv
$ virtualenv ./env
$ source ./env/bin/activate
.gitignore을 생성하여 결과 파일들은 git repository에 업로드 되지 않도록 한다.
env
output
$ ls -a
./                 .gitignore         develop_server.sh* pelicanconf.py
../                Makefile           env/               pelicanconf.pyc
.git/              content/           fabfile.py         publishconf.py
Pelican 설치
가상환경 상태에서 pelican, markdown 패키지를 설치하고 Pelican 기본 웹사이트를 생성한다. 설정 몇가지를 입력하면 기본 blog가 생성된다.
(env) $ pip install pelican markdown
(env) $ pelican-quickstart
Welcome to pelican-quickstart v3.7.1.

This script will help you create a new Pelican-based website.

Please answer the following questions so this script can generate the files
needed by Pelican.


> Where do you want to create your new web site? [.]
> What will be the title of this web site? Pelican Blog
> Who will be the author of this web site? Me
> What will be the default language of this web site? [en] en
> Do you want to specify a URL prefix? e.g., http://example.com   (Y/n) n
> Do you want to enable article pagination? (Y/n) Y
> How many articles per page do you want? [10] 10
> What is your time zone? [Europe/Paris] Asia/Seoul
> Do you want to generate a Fabfile/Makefile to automate generation and publishing? (Y/n) Y
> Do you want an auto-reload & simpleHTTP script to assist with theme and site development? (Y/n) Y
> Do you want to upload your website using FTP? (y/N) N
> Do you want to upload your website using SSH? (y/N) N
> Do you want to upload your website using Dropbox? (y/N) N
> Do you want to upload your website using S3? (y/N) N
> Do you want to upload your website using Rackspace Cloud Files? (y/N) N
> Do you want to upload your website using GitHub Pages? (y/N) N
Done. Your new project is available at /Users/harry/work/mega/pelican-blog
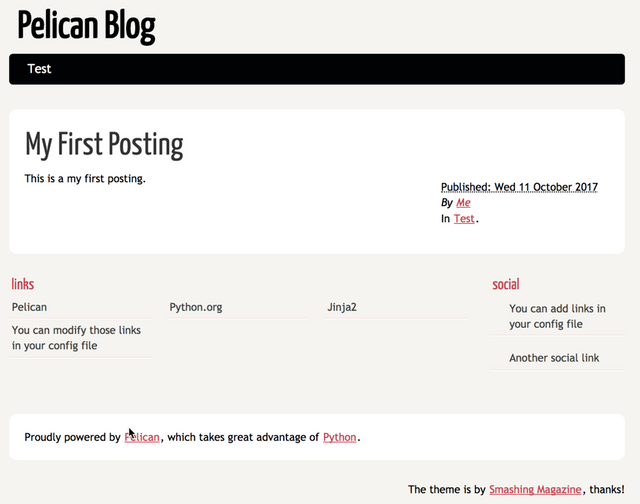
Posting 작성
/content/my-first-posting.md을 다음과 같이 생성한다.
Title: My First Posting
Date: 2017-10-11 00:00
Category: Test

This is a my first posting.
Blog 생성
pelican cli를 이용하여 blog를 생성한다.
$ pelican content
Done: Processed 1 article, 0 drafts, 0 pages and 0 hidden pages in 0.13 seconds.
만들어진 blog는 output 폴더에 생성된다.
$ ls output/
archives.html          authors.html           category/              my-first-posting.html  theme/
author/                categories.html        index.html             tags.html
Blog 확인하기
별도의 웹서버를 설치하지 않아도 pelican은 local 환경에서 Blog를 확인할 수 있다.
$ cd output
$ python -m pelican.server
별다른 메세지가 나오지는 않으면 웹브라우저에서 http://localhost:8000을 접속하여 확인한다.
http://www.pelicanthemes.com/에 가면 많은 테마들이 있다. 원하는 테마를 찾아서 설치할 수 있다.
소스 업로드
pelican-blog root 디렉토리로 이동하여 지금까지 생성한 Blog를 CodeCommit으로 업로드한다.
$ cd pelican-blog
$ git add .
$ git commit -m "Initial Commit"
$ git push origin master
Counting objects: 11, done.
Delta compression using up to 8 threads.
Compressing objects: 100% (9/9), done.
Writing objects: 100% (11/11), 5.24 KiB | 5.24 MiB/s, done.
Total 11 (delta 0), reused 0 (delta 0)
To https://git-codecommit.ap-northeast-1.amazonaws.com/v1/repos/pelican-blog
 * [new branch]      master -> master
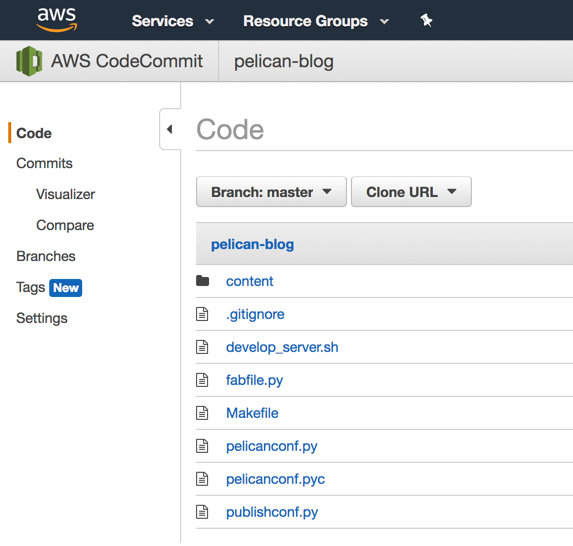
CodeCommit에서 확인
AWS Service > CodeCommit > pelican-blog에서 업로드한 코드들이 정상적으로 업로드 되었는지 확인해본다.
S3
S3에 Blog가 저장될 Bucket을 생성하고 Static Web Hosting이 가능하도록 한다.
Bucket 생성
AWS Service > S3로 이동후에 [Create bucket]을 선택한다. Bucket name은 pelican-blog-[자신의 아이디] 으로 하고 Region은 Tokyo로 한다.

계속 [Next] 버튼을 선택하고 [Create bucket]을 선택해 Bucket을 만든다.
Static web hosting
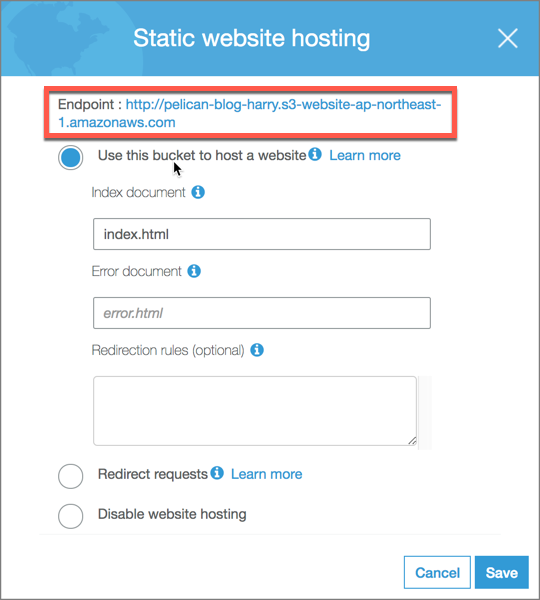
새롭게 만들어진 Bucket을 클릭하여 [Properties] 탭을 선택한다. 카드타입의 항목중에서 [Static website hosting]을 클릭한다.
새로운 참이 보이면 그 안에서 Use this bucket to host a website를 선택하고 Index Document 항목에 index.html을 입력하고 [Save] 버튼을 누른다.

다시 [Static website hosting]을 클릭하면 Endpoint에 주소를 확인할 수가 있다. 잘 기억한다.
Permission
[Permission] 탭을 선택하고 [Bucket Policy]를 누른다. Bucket policy editor에 다음과 같이 입력한다.
{
    "Version": "2012-10-17",
    "Statement": [
        {
            "Effect": "Allow",
            "Principal": "*",
            "Action": "s3:GetObject",
            "Resource": "arn:aws:s3:::pelican-blog-[자신의 아이디]/*"
        }
    ]
}
Test
index.html 파일을 간단하게 만들어 Bucket에 업로드하여 테스트해보자.
index.html
<html>
<body>
    Hello, World!
</body>
</html>
아까 기억했던 S3의 website hosting endpoint에 접속해서 테스트한다. Hello, World! 라고 잘 나온다.
CodeBuild
CodeCommit에 업로드된 코드를 CodeBuild를 이용하여 정적 Blog를 생성해야한다. 생성된 Blog는 S3에 업로드하여 서비스하도록 한다.
Build Project 생성
AWS Service > CodeBuild > Build projects에서 [Create project]를 선택한다.
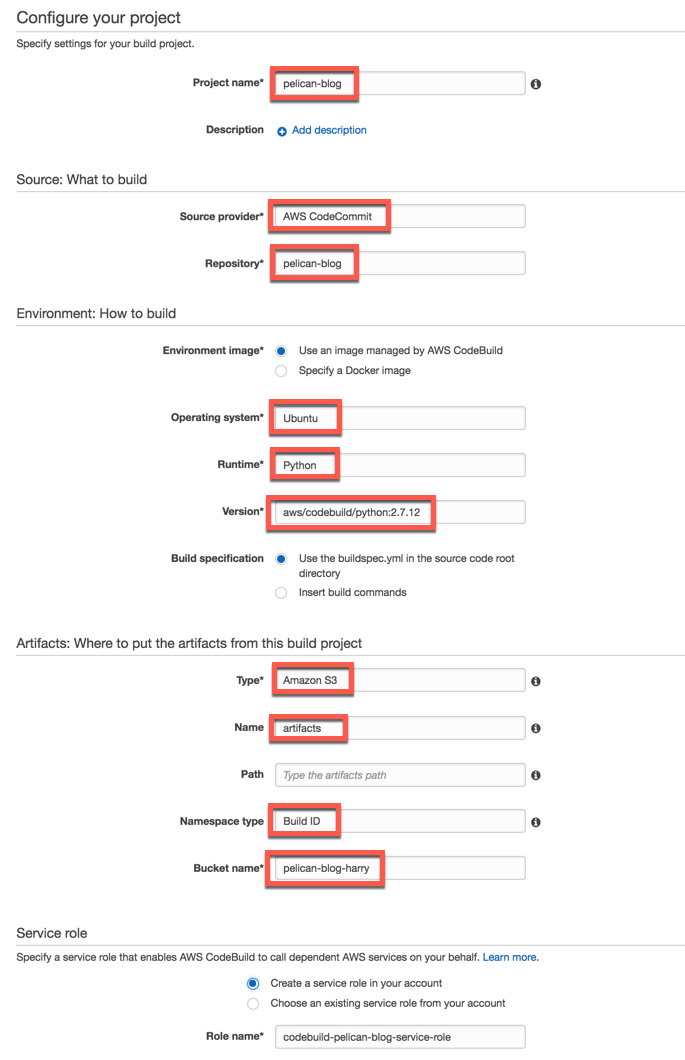
Configure your project
다음과 같이 입력한다.
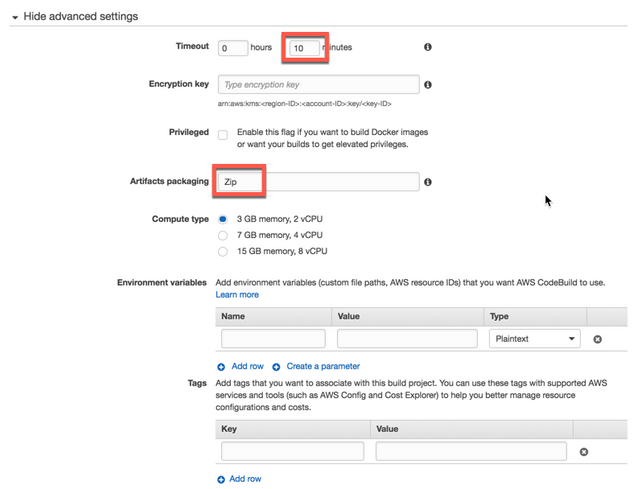
advanced settings
[Show advanced settings]를 눌러서 다음과 같이 설정한다.
[Continue]를 눌러 Review 페이지를 검토하고 [Save] 를 선태한다.
buildspec.yml 작성
CodeBuild에서 Build할 수 있도록 buildspec.yml을 작성한다. 레파지토리의 Root 디렉토리에 저장한다.
pelican-blog/buildspec.yml
version: 0.1

phases:
  install:
    commands:
      - pip install --upgrade pip
      - pip install pelican markdown
  build:
    commands:
      - echo Build started on `date`
      - pelican content
  post_build:
    commands:
      - aws s3 sync --delete output s3://pelican-blog-[자신의 아이디]

artifacts:
  files:
    - output/**/*
  discard-paths: no
작성후에는 레파지토리에 추가해서 업로드한다.
$ cd pelican-bolg

$ git add buildspec.yml
(megazone) Harry-MacPro:pelican-blog harry(master)$ git commit -m "Add buildspec.yml"
[master 0725b3b] Add buildspec.yml
 1 file changed, 19 insertions(+)
 create mode 100644 buildspec.yml

$ git push origin master
Counting objects: 3, done.
Delta compression using up to 8 threads.
Compressing objects: 100% (3/3), done.
Writing objects: 100% (3/3), 466 bytes | 466.00 KiB/s, done.
Total 3 (delta 1), reused 0 (delta 0)
Role Permission
CodeBuild에서 S3로 sync하기 위해서는 해당 레파지토리의 쓰기 권한이 있어야한다. CodeBuild project를 생성할때 자동으로 생성했던 Role에 Bucket과 Sync 할 수 있도록 권한을 부여한다.
AWS Service > IAM > Role 에서 codebuild-pelican-blog-service-role을 선택한다.!
[Permission] 탭에서 CodeBuildPolicy-pelican-blog-xxxx Policy를 선택하고 [Edit Policy]를 클릭하면 수정이 가능하다.
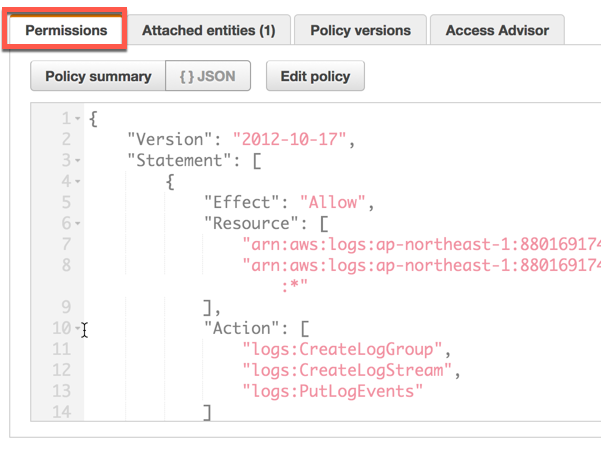
이미 저장되어있는 설정에서 arn:aws:s3:::pelican-blog-[아이디]/* 항목이 있다. 아래와 같이 수정한다.
{
            "Effect": "Allow",
            "Resource": [
                "arn:aws:s3:::pelican-blog-[아이디]",
                "arn:aws:s3:::pelican-blog-[아이디]/*"
            ],
            "Action": [
                "s3:Put*",
                "s3:List*",
                "s3:DeleteObject"
            ]
        }
수정후에 [Save] 버튼을 누른다.
Test
AWS Service > CodeBuild에서 생성한 pelican-blog 프로젝트를 선택한다. [Start build]를 클릭하고 Branch 항목에 master를 입력하고 [Start build]를 누른다.
aws_codebuild_start_build_pelican.png
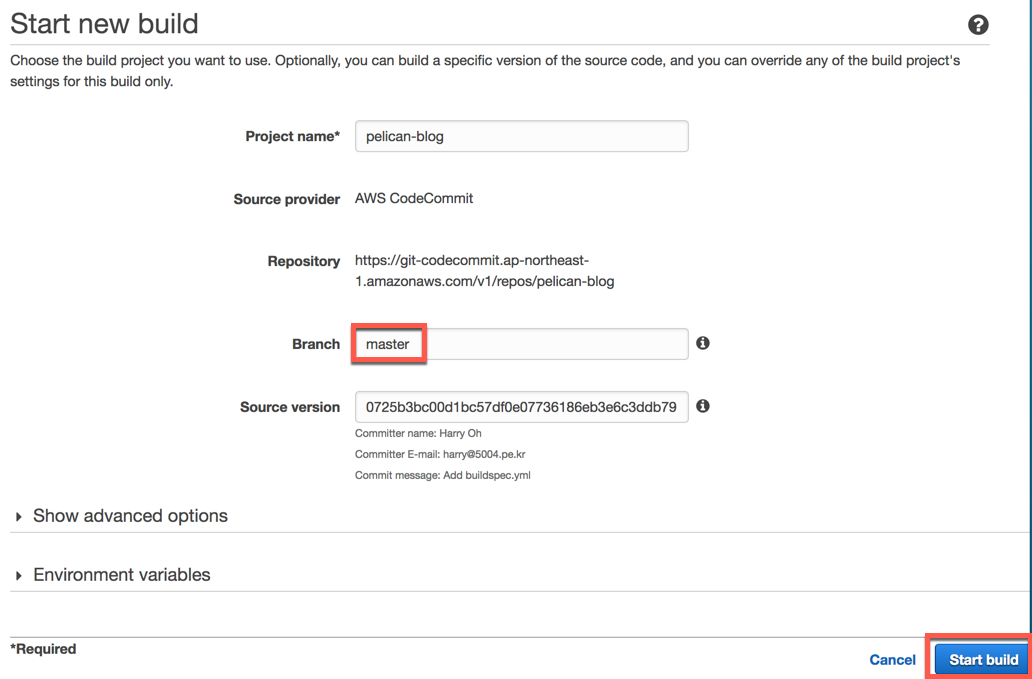
성공적으로 Build가 되었는지 확인 할 수가 있다.
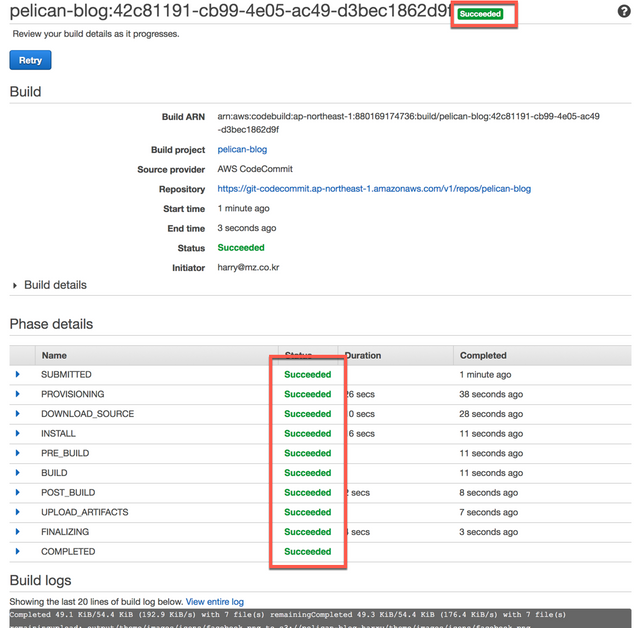
모두 성공했으면 웹브라우저에서 S3의 Static website hosting 주소로 접속한다.
CodePipeline
이제 CodePipeline을 이용하여 CodeCommit에 새로운 커밋이 생성되면 CodeBuild를 통해서 빌드 및 배포가 자동으로 될 수 있도록 한다.
AWS Service > CodePipeline에서 [Create pipeline]를 클릭하고 다음과 같이 입력한다.
Step 1: Name
- Pipeline name: pelican-blog
Step 2: Source
- Source provider: AWS CodeCommit
- Repository name: pelican-blog
- Branch name: **
Step 3: Build
- Build provider: AWS CodeBuild
- Configure your project: Select an existing build project
- Project name: pelican-blog
Step 4: Deploy
- Deployment provider: No Deployment
Step 5: Service Role
- Role name: AWS-CodePipeline-Service
Step 6: Review 에서 확인 후
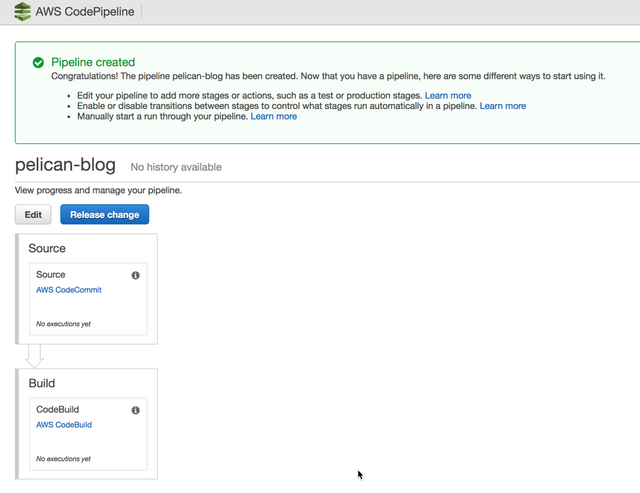
[Create pipeline]를 클릭한다.
생성이 완료되면 다이어그램이 보인다.
최종 테스트
새로운 Posting을 추가하여 CodeCommit으로 업로드를 하여 자동으로 Blog가 만들어 지는지 확인한다.
새로운 Posting 작성
content/my-second-posting.md을 작성한다.
Title: My Second Posting
Date: 2017-10-12 00:00
Category: Test2
작성후에 CodeCommit에 업로드한다.
$ git add .

$ git commit -m "Add second posting"
[master 4127238] Add second posting
 1 file changed, 3 insertions(+)
 create mode 100644 content/my-second-posting.md

$ git push origin master
Counting objects: 4, done.
Delta compression using up to 8 threads.
Compressing objects: 100% (4/4), done.
Writing objects: 100% (4/4), 411 bytes | 411.00 KiB/s, done.
Total 4 (delta 1), reused 0 (delta 0)
To https://git-codecommit.ap-northeast-1.amazonaws.com/v1/repos/pelican-blog
   0725b3b..4127238  master -> master
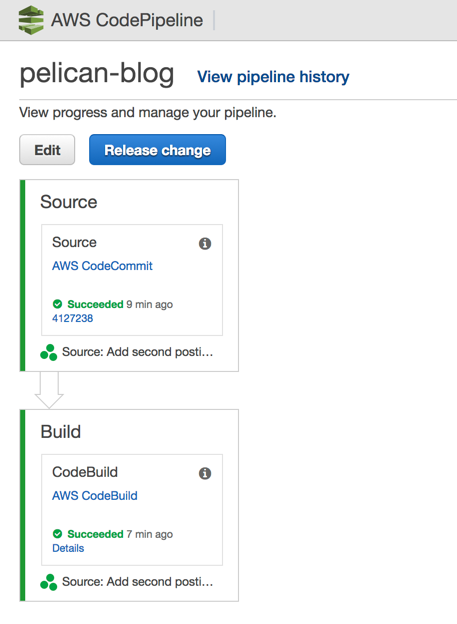
CodePipeline 확인
AWS Service > CodePipeline에서 pelican-blog를 선택하면 다이어그램이 보인다. 정상적으로 모두 완료되었는지 확인한다.
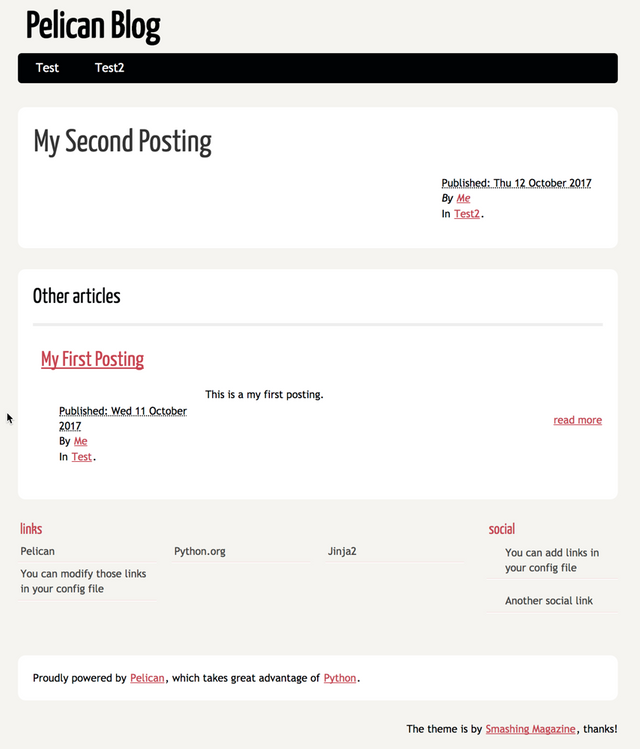
웹 브라우저에서 확인
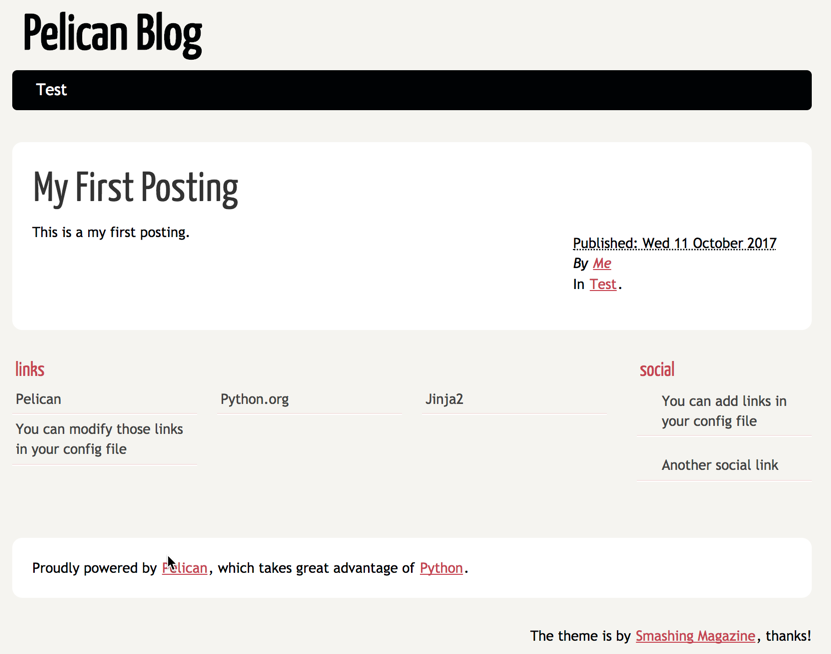
S3 Static website hosting 주소를 웹 브라우저에서 열어서 확인한다. 새로 추가한 My Second Posting가 추가되었는지 확인한다.
Congratulations @ohk5004! You have completed some achievement on Steemit and have been rewarded with new badge(s) :
Click on any badge to view your own Board of Honor on SteemitBoard.
To support your work, I also upvoted your post!
For more information about SteemitBoard, click here
If you no longer want to receive notifications, reply to this comment with the word
STOP