How to draw a small and a cute little rabbit?
Hola!!!!!😏😏
Hola mis amigos Steemers, el dia de hoy les enseñare como dibujar un bonito conejo con una gorra y sosteniendo una flor (estilo tradicional). A continuación les pondré que material utilice para la realización del diseño.
Hello my friends Steemers, today I will show you how to draw a nice rabbit with a cap and holding a flower (traditional style).
Next, I will put you the material I used to make the design.
MATERIALES
- 1 LAPIZ DE GRAFITO #2
- 1 MARCADOR SHARPIE COLOR NEGRO
- 1 BORRADOR DE MIGAJON
- COLORES (YO USE “PRISMACOLOR”)
- HOJA BLANCA DE 130 GR
IMPLEMENTS
- GRAPHITE PENCIL #2
- 1 SHARPIE BLACK MARKER
- 1 DRAFT
- COLORS (I USED "PRISMACOLOR")
- WHITE LEAF 130 GR.

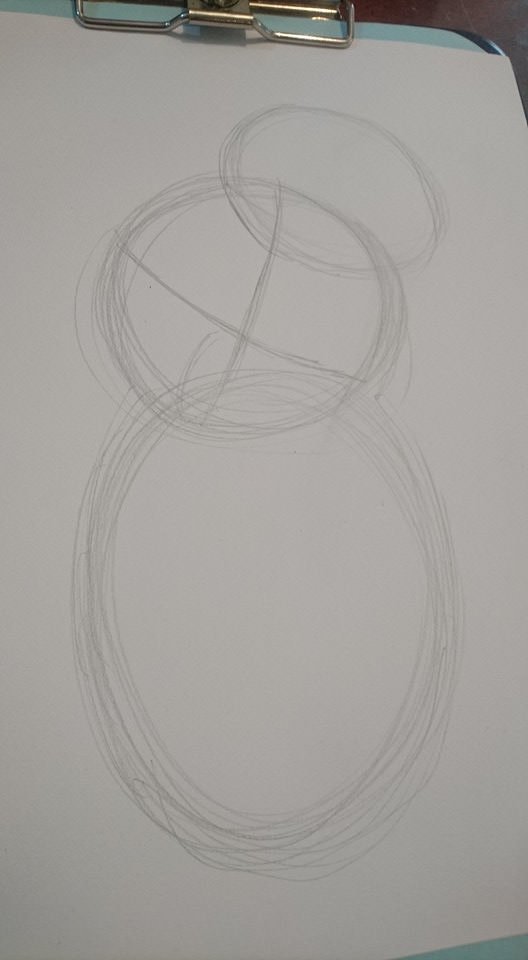
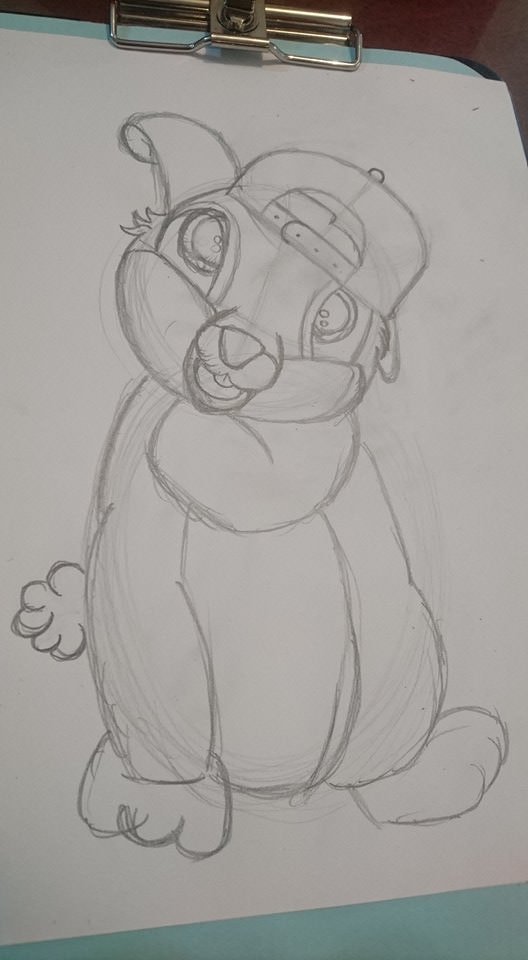
Empezaremos realizando nuestros círculos (óvalos) guía, serán 3, uno superior para la gorra, uno central para la cabeza y uno inferior (el mas grande) para el cuerpo. Marcaremos nuestras líneas guías en la cara, para empezar a estructurar la cara del conejo
We will begin by making our circles (ovals) guide, will be 3, an upper one for the cap, a central one for the head and a lower one (the largest) for the body.
We'll mark our guidelines on the face, to start structuring the rabbit's face.
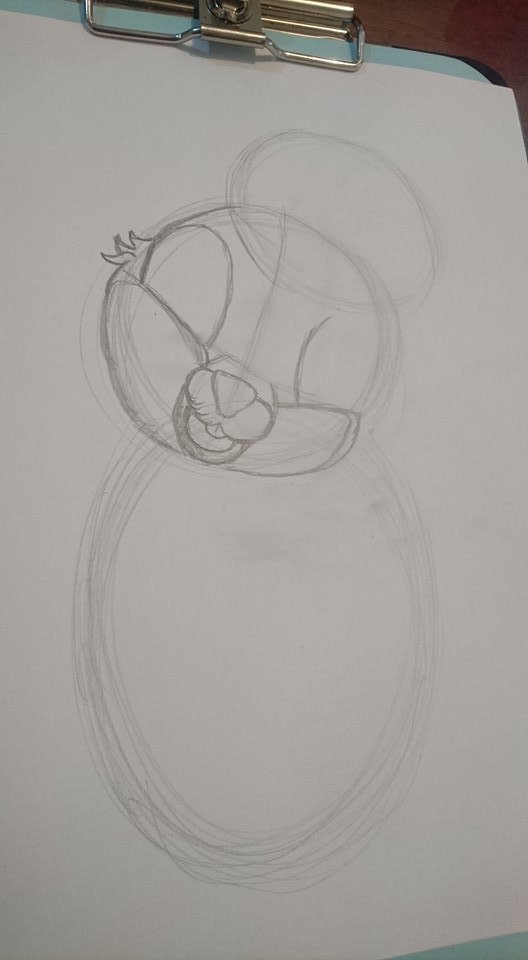
empezaremos a formar parte de la cara del conejo, usando las líneas guía. Por debajo del cruce de estas líneas justo por el centro quedaran la boca y las mejillas (deben ser muy regordetas). También se debe ir colocando parte de los pelitos que iran a los lados de las mejillas, se formara la boca y sus pequeños dientes. Por arriba se dibujaran los ojos, deberán ser grandes y sin pasar la línea del circulo superior (La gorra cubrirá parte del ojo izquierdo).
we'll start to become part of the rabbit's face, using the guide lines. Below the crossing of these lines, just in the middle, the mouth and cheeks will be left (they must be very chubby). You should also put some of the hair on the sides of the cheeks, it will form the mouth and small teeth. The eyes will be drawn on the top, they should be large and should not pass the line of the upper circle (the cap will cover part of the left eye).
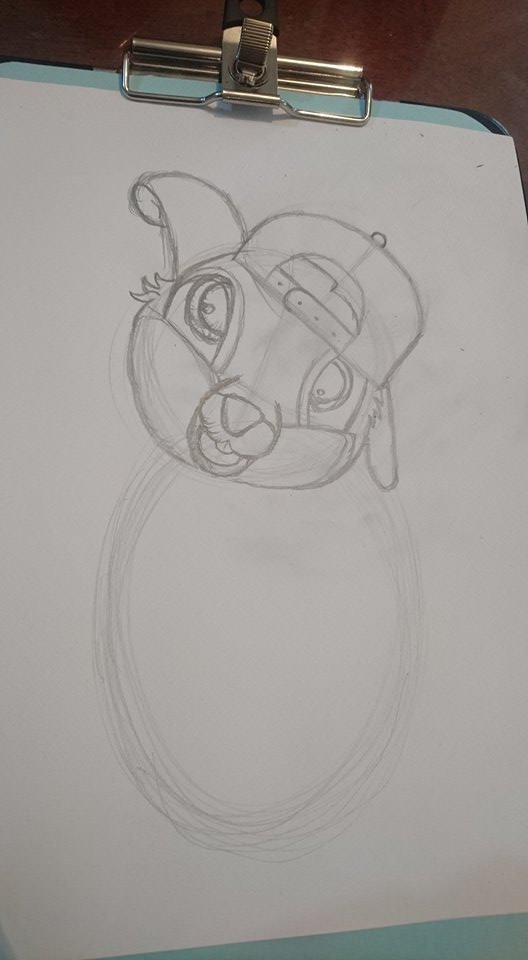
Seguiremos con el diseño de la gorra, el conejo la portara como un chico adolescente (hacia atrás). Se usará como guía el circulo de arriba, parte de la línea externa será la curva superior de la gorra y la línea interna será la que se recargará en parte de la frente y ojo izquierdo del conejo. Las cintas de ajuste solamente llevaran 4 punto, ya que, si le ponemos más la gorra se empezará a ver un poco asimétrica. También se le colocará un circulo pequeño hasta arriba de la gorra y en la parte interna se dejará un espacio libre, ya que después se formará el dobles de la oreja izquierda.
We will continue with the design of the cap, the rabbit will carry it like a teenage boy (backwards). The top circle will be used as a guide, part of the outer line will be the top curve of the cap and the inner line will be the one that will recharge part of the rabbit's forehead and left eye. The adjustment straps will only take 4 points, because if we put more on the cap will begin to look a little asymmetrical. A small circle will also be placed at the top of the cap and a free space will be left on the inside, as the left ear will then be formed.

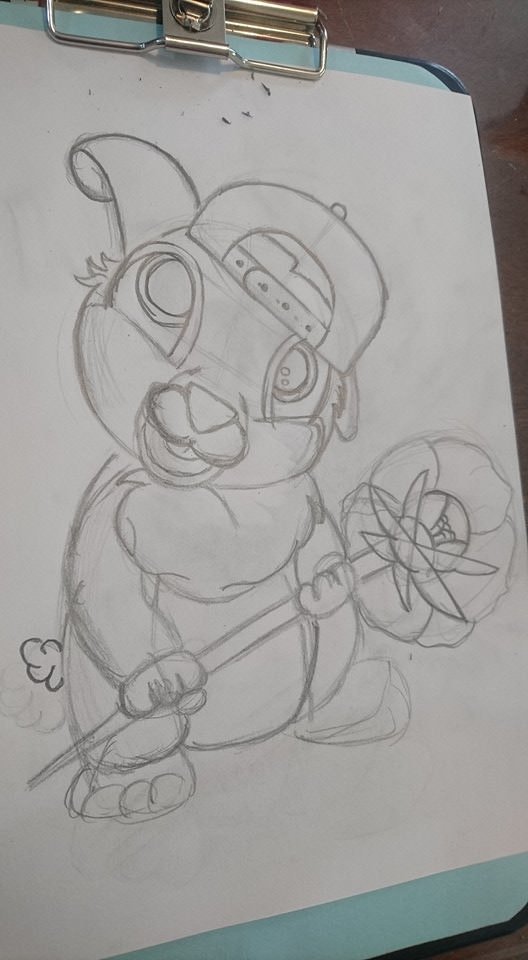
Despues, dibujaremos las dos orejas y delinearemos los ojos, para la oreja derecha se deberá hacer un dobles para dar efecto inclinado y la oreja izquierda deberá dibujarse de menor tamaño y por dentro de la gorra se marcara un pequeño dobles (con una línea) para que logre simular el movimiento de la oreja por la gorra. En los ojos se delimitaran dos líneas extra, para poder marcar el color del iris y del cristalino. Y se le marcara un pequeño destello de brillo con un pequeño circulo dentro del cristalino.
Afterwards, we will draw the two ears and outline the eyes, for the right ear we will have to make a double to give an inclined effect and the left ear will have to be drawn of smaller size and inside the cap a small double will be marked (with a line) so that it can simulate the movement of the ear by the cap.
In the eyes two extra lines will be delimited, in order to mark the color of the iris and the crystalline lens. And it will be marked with a small sparkle of brightness with a small circle inside the crystalline lens.
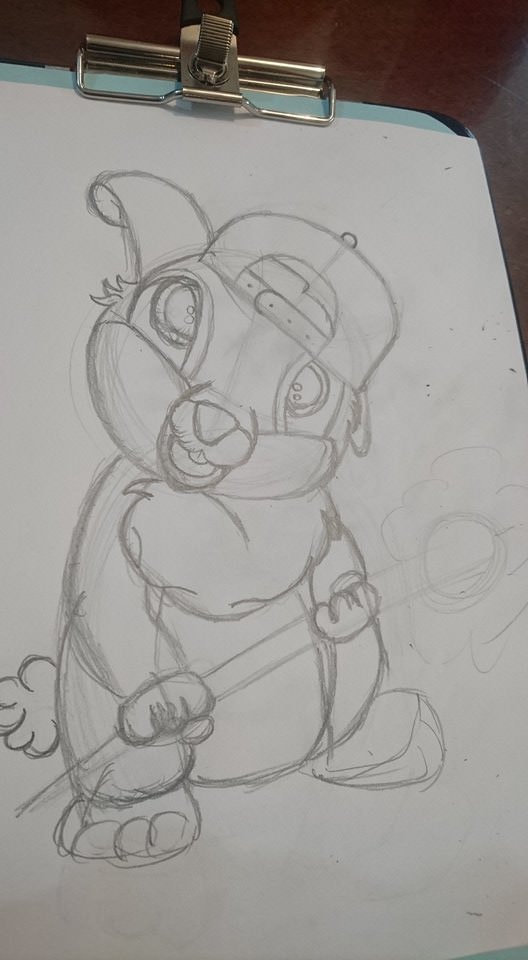
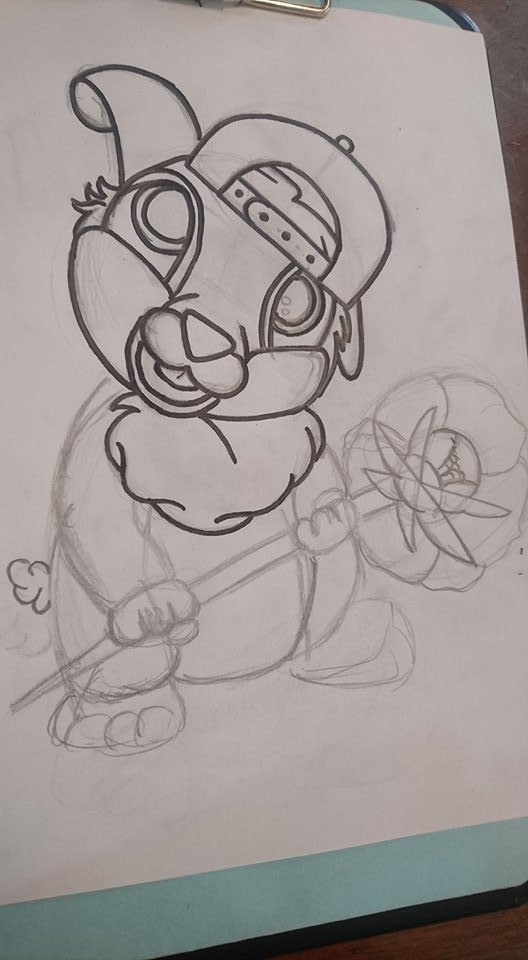
Al terminar toda la región de la cabeza, empezaremos a buscar la simetría con el cuerpo, al inicio, se deberá usar todo el circulo inferior para calcular el tamaño del conejo como en la imagen.
At the end of the whole head region, we will begin to look for symmetry with the body, at the beginning, the whole lower circle should be used to calculate the size of the rabbit as in the image.
No se preocupen si queda un poco desproporcional, es por eso que los trazos se inician con el lápiz de grafito. Ya que hayan encontrado el tamaño ideal para su conejo deberán dibujar las patas delanteras y trasera, en mi caso busque un tamaño grande para las traseras y unas pequeñas y delgadas para las delanteras. La cola, esa definitivamente será a su gusto y con el numero de curvas que deseen :3 En su pecho deberán colocar una gran bola de pelo esponjoso de tal manera que parezca una gran bufanda alrededor de su cuello. 😊 y desde este momento empiecen a dibujar el tallo de su flor 😊
Don't worry if it's a little out of proportion, that's why the strokes start with the graphite pencil. Once you have found the ideal size for your rabbit you should draw the front and rear legs, in my case look for a big size for the rear legs and a small, thin one for the front ones. The tail, that will definitely be to your liking and with the number of curves you want :3
A large ball of fluffy hair should be placed on your chest so that it looks like a large scarf around your neck. 😊 and from this moment on start drawing the stem of your flower 😊
Teniendo listas las proporciones del conejito, empezaremos a diseñar la flor, unida al tallo. Generalmente, para dibujar una flor tradicional, se deberá iniciar con un circulo grande y en el centro uno pequeño, en el grande se realizaran los trazos para los petalos y en el circulo del centro se harán los trazos para el “polen”. Un punto muy importante, se deberán colocar entre 5 a 6 petalos para formar una flor, si se colocan menos de 5 en lugar de ser una flor, seria un trébol xD
Having the proportions of the bunny ready, we will begin to design the flower, attached to the stem. Generally, to draw a traditional flower, start with a large circle and in the middle a small circle, in the big one the strokes for the petals will be made and in the middle circle the strokes for the "pollen" will be made.
A very important point, should be placed between 5 to 6 petals to form a flower, if less than 5 are placed instead of being a flower, would be a clover xD
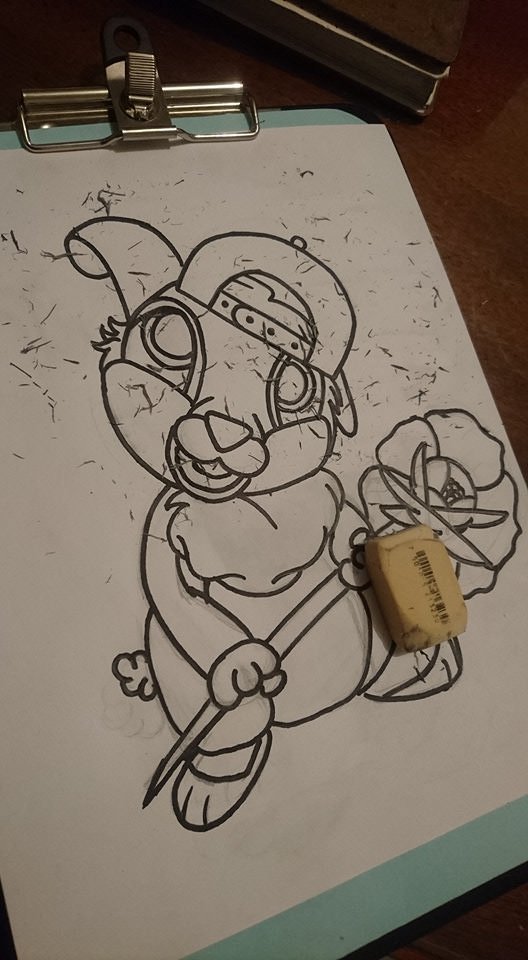
Ya que hayamos terminado el boceto en lápiz de grafito, empezaremos a remarcar cada línea con el marcador negro. Sigan las líneas cuidadosamente e intenten hacer los trazos en un solo movimiento, ya que si los remarcan las líneas se harán muy gruesas en algunas partes y se distorsionara nuestro diseño.
Once we have finished the sketch in graphite pencil, we will begin to highlight each line with the black marker. Follow the lines carefully and try to make the strokes in a single movement, because if you highlight them the lines will become very thick in some parts and will distort our design.
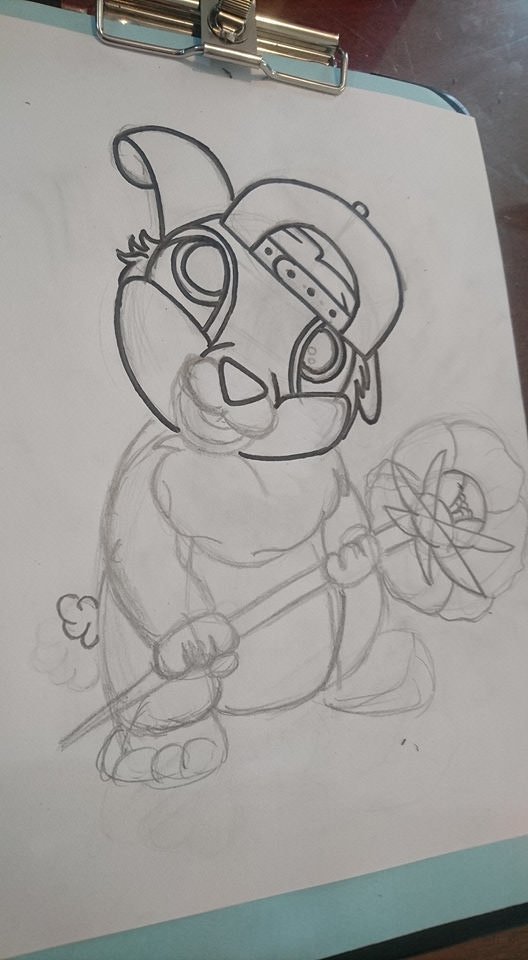
Hagan los trazos con mucha paciencia y si tienen algún trazo desalineado (el que se hizo con lapiz) pueden arreglarlo antes de colocar el marcador negro.
Make the strokes with a lot of patience and if you have any misaligned strokes (the one made with pencil) you can fix them before placing the black marker.
Terminando de realizar el trazado con el marcador negro, se deberán borrar todas las líneas restantes hechas con el lápiz de grafito.
When you have finished plotting with the black marker, all the remaining lines made with the graphite pencil should be deleted.
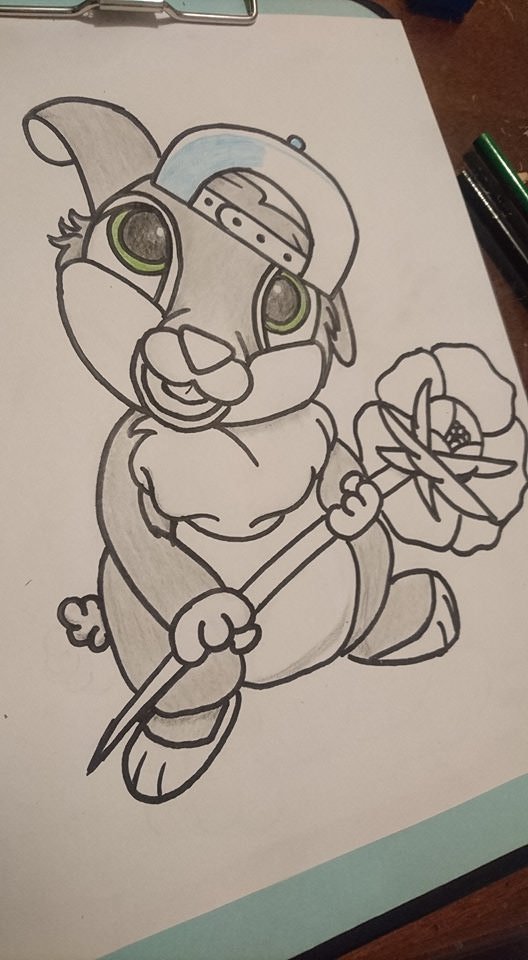
Se deberán colocar pequeños sombreados con el color negro, para intentar darle un poco de profundidad al diseño.
Small shades should be placed with the color black, to try to give a little depth to the design.

Empezaremos a colorear al conejo, el cuerpo será de color gris y su gorra color azul.
We will begin to color the rabbit, the body will be gray and the cap will be blue.
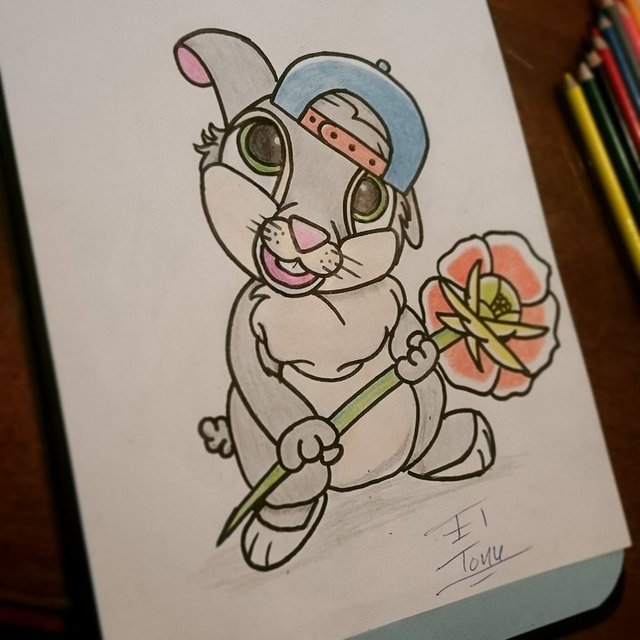
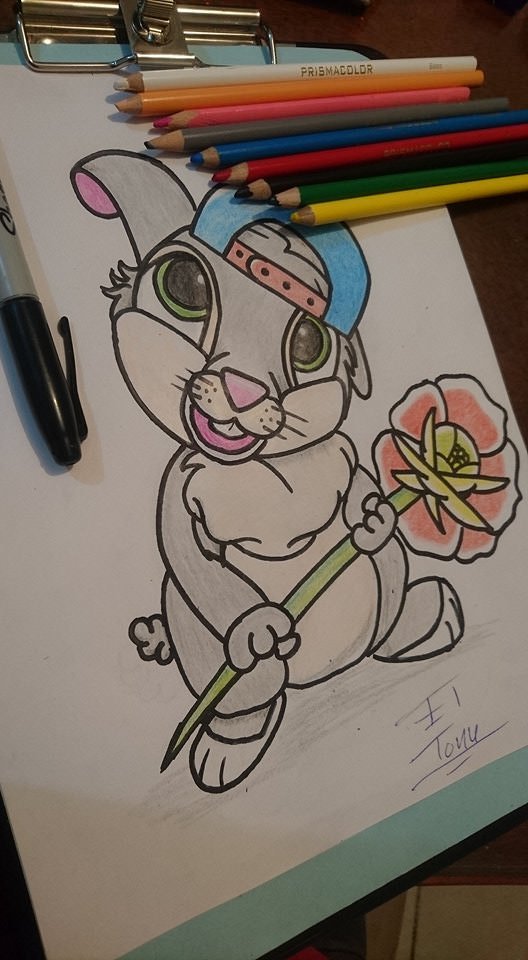
Ya para terminar, se deberá pintar su boca, iris, detalles de la gorra y la flor, esas zonas yo las puedo dejar a su criterio (píntenlo como ustedes deseen). Y si es posible agréguenle algún tipo de fondo para que el diseño no se vea muy plano. Así es como queda el conejito Hardcore :3 Espero que les haya gustado y espero que ustedes también lo dibujen y me lo enseñen. Con mucho gusto lo estaré votando :3
To finish, you will have to paint your mouth, iris, details of the cap and flower, those areas I can leave to your discretion (paint it as you wish). And if possible add some kind of background so that the design does not look too flat.
Here's how the Hardcore Bunny looks :3
I hope you liked it and I hope you will also draw it and show it to me. I'd be happy to vote on it :3


TAMBIÉN ACEPTO TODO TIPO DE DONACIÓN POR SI ES QUE ALGUIEN DESEA HACERLO. SALUDOS DESDE MÉXICO
Está chingón ese conejo se ve bien en la cuarta foto, parece un bebé hecho taquito en si cobija jajaja
Muchas gracias vato !!!!
y si, no me habia dado cuenta que esta en forma de taco jajajajaja
Congratulations @tonymon! You have completed some achievement on Steemit and have been rewarded with new badge(s) :
Click on any badge to view your own Board of Honor on SteemitBoard.
For more information about SteemitBoard, click here
If you no longer want to receive notifications, reply to this comment with the word
STOPDo not miss the last announcement from @steemitboard!
It doesn't matter how slowly you go as long as you do not stop.
Thanks buddy, i will keep in my mind 🤘🏽😎
Greetings from México
Buenos días, un muy bonito dibujo, espero que continúes dibujando un saludo desde Venezuela
Muchisimas gracias, y si, seguire dibujando, como yo soy tatuador. Es casi obligatorio el estar dibujando del diario jajajaja
Muchas gracias por el comentario 🙈🙈
Saludos desde México.
que fino que seas tatuador, y si es obligatorio, gracias por tomar en cuenta el comentario y por los saludos
Excelente explicación! ¡el tatuaje es la mejor manera de expresar quiénes somos!
Exacto!!!!!!
Es por eso que sigo muy detalladamente al tatuaje (soy tatuador) y todo tipo de ilustración.
Seguire publicando tutoriales de pequeños dibujos y tambien de tatuajes, por si desea regresar a verlo a mi blog 🙈🙈🙈
Saludos desde México 🤘🏽😎
Congratulations @tonymon! You have completed the following achievement on Steemit and have been rewarded with new badge(s) :
Click on the badge to view your Board of Honor.
If you no longer want to receive notifications, reply to this comment with the word
STOPDo not miss the last post from @steemitboard:
SteemitBoard and the Veterans on Steemit - The First Community Badge.