Tutorial learn to draw Neymar JR "Star football"
Happy Sunday..
Painting is one form of art that can be perceived beauty by art lovers. Painting is important with the name of the picture. Lots of techniques done to get a beautiful art work and worth selling of course. Since ancient art painting is not foreign anymore, but what distinguishes it is media san technique used.
In ancient times, paintings that can be enjoyed usually paintings of charcoal, lime, or materials that are easy to meet. Painting is basically the art of development in drawing. Painting is the activity of processing a two-dimensional medium to get a certain impression that is certainly implied in the artwork.For the painters, this type of artwork is not just a collection of colors incorporated without any meaning, but there is a message implied in the brush strokes.
Speaking of face painting, the first thing you should know is to create a helpful line, with the aim of simplifying the painting process. Here are some methods used when painting faces and you can directly practice:
- The first method is to paint a woman's face using an oval base image
Basically the shape of the face is not completely round, so from try to sketch with oval base image, but at the bottom is made a little pointed than the top. Then give the oval shape maps that have been made into 4 parts by using the help line.
To place the position of the nose and mouth then make a line 2 auxiliary lines at the beginning, adjust to the shape of the face you will paint. In the horizontal line section of the first mapping make 2 pieces of circles as a place to draw the eye later.
In the upper half circle use for the place of drawing eyebrows, while at the bottom use as cheekbones. If the fear of the eye size is different, then add auxiliary images so that the left and right eye sizes are the same.
When the size of the eye that you draw is perfectly perfected continue by drawing the eyeball. Make one more circle to draw the eyelid. And to reinforce the boundary between the nose and eye socket, add a little black shadow, it also makes the image look more real.
The next step is to make ears. Before drawing further first make sure the bottom of the ear parallel to the bottom of the nose, while for the top of the ears align with the eyebrows. It is also necessary to make sure the ear drawing is made stick with the face base.
For hair, make sure to which position is parallel to the nose and directed to the outside of course. Then for the neck, make from the meeting point between the bottom horizontal line with the bottom on the face.
After all the steps were completed the final step is to reinforce the shape of the image by giving a little shadow around the lips, nose and eyes. The firmer the shadow the image will look older.
- The second method, namely by painting a male face using a rounded image
First we create a circle first, after that make the vertical line beyond the circle image to bottom, this line aims to assert that the image to be made facing forward
Make a line to determine the shape of cheeks, chin and jaw. Next make a sketch to determine the length, width and determine where the eyes, nose, ears, and mouth.When finished, then sketch the hair detail and neckline. Then create a fine line around the face area by using a pointy tip on the pencil, with the aim of reinforcing the image, determining the highlights of the image to make it look more alive.
The last stage is to re-clarify the important parts, such as eyes, eyebrows, nose, ears, and mouth using a slightly thick pencil tip. After getting to this stage then the auxiliary lines are removed.
- The third method uses the shape of the face in accordance with the wishes
Make a basic image as you wish, round, oval, square or something.
The next step, using the steps on the first and second method earlier. By creating auxiliary lines to determine the location of the nose, eyes, mouth and ears.
Next line of stone to determine the size of eyes, nose, mouth, and ears to be made.
Sketch the shape of the eyes, nose, and mouth. Next to the stage add hair details. To model your hair isa custom tailored.
Use a pointed tip pencil to add fine detail around the eyes, mouth, nose, and ears.
Next add the shape of the eyebrows by using the tip of a rather large pencil. After all the steps have finished remove the auxiliary line created earlier.
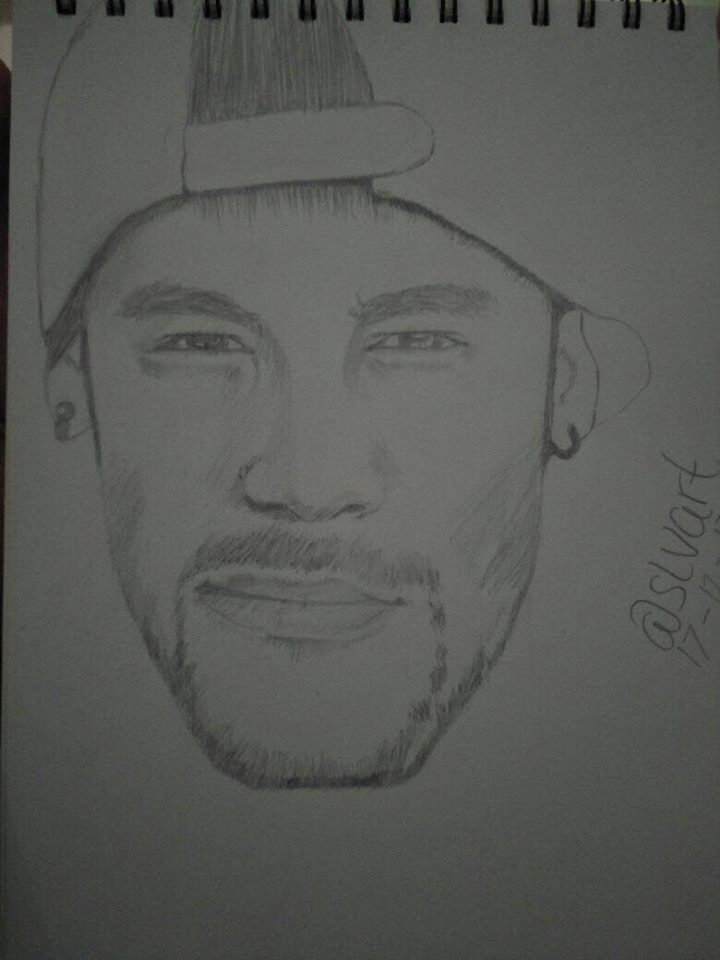
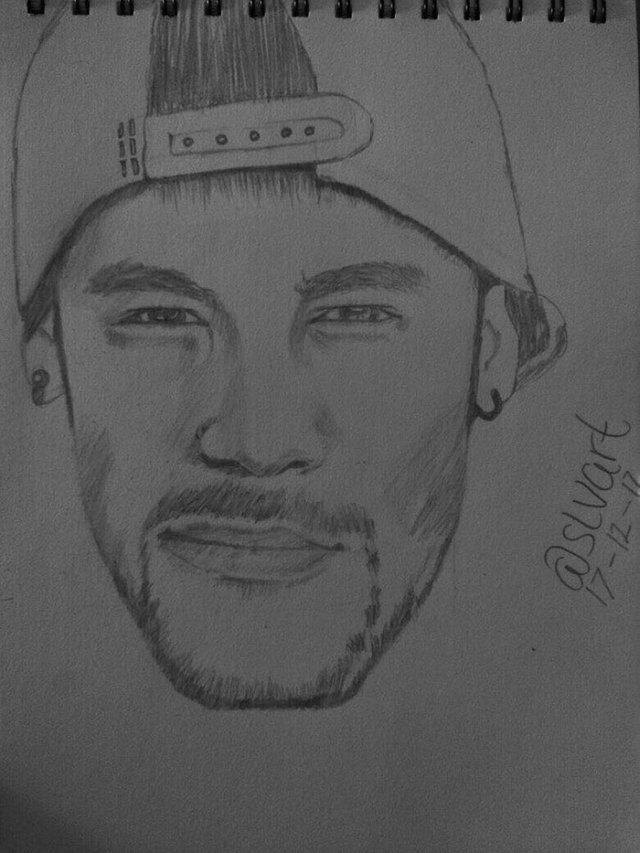
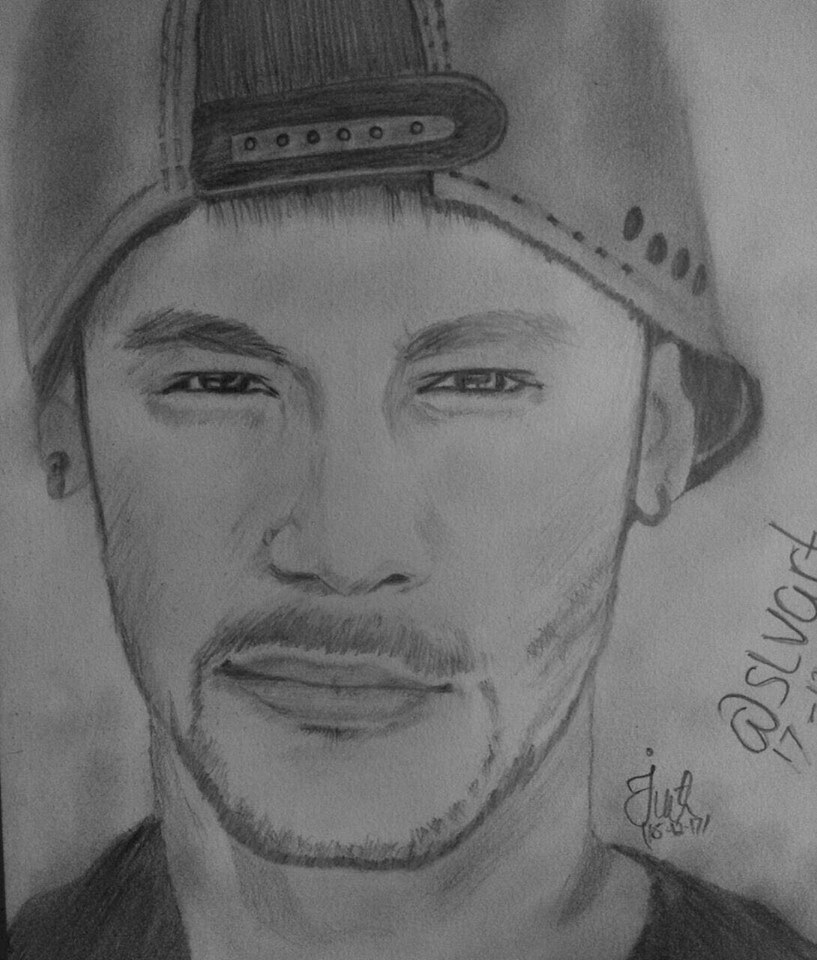
An artist has very often shown the results of his work when drawing sketches of human faces with detail. For Ease I'll give you 8 simple steps to create a face image using Sketches using a Pencil. For the occasion this time I will draw one of the star football field that is "Neymar JR" What are the steps? Here's a simple tutorial.
Note: Remember to always use HB pencil to make it easier to delete. In this tutorial itself, the pencil used is a 4B pencil to make the image brighter and easier to see. The thing to note is that the darker the color of the pencil is used, the more difficult it is to remove the lines or lines you use.
Tools and materials :
- Pencil HB
- Ruler
- Rough pencil eraser
- A fine pencil eraser
How to Draw a realistic face "Neymar JR" :
Step 1: The face is not completely round. Therefore, make the initial sketch with an oval shape, only the bottom you make smaller than the top. To simplify this step use the dividing line to map the parts of the face. The first thing you do is to line the center of the oval circle you've created. For the third stage make 2 lines below it as a line to determine the part of the nose and mouth. When finished drawing the nose and mouth, give the circle on the top right and top left to make his eyes.
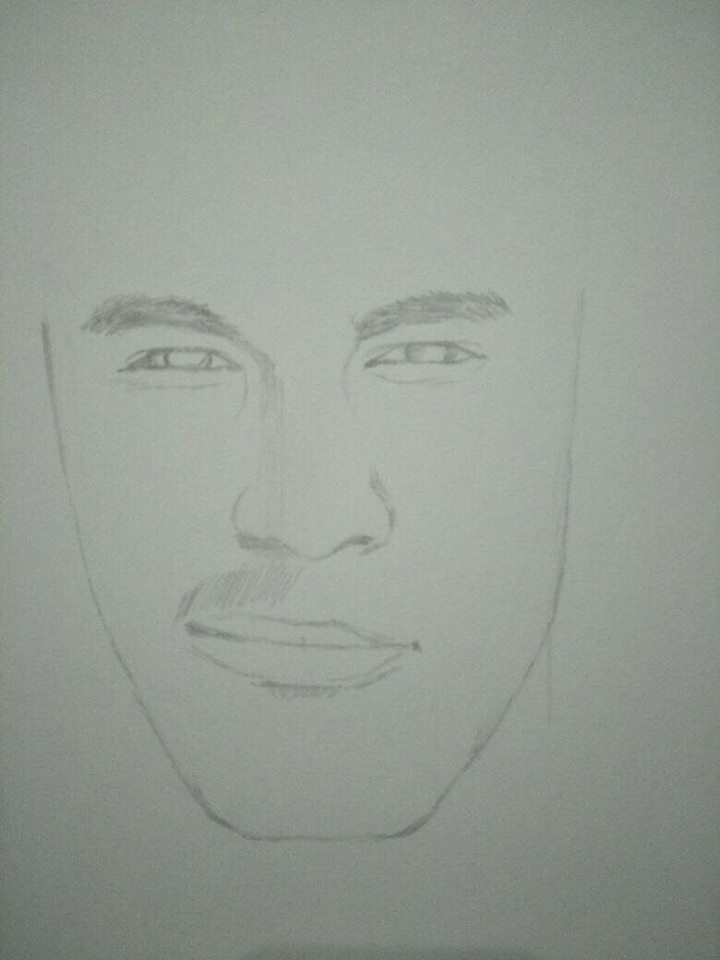
Step 2 : After the top is given two circles, draw an eyebrow on the eyelid above the eye circle. Make sure that the size of your eyes is as large, or you can use auxiliary images. If you feel the size of both eyes is equal, it is time to make the eyeball. After the eyeball is created, it's time to add one circle of the circle again. This circle is used as an eyelid. Make sure there is a line between the nose and eye socket, then add a black shadow to make the image look more alive.
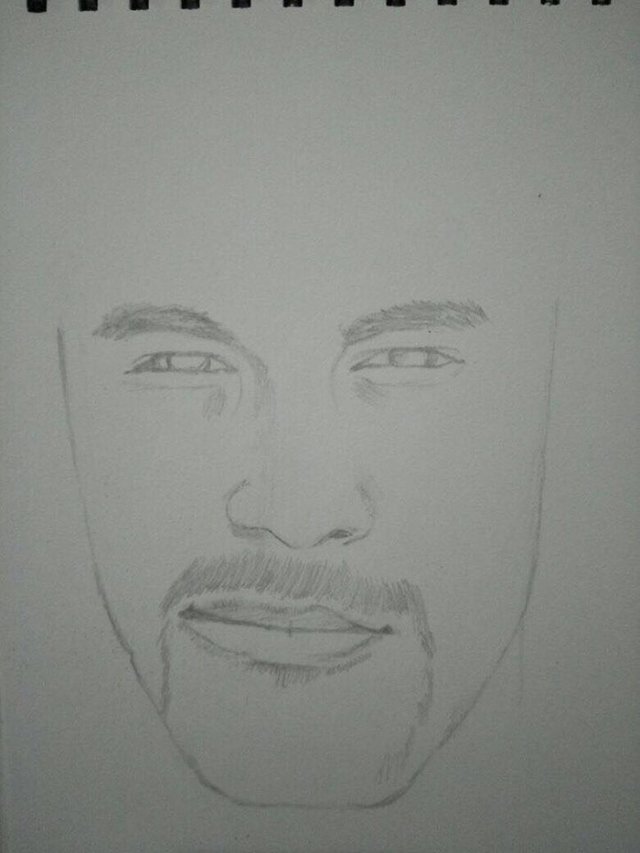
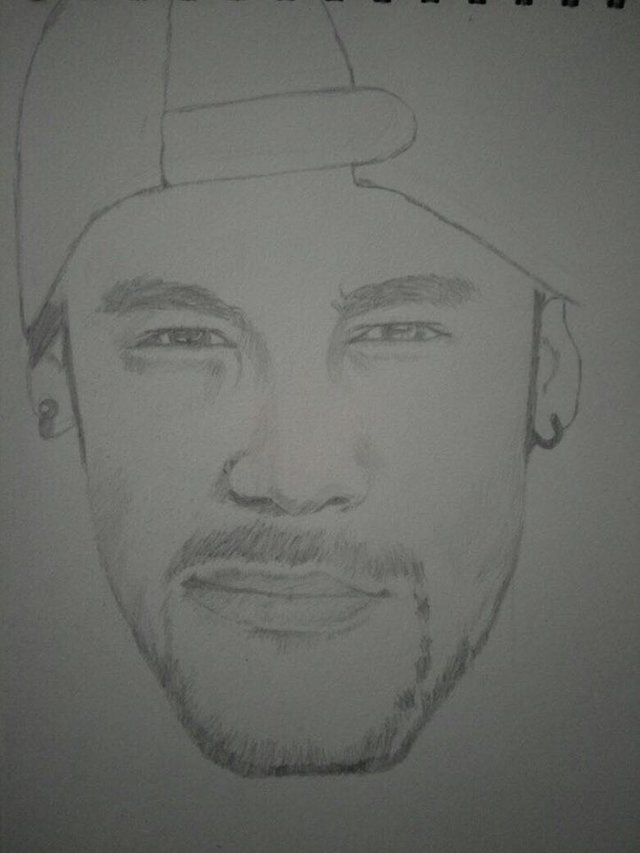
Step 3 : Then, we make the earlobe. Make sure also that the ears are parallel to the nose. The image is already alive, then we add the hat at the top upside down to the back. With a little hair out of the sidelines hat.
Step 4 : Create a curved object on the part to be bearded with a pencil, Give color to each object in gray.
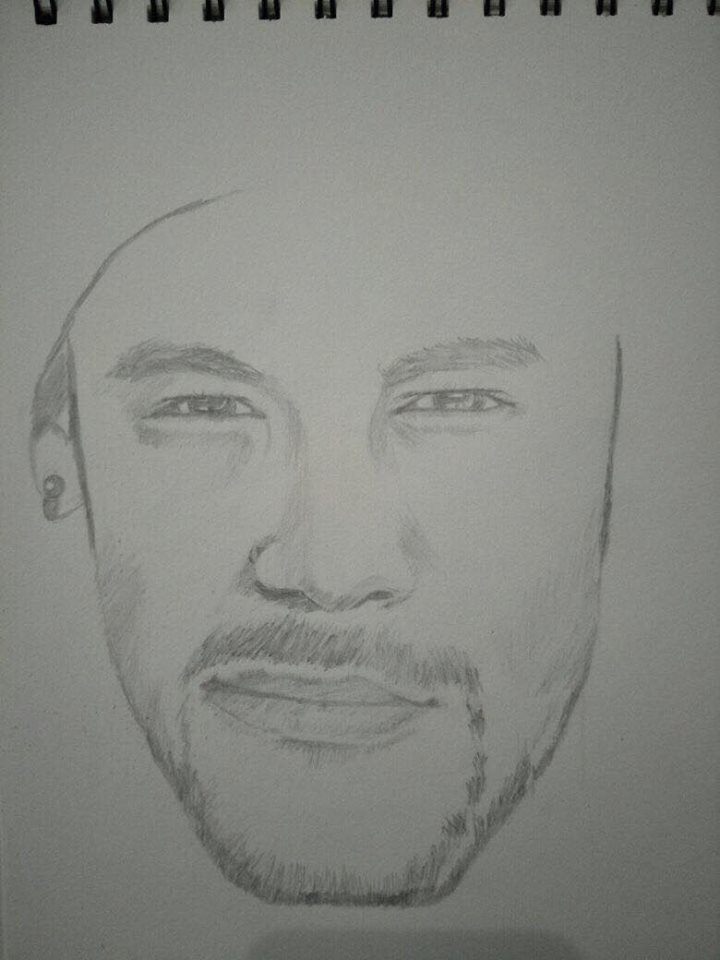
Step 5 : When to make the neck, do not make the neck too small, because it will make the top look ugly later. To make a perfect neck, you must equate the meeting point on the cheek. Well, the picture already looks like more life. Then it's time to reinforce the shape of the image. But previously give a shadow on the lips, nose and eyes.
Step 6 : For the clothes you can also add the clothes you want. If all is done, remove the help line we have created earlier in the picture so that the image does not look like it is still being updated. For the coloring section, you can use the color that you want to taste.
Step 7 : Finish.
In this technique of drawing human face tutorial I suggest also to try to draw again so that your skills more honed. I also recommend that you use a reference to sense or sense of the face shape is also more mature. Thus later you can just draw a face without reference but the results remain good and look realistic.
I hope this technical tutorial drawing human face this time can be useful for you who are learning to draw. For that please also visit facial pictures to see some tutorials drawing faces that I have created or follow other tutorials that I offer in this account.