study painting - step by step
🌸hi everybody🌸
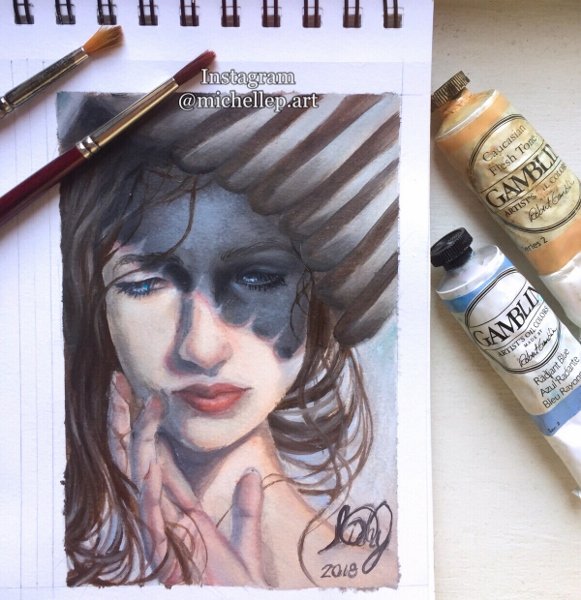.jpg)
(Hay una version en español de este post)
♡ today i'll be showing you a painting i did these days ♡
it always happens to me that due to university studies or other personal activities i left painting aside for long periods of time, from days to weeks, and sometimes even months. As a 2018 resolution i proposed to myself to make more art this year, at least little and fast doodles, and i'm going really well by now.
one of my goals in here ain't just showing my art here, but it's process and giving advice of each artwork i make
let's start
୧(•̀ᴗ•́)9
୧(•̀ᴗ•́)9
🎨materials🎨
- canvas: I used a mix media sketchbook, it's pages are grainy and thick, perfect for painting. sketchbook's measurements are 7x10 inches, but i made some guidelines and divided the space in 2, so the painting surface is 6.2x4.3 inches.
- paint colors: The colors i used for this painting are: burnt mber; titanium white; cadmium red medium; caucasian flesh tone; radiant blue; partland grey medium; mars black (left to right in picture)
- masking tape: I use it to cover the canvases borders, so when it's taken off it has clean borders, and a defined rectangle shape
- brush soap: it's better to use a special soap, cause the common ones will bent the bristles of your brush
- mechanical pencil HB and eraser: to make the sketch before painting
- brushes: synthetic brushes, all of them are size 2 and round tip. the big clear handle brush is used to extend the medium throughtout the canvas, it wasn't used to paint.
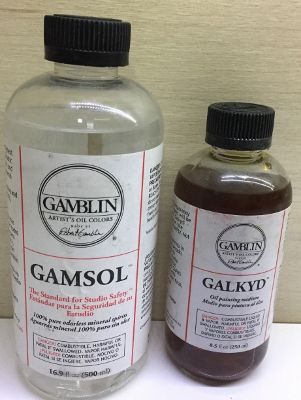
- medium: to make the process (a lot) easier, i use a mix of Gamsol (odorless mineral-spirits) and galkyd ( pain thinner and speed-dryer), the mix must be 50/50 and in little quantities because it's really concentrate.
.jpg)
.jpg)
🕒Process🕒
.jpg)
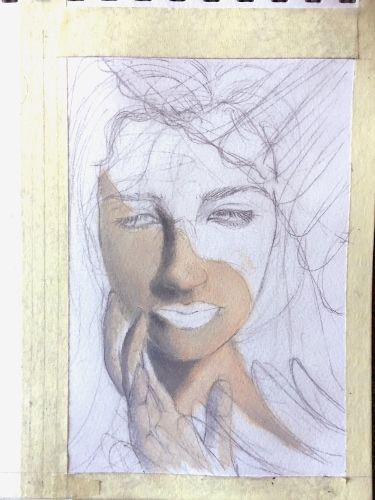
first we start with the sketch, it's important to do the main shape of our painting on the center of the canvas before giving details.
to get a realistic effect i guided myself with some photos i took to myself with my cellphone. in this phase i chose to make a simple sketch: an sketch with the basic shapes and details i wnted in my painting, because there was the posibility of changing, sustitute or erase something out of the sketch during the painting process. besides i didn't make this painting with the intention to give it a refined detail but to entertaint myself and enjoy it.
.jpg)
here starts the best(๑>ᴗ<๑)
ok, with the finished sketch and our ideas clear, we are ready to add some color. But wait! not yet, to ease the process of painting and avoid being many days needlesly into it, we use the G+G mix (Galkyd+gamsol) and we cover the whole surface with it, using a big flat brush.
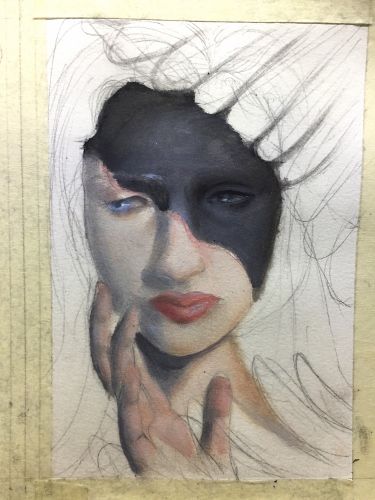
¡now let's go painting! i start with the skin that is being iluminated, i'm looking for a cold skin tone with the help of the radiant blue paint
.jpg)
this mix must be used carefully, you don't need to dip the whole brush into it, just with the tips of the bristles lightly touching the surface it's more than enough, beacuse the bushes tend to absorb very easily this mix. besides if you constantly dip the whole brush into the mix it will get more and more polluted with the pigment each time, and this affects the paint tones on each use after it
.jpg)
.jpg)
this process can come to be frustrating, since painting is something tha requires patience. and sometimes after hours or days of work we just want to finish with it quickly, and with that we stop learning and progressing; we can even end up ruining the painting. that's why is recomendable to take some breaks every now and then. remember the main idea of this is to enjoy it (✿•◡•)
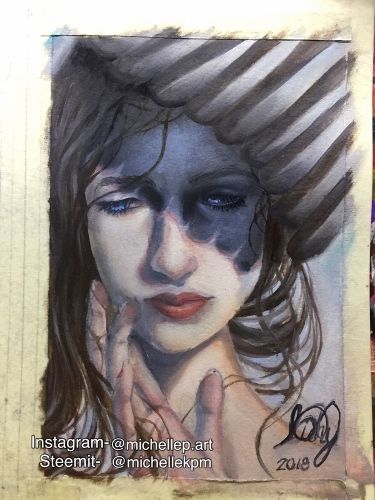
i started using the detail's brush in this part, for the eyelashes, lips and some small and fine things on the face and hands.
.jpg)
and as you can see there's just one more step to finish and is to take off the masking tape, this must be done carefully, if you take it off to harsh or fast it can peel off the paper we are using as canvas, and it will left a bad finish.
for the fine hair strands i dipped the detail's brush on G+G lightly but many times to get a very smooth look, the same for the feathers with the other brushes, mixing paint with the G+G mix helps get a very smooth look.
thatt's all, i hope you liked it ♡( ◡‿◡ )♡
comment what do you think about it
-¿is it too long?
-¿did you liked the explanation?
-¿do you want me to detail anything a talked about here?
-¿do you have any question? ¡ask it! i'll answer them the better i can :)
i invite you all to follow me on my instagram account
[source: photos taken by me = the author, with my cellphone]
none of the photos or archives present on this post can be used without asking first the author= me/i (you can reestim this post)
ninguna de las imágenes o archivos presentes en este post puede ser usada sin consulta previa a el autor = yo (pueden reestimear)
Resteemed your article. This article was resteemed because you are part of the New Steemians project. You can learn more about it here: https://steemit.com/introduceyourself/@gaman/new-steemians-project-launch
THANKS! that really helps me :D
That painting looks really good. And with your guide it looks simple to do it...but i think its not^^ you spend much Time of training to paint this good, right?
thanks. :)
Well it's pretty hard to describe every little step of the paintintg with just a few pictures, and not making it too long trying to do so.
And i spent about 5 (non continuous hours) on the whole painting. for my skills this painting it's pretty simple, but for a begginer, yes, it would be pretty hard. Anyways at least this post serves as a guide to understan the process of paintings like this, and with it start improving on your level/skills :)
Congratulations @michellekpm! You received a personal award!
Click here to view your Board
Congratulations @michellekpm! You received a personal award!
You can view your badges on your Steem Board and compare to others on the Steem Ranking
Vote for @Steemitboard as a witness to get one more award and increased upvotes!