04 - 02. Learn the Unreal Engine- Light Functions

Greetings! In this lesson, we will cover light functions, a type of material allowing you to change the behavior of your movable and stationary lights. We will be dealing with materials so make sure to watch my lesson on master materials and instances to better understand some of the things I'll be doing. So let's jump right in.
So far our lighting setup is giving good results but it feels a bit static. A nice touch would be to add brightness variations in some of our lights, simulating malfunctions. This is where light functions are useful. A light function is a type of material that can only be used by movable and stationary lights. It is used to modulate the intensity but can also be used for more advanced effects. Be aware though that light functions can't change the color, only the color option can do that. Let's create one.
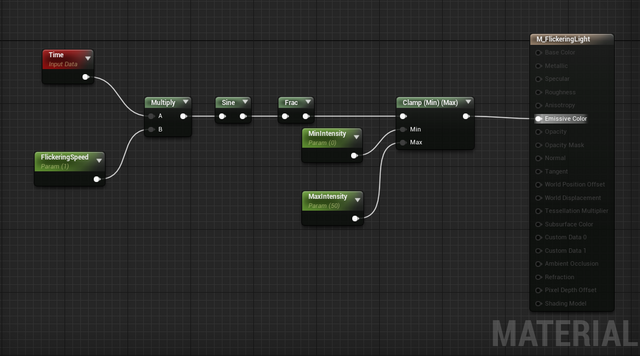
In the content browser, right click and add a new material that will serve as a master for our light function. Name it M_Flickeringlight. Open it, and in the detail panel, change the material domain to light function. This will leave only the emissive output to work with. Right click to search for a red node called time. You might have guessed, this will keep track of time to animate the flickering. Drag out the time output pin and let go to search for the multiply node. Now from the B input, drag out and search for a scalar parameter. Rename it to FlickeringSpeed. In the details panel, give it a default value of 1.
Let's get our multiply and drag out the pin to search for sine. This is a sine wave, which is used here to fluctuate the intensity. Let's continue with frac. This will break the sine wave and add variations. Before completing this material, I'd like to challenge you. Add parameters to control the minimum and maximum intensity. Pause the video, give it a shot, otherwise i'll continue with the solution.
Drag out the frac and search for clamp. This node is designed exactly for what we want. For the max input, create a scalar parameter named MaxIntensity with a default value of one. For minimum, take shortcuts and duplicate MaxIntensity using ctrlW. Rename it accordingly but now change the default value to 0. And there you go.
Congratulations to those who made it. Also, using different technique can get you the same results so don't worry if you came up with something different. Finally, drag out the clamp in the Emissive Color and were done.
Using control + B, quicky find your material in the browser and right-click to create an instance. Now, let's select our light and in the Light Function category, Drop your instance onto the material slot. Now use the instance parameters to dial in the effect that you want and voila.

Flickering lights are basic lightfunctions but can add to realism a lot. Plus, It can be used for more than just flickering. Experiment with textures, combine them with other shading techniques and trick the viewer for little performance cost.
In the last lesson, we will cover IES profiles, how they give more realism to your lighting and I'll be showing other cool stuff as a bonus.
Peace out!