Aquaponics tech #1
Hey all, figured I would see if I could put something useful out there.
This is one of the first things many aquaponic builders get hung up on. Sometimes even experienced aquaponics builders find themselves having problems with these things. I know I had a heck of a time in the beginning with it.. Some times it worked the first time, other times I couldn't get it to work no matter what I did. Along the way I discovered a few rules that make them work every time. I found that little pieces of information can sometimes make or break your system. So I decided to throw out this little run down of how I build the gravity fed bell siphon.
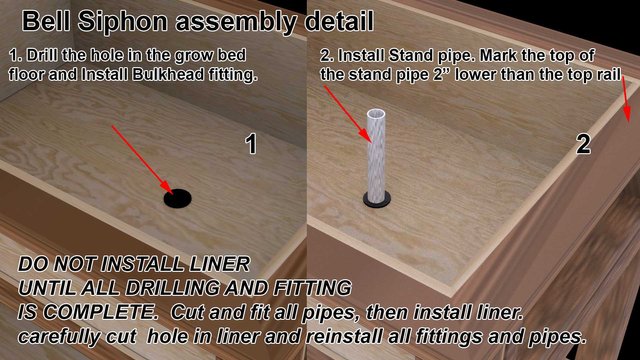
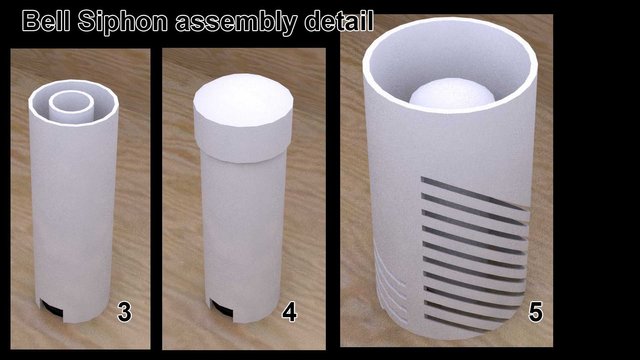
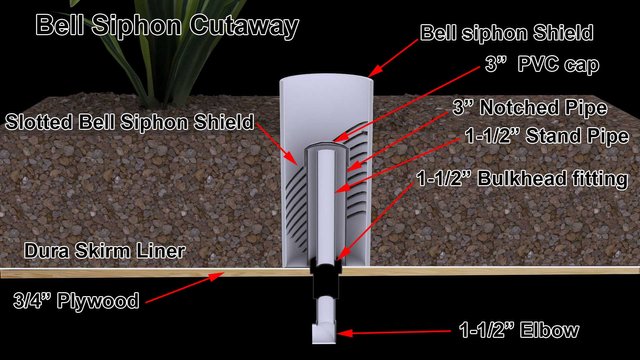
Here are a few diagrams from my book showing how to construct a bell siphon.
One thing I would like to point out, this setup is designed for a built grow bed with a food grade liner. If your using a plastic drum or something similar, just make sure that the stand pipe is cut to the top level where the water will be. Your water depth will be determined by the height of the stand pipe. Keep the water level below the top of the grow bed media so that the media top remains dry.
- Drill the hole and install the bulkhead fitting
- Cut and Install the stand pipe
- Cut the Bell pipe so that it is flush on the top with the height of the stand pipe. Cut a 1" notch on the bottom of the bell pipe. The height of the notch will determine the cut off of the sludge zone water.
- Put the cap on the bell pipe
- Install the shield pipe that keeps the media away from the bell pipe. Cut the shield pipe so that it is at least 2" taller than the top of the grow bed media. When complete put a cap over the shield pipe to keep debris out of the bell area.
Use a 1-1/2" stand pipe, 3" Bell pipe, and 6" Shield pipe.


NOTE
I find that cutting slots in the shield pipe with a miter saw works far better than drilling holes. Its much faster as well.
Once the siphon is installed, use 2-90 degree elbows (DO NOT USE SWEEPS) on the outlet pipe to dump water into the sump tank. This is because you want the water to slow down enough in the turns to create the vacuum. without the two 90 degree elbows the water wont create an air pocket and the siphon just wont start.

The siphon will engage as a vacuum develops once water begins to backup into the stand pipe.
Also, Install a valve where the water comes into your grow bed. You will need to be able to control the rate of water flow to the grow bed in order to get the siphon to balance out.
If you have too little water coming in to the grow bed the siphon wont start.
If you have too much water coming in, the siphon wont stop once it begins.
You will need to dial the water flow in so that the amount of water is just right to start the bell siphon but not so much that it wont shut off on its own.
Once balanced it will function properly until the balance is disrupted by debris or the like. Once cleaned away, the siphon will return to working properly.
Using this as a guide you should be able to build a functioning and problem free siphon.
Hello robbieolson!
Congratulations! This post has been randomly Resteemed! For a chance to get more of your content resteemed join the Steem Engine Team