Free content filtering for your home network
Ever wondered, on how to block those unwanted websites at home for kids security, similar to your enterprise/office network, you can now and be the network administrator for your home network.
Norton ConnectSafe helps keep your kids safe from Web sites with undesirable content. Norton ConnectSafe blocks inappropriate content in 23 different languages.
It acts as a First Layer of Defense with real-time protection and automatically blocks known unsafe, fraudulent, phishing and infected websites from entering our home network and causing harm to your devices including tablets, laptop, desktops, game console and mobile devices.
No Software or hardware installation as this works cloud-based, the good thing with this services it's free for non-commercial use.
There are 3 protection policy to choose from:
A - Security (malware, phishing sites and scam sites)
Preferred DNS: 199.85.126.10
Alternate DNS: 199.85.127.10
B - Security + Pornography
Preferred DNS: 199.85.126.20
Alternate DNS: 199.85.127.20
C - Security + Pornography + Other
Preferred DNS: 199.85.126.30
Alternate DNS: 199.85.127.30
There are two basic ways to use Norton ConnectSafe.
You can either setup your router to use Norton ConnectSafe and protect your entire home network (recommended) or You can set up Norton ConnectSafe on individual computers
To Configure your home router
Enter the IP address of your router in a Web browser, most home networks, the default router address is 192.168.1.1 or 192.168.0.1 or 192.168.1.254.
Enter the username and password. (The default username and password are provided in the router's directions).
Navigate through the router menu system and locate the DNS Server settings. It may look like this:

Chose the Policy above, A, B, or C and Enter the Norton ConnectSafe DNS IP addresses and save your changes.
To configure your home PC
Windows 10
a. On your Start menu, open the Control Panel.
b. Under the Network and Internet section, click View network status and tasks.
c. In the View your active networks section, click the item to the right of Connections:

d. On the General tab of the Connection Status window, click Properties.
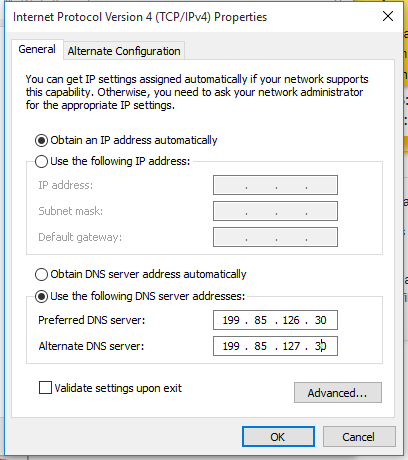
e. On the General tab of the Connection Properties window, scroll down and select Internet Protocol Version 4 (TCP/IPv4), then click Properties.
f. On the General tab of the Internet Protocol Version 4 (TCP/IPv4) Properties window, in the lower section, select Use the following DNS server addresses, and then type the Norton ConnectSafe DNS IP addresses shown above on this page. (Policy A, B or C)
g. Click OK and exit all the windows.
Windows® 7/8
a. On your Start menu, open the Control Panel.
b. Under the Network and Internet section, click View network status and tasks.
c. In the View your active networks section, click the item to the right of Connections:
d. On the General tab of the Connection Status window, click Properties.
e. On the General tab of the Connection Properties window, scroll down and select Internet Protocol Version 4 (TCP/IPv4), then click Properties.
f. On the General tab of the Internet Protocol Version 4 (TCP/IPv4) Properties window, in the lower section, select Use the following DNS server addresses, and then type the Norton ConnectSafe DNS IP addresses shown above on this page. (Policy A, B or C)
g. Click OK and exit all the windows.
Windows® Vista
a. On your Start menu, open the Control Panel.
b. In the Control Panel window, click Network and Sharing Center.
c. In the Network section, select View Status of each connection.
d. On the General tab of the Connection Status window, click Properties.
e. On the General tab of the Connection Properties, scroll down and select Internet Protocol Version 4 (TCP/IPv4), then click Properties.
f. On the General tab of the Internet Protocol Version 4 (TCP/IPv4) Properties window, in the lower section, select Use the following DNS server addresses, and then type the Norton ConnectSafe DNS IP addresses shown above on this page.
g. Click OK and exit all the windows.
Windows® XP
a. On your Start menu, open the Control Panel.
b In the Control Panel window, click Network Connections and choose your current connection.
c. On the General tab of the Connection Status window, click Properties.
d. On the General tab of the Connection Properties window, scroll down and select Internet Protocol (TCP/IP), then click e. Properties.
f. On the General tab of the Internet Protocol (TCP/IP) Properties window, in the lower section, select Use the following DNS server addresses, and then type the Norton ConnectSafe DNS IP addresses shown above on this page.
g. Click OK and exit all the windows.
For MAC users.
macOS 10.12 (Sierra)
a. Choose Apple menu and select System Preferences, then click Network.
b. Select the network connection service you want to use (Wi-Fi or Ethernet for example) in the list, then click Advanced c. button in the lower right corner of the Network window.
d. Click DNS tab, then click Add + at the bottom of the DNS Servers list. Enter the Norton ConnectSafe DNS IP addresses shown above on this page.
e. When finished making changes to the DNS settings, click on the OK button
f. Now click on Apply for the DNS changes to take effect
OS X 10.11 (El Capitan)
a. Choose Apple menu and select System Preferences, then click Network.
b. Select the network connection service you want to use (Wi-Fi or Ethernet for example) in the list, then click Advanced button in the lower right corner of the Network window.
c. Click DNS tab, then click Add + at the bottom of the DNS Servers list. Enter the Norton ConnectSafe DNS IP addresses shown above on this page.
d. When finished making changes to the DNS settings, click on the OK button
e. Now click on Apply for the DNS changes to take effect
OS X 10.10 (Yosemite)
a. Choose Apple menu and select System Preferences, then click Network.
b. Select the network connection service you want to use (Wi-Fi or Ethernet for example) in the list, then click Advanced button in the lower right corner of the Network window.
c. Click DNS tab, then click Add + at the bottom of the DNS Servers list. Enter the Norton ConnectSafe DNS IP addresses shown above on this page.
d. When finished making changes to the DNS settings, click on the OK button
e. Now click on Apply for the DNS changes to take effect
OS X 10.9 (Mavericks)
a. Choose Apple menu and select System Preferences, then click Network.
b. Select the network connection service you want to use (Wi-Fi or Ethernet for example) in the list, then click Advanced button in the lower right corner of the Network window.
c. Click DNS tab, then click Add + at the bottom of the DNS Servers list. Enter the Norton ConnectSafe DNS IP addresses shown above on this page.
d. When finished making changes to the DNS settings, click on the OK button
e. Now click on Apply for the DNS changes to take effect
OS X 10.8 (Mountain Lion)
a. Choose Apple menu and select System Preferences, then click Network.
b. Select the network connection service you want to use (Wi-Fi or Ethernet for example) in the list, then click Advanced button in the lower right corner of the Network window.
c. Click DNS tab, then click Add + at the bottom of the DNS Servers list. Enter the Norton ConnectSafe DNS IP addresses shown above on this page.
d. When finished making changes to the DNS settings, click on the OK button
e. Now click on Apply for the DNS changes to take effect
Mac OS X 10.7 (Lion)
a. Choose Apple menu and select System Preferences, then click Network.
b. Select the network connection service you want to use (Wi-Fi or Ethernet for example) in the list, then click Advanced button in the lower right corner of the Network window.
c. Click DNS tab, then click Add + at the bottom of the DNS Servers list. Enter the Norton ConnectSafe DNS IP addresses shown above on this page.
d. When finished making changes to the DNS settings, click on the OK button
e. Now click on Apply for the DNS changes to take effect
Mac OS X 10.6 (Snow Leopard)
a. Choose Apple menu and select System Preferences, then click Network.
b. Select the network connection service you want to use (Wi-Fi or Ethernet for example) in the list, then click Advanced button in the lower right corner of the Network window.
c. Click DNS tab, then click Add + at the bottom of the DNS Servers list. Enter the Norton ConnectSafe DNS IP addresses shown above on this page.
d. When finished making changes to the DNS settings, click on the OK button
e. Now click on Apply for the DNS changes to take effect
Mac OS® X (10.5 Leopard)
a. On the Mac menu bar, click System Preferences.
b. Under Internet & Network, click Network.
c. In the left pane, select your current network connection from the network connection services list.
A green icon indicates your current network connection.
d. In the window that appears, click Advanced.
e.In the window that appears, click the DNS tab.
f. Click the plus sign at the bottom of the DNS Servers list area.
g. Enter the Norton ConnectSafe DNS IP addresses shown above on this page.
h. Click OK.
i. In the Network window, click Apply
Mac OS X (10.4 Tiger)
a. On the Mac menu bar, click System Preferences.
b. Under Internet & Network, click Network.
c. Double-click your current network connection from the network connection services list.
A green icon indicates your current network connection.
d. In the DNS Servers list, enter the Norton ConnectSafe DNS IP addresses shown above on this page.
e. Click Apply Now.
f. Close the Network window.
Once everything is all setup Norton ConnectSafe will work automagically, Enjoy!!!
@resteemator is a new bot casting votes for its followers. Follow @resteemator and vote this comment to increase your chance to be voted in the future!