A Beginner’s Guide to Adobe Lightroom
Part 1:
It is straightforward to feel flooded with the numerous totally different options of Adobe Lightroom. Lightroom has such a large amount of prospects, that even once years of mistreatment it, I still am systematically learning one thing new. I even have found that their area unit such a large amount of new photographers United Nations agency either feel too flooded to begin learning the intensive computer code, or they still aren’t assured that they need to be been mistreatment it properly. owing to this, I wished to make a straightforward beginner’s guide to mistreatment Lightroom. this can be the primary of what is going to be a multiple half series of articles on Lightroom basics.
Lightroom is Adobe’s all-in-one photography computer code, designed for organizing, editing, and sharing your photos. one amongst the foremost necessary things to grasp concerning Lightroom is that it performs nondestructive edits. What this suggests is that the changes you're adding to your image in Lightroom don't seem to be really being performed to the first file. The changes that you just area unit creating area unit written to a very separate file as an inventory of directions, so what you see in Lightroom could be a preview of the first image combined with the list of changes created to that. this can be necessary for 2 main reasons. First, you'll fully alter the looks of your icon while not ever really ever-changing the first image. You don’t need to worry concerning destruction the icon as any step will invariably be undone. Secondly, you ne'er save your changes as you're in all probability conversant in different styles of computer code since you area unit you're ne'er reaching a degree once all of your edits are bolted into the first image. this may be explained more in future components of this series.
Now that we've got a basic understanding of what Lightroom is, I need to leap in and pay the remainder of this text covering what steps to require to arrange your photos for written material. the primary step is mercantilism your photos. Their area unit many ways that to travel concerning this however here is that the best technique that I even have found. once a session, I insert my memory card into a card reader, produce a brand new folder on my external Winchester drive, and transfer all of the pictures into that folder. These folders I label by date, beginning with the year, followed by the purchaser's name, so the kind of session. as an example, I'd decision last weekends wedding “2017-9-16-Smith-Wedding.” after you area unit beginning out, the final thing you almost certainly care concerning is an organization, however, it'll prevent stress anon. Having a way that's consistent can pay off within the long haul, and that I have found the higher than technique to figure best with however Lightroom organizes your folders. once all of your pictures area units downloaded to the folder, you'll currently pass on to mercantilism into Lightroom.
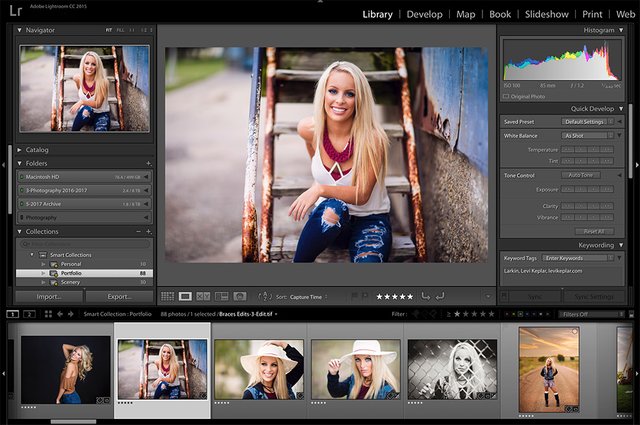
Lightroom is perhaps progressing to be discouraging after you initially open it up, with all of its choices and settings. one amongst the essential things to know concerning Lightroom is that there area unit many totally different workspaces, known as modules. This area unit found within the prime right corner and have names like Library, Develop, etc. Modules area unit places within the computer code wherever you'll perform totally different actions, however, the Library and Develop modules area unit wherever you'll pay the bulk of it slow. The Library module is wherever you organize your photos, add (and view and consider and think concerning and look at and examine) information (information about your images), and import and export your files
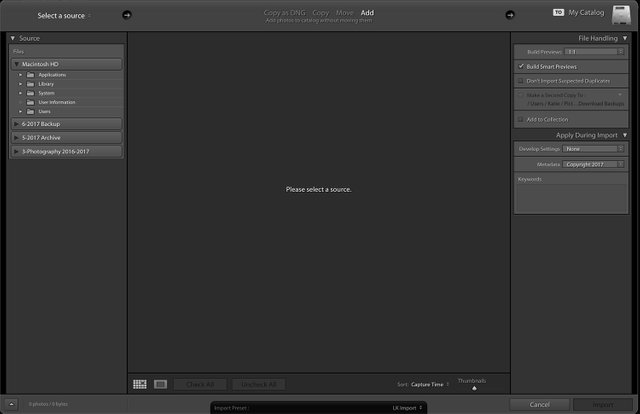
To get started mercantilism your photos, notice the “Import” button at rock bottom left of your library module. this can talk about a replacement space with multiple settings for mercantilism. On the highest section, you may wish to form certain the “Add” choice is chosen. this can import your pictures into Lightroom while not moving your original file. the proper aspect contains many import settings that you just will forbear for currently, however ar any coated in my article on Lightroom’s speed. On the left aspect is that the supply section, wherever you may find your pictures that we have a tendency to earlier downloaded to your disc drive. Once you’ve designated the right folder, you'll be able to push the import button at rock bottom right of your screen.
After Lightroom has finished commerce all of your photos, you may see on the left the folders of your foreign pictures. Here you may realize terms like catalog, folders, and collections. to stay it straightforward for currently, the catalog is that the location that stores all of the previews, data, and changes that area unit being employed on your foreign pictures. The catalog doesn't really contain the first image itself. The folders area unit the area unitas wherever the first image is hold on that Lightroom is touching on once applying the changes that are written within the catalog. Catalogs, once beginning out, aren't as essential to grasp, however at now it's vital to notice that if you ever move the first files or rename their folders, you may need to relocate them in Lightroom mistreatment the folders section.

The very last thing I would like to hide during this article is a way to cull your pictures. I prefer to remain within the Library module for culling. you've got many choices for choosing your photos in Lightroom. One possibility you'll use is as you undergo your pictures, you'll be able to push "P" for choose or "X" for reject. the tactic I like, though, is to use the quantity keys to relinquish it a star rating between zero and 5. I take advantage of zero stars for photos I don’t need, one star for photos I would like to stay, 2 stars for photos that I prefer however would like any touchups once I’m finished, and 5 stars for photos that may move into my portfolio. to assist choose between photos, you'll be able to additionally switch between many totally different views. the subsequent varieties of views and their various cutoff keys will all be used for scrutiny pictures.
Loupe (E): Shows a full-sized read of one image.
Grid (G): Shows all pictures within the folder.
Survey (N): can show all of the pictures you've got elect on a similar screen to match.
Compare (C): can show 2 pictures at a time, out of your choices, and permit you to simply opt for your favorite of the two.
When you are finished rating your photos, you'll currently regulate your settings to solely show your designated photos. at the bottom right of the screen, you'll choose from totally different filters to indicate and conceal pictures supported however you’ve rated them.