Create a droplet( server) DigitalOcean
Greeting Steemit Family
I will be sharing with us how to create a droplet( server) using the platform DigitalOcean. We have been using this platform for the past couple of years, but I have been more involved in the past year. The account I will be working from, some details will be covered for security reasons. It is not my account, but I have access to work from there.
In this post, I will be looking at Droplets on DigitalOcean, which is one of their resources. I did mention droplets in my previous post, but I did not explain what droplets are. On the DigitalOcean platform, droplets are a virtual machine and another name for the server. DigitalOcean droplets are virtual machines, which are Linux-based to mount OS like Ubuntu, Fedora, Rocky Linux etc.
To create a droplet, you will need to have an account on the DigitalOcean platform. Before going ahead on how to create a droplet, I will help outline what you need to have a running DigitalOcean account.
- A valid email address
- A valid payment method (could be credit card or PayPal)
- You may need your phone number for 2FA
I have put together some details in place to make a post on creating an account on DigitalOcean in the days ahead.
Let's log on to the DigitalOcean dashboard, where you will need a username, password, and to some level your phone number.
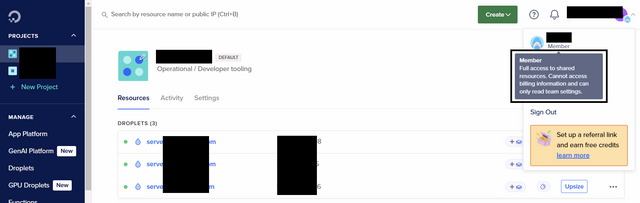
I will do a better explanation of the different levels of accounts and permissions graded. I will be working from a member account, which is completely different from an admin account. The account I'm using has full access but with a billing restriction. We will look at this when creating an account on DigitalOcean.
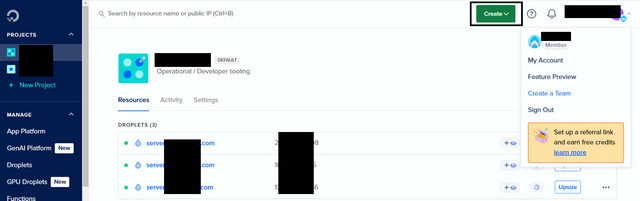
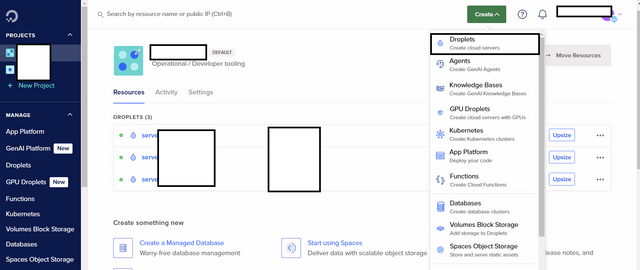
Here on my dashboard, the create button on the top right corner is close to the profile icon. This is where we see a list of resources, but our interest is the first (Droplet).
The step to create a droplet(VM) starts here.
- Step 1
We have to choose the Region. This is where we will choose where we want our servers to be hosted. Note that the closer the region, the lower the latency. Latency is the time taken to transfer data from one point to the other on a network. So, that is one of the things to think about when choosing a region for your droplet.
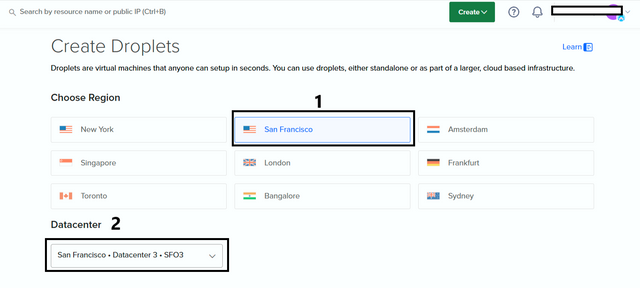
- Step 2
Next is the Datacenter. A region can have more than one data center. So in the same way, consider those who will be using your droplet. Just like picking the closest region, the same goes with the Datacenter.
At this point, we have selected our Region, and the physical location(Datacenter) for the server. It is just like owning a Laptop without an operating system.
Note we have not yet created the droplet, but still putting together the necessary resources.
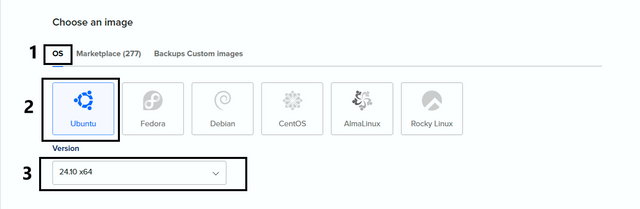
- Step 3
Choose the Operating System, remember it is a Linux base. That is the reason you will not find Windows Os on the list. I selected Ubuntu and moved to pick the version. I will be going with the default, which you used the drop-down to get the version of your choice.
- Step 4
Just like when picking a PC to use, you take into consideration the capacity. that is CPU, Disk, RAM, depending on the size of your project. Before getting to that point, I have to select my droplet type. That is determining if it will be a shared CPU or a dedicated CPU. In the case of the shared CPU, we can have more than one project making use of the same resources(CPU) on the droplet. Dedicated, as per the name will be restricted to one project.

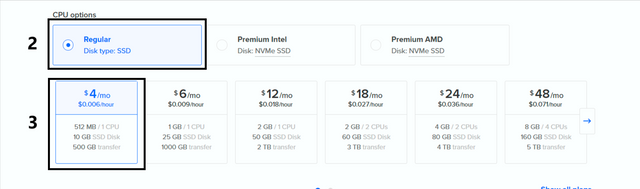
- Step 5
Picking the CPU option has to do with the functionality of your project and your budget. Using an Intel processor is more expensive than an AMD processor. Since we are working on demonstrations, I will be using the Regular option. I will select the first option which is the cheapest quota for the droplet. As I mentioned, the size of your project will help you determine the capacity.
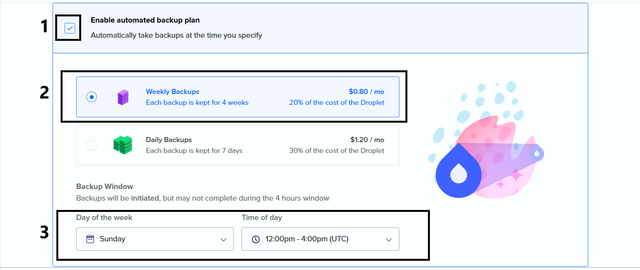
- Step 6
An important aspect when creating a droplet is the backups. Backups are snapshot copies of the droplet, which can later be used in case the droplet fails or is corrupted. For our case, we have two options, that is Weekly backup or the daily backup.

I will select the weekly backup, the day of the week, and the time. So technically means, if the droplet has a problem this week. We can restore to the state of the previous week when the droplet was working fine.
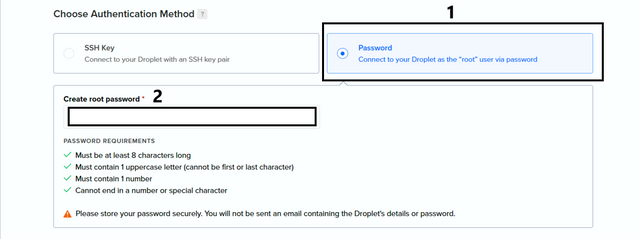
- Step 7
To be able to access the droplet, you need to log in. We have two options, SSH Key and Password method. Why SSH key is recommended, will be going with a password for convenience purposes.
- Step 8
It is time to set the hostname of my droplet, which will help me identify my droplet from the other droplets.
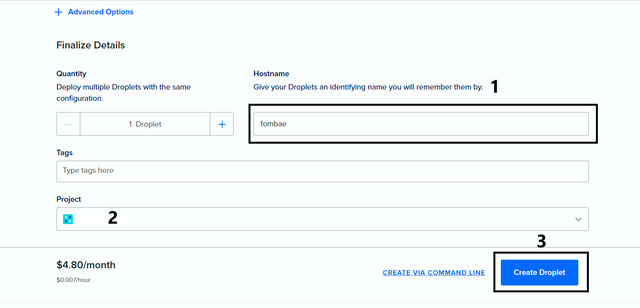
Next, you have to select the project where your droplet will be located, and finally, we create our create droplet button.
It will take a couple of minutes to create an end configuration for our droplet.

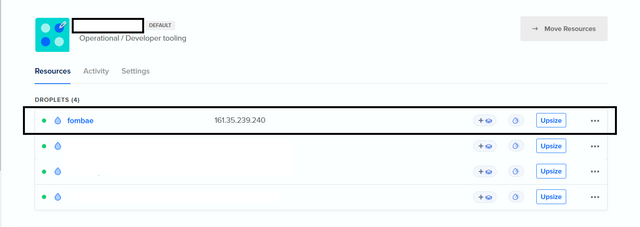
To be sure our droplet was created, we can find the list of droplets on the dashboard.
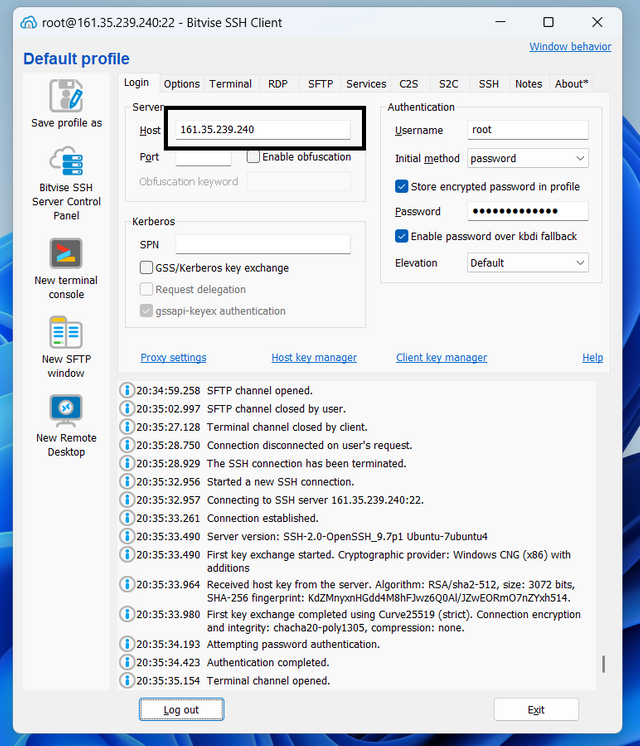
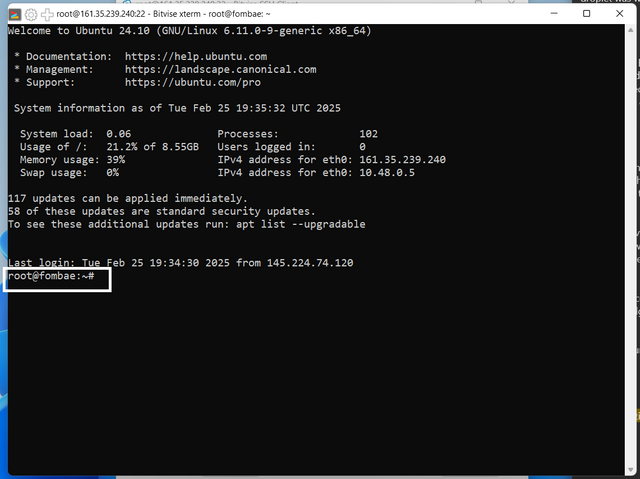
Now I will log into the droplet using the Bitvise SSh client. I will make use of the IP and the password we assign to our droplet. Remember, for a Linux system. The default user is root, that is the reason I used root and the password.
.png)
.png)
From the terminal, I have logged in as root.
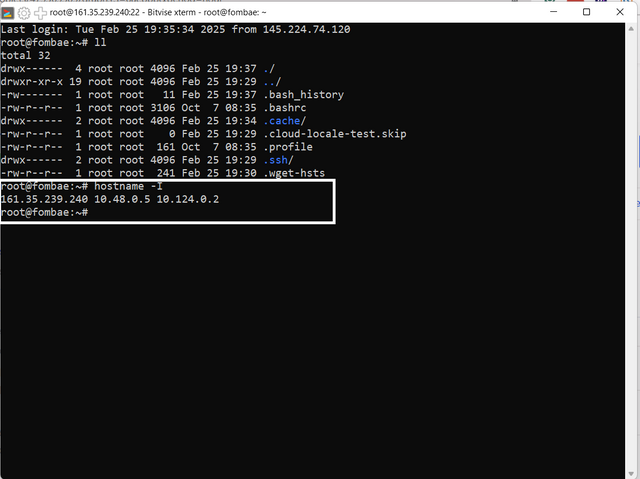
To be sure I was not in the wrong droplet, I decided to check the IP (hostname -I). As seen, we are in the new droplet I just created.
.png)
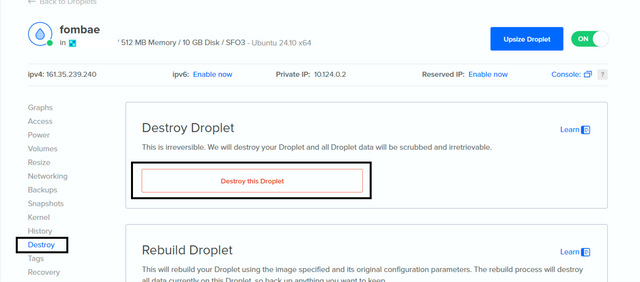
Stey on, I will go ahead to destroy the droplet. Next time we will be looking at configuring the droplet to host a web project. Feel free to ask any question, in case I rush over a section.
Cheers
Thanks for dropping by
@fombae
Upvoted! Thank you for supporting witness @jswit.
Thank you for sharing this tutorial using our club tag. I think you are not sharing this post to participate in the best post project but just to share information with us, right?
Also, two days ago, I chose DigitalOcean as the provider to host an application related to Steemit (though it’s not hosted yet? I just selected DigitalOcean and got charged 😂). I also used it to train an AI model
@kafio thanks for your feedback, but I seem not have a good understanding of the club rules.
I was thinking a step by step of project (Creating a Droplet) falls inline. I'm working towards a complete host server with DigitalOcean Droplet. It not something I do everyday, so this practically a learning process for me.
Just my thoughts of sharing what I was doing, hoping it felt inline with the club rules. Looks I was wrong.
I can't say sorry you got charged, DigitalOcean make used of the Pay As You Go model on paid resources. Then again you most have used the resources which required them to charge you. I'm learning on the platform, a good number of resources I don't have an idea of their functions.
Any where thanks again
Congratulations! This post has been voted through steemcurator09 We support quality posts, good comments anywhere and any tags.