SEC S20W1 - A Comprehensive Guide to Flutter Mobile Application Development
Hi everyone!
You are warmly welcome to the 1st week of Steemit Engagement Challenge Season 20. Here you will learn the basics of flutter, understanding its framework, developmemnt setup, core features, connecting virtual and physical device, as well as the basic types of flutter widgets. So let's start.
Introduction to Flutter: What it is and why we use it?
Flutter is an open source user interface software development toolkit. It was created by Google. It is used for developing applications for mobile such as Android and iOS. It is also useful for web, and desktop applications from a single codebase. Flutter allows to build high quality applications with great performance.
Flutter is actually a framework. It helps to build beautiful, fast, and customizable applications. The two main components of Flutter are:
Flutter SDK: A collection of tools that help to compile the code into native machine code for Android and iOS. It also includes libraries, frameworks, and tools to develop apps.
Dart Programming Language: Flutter apps are written using Dart.It is a modern programming language created by Google. It is an optimized language for UI development. Dart is easy to learn. It is similar to JavaScript, Java, or C#.
Why Use Flutter?
Cross Platform Development: Flutter is famous for its cross platform development. You write a single code and it will run on multiple platforms. It helps in saving time and effort.
High Performance: The architecture of Flutter removes the traditional bridge between the app and platform specific code. This allows Flutter apps to have more performance than other native apps. Moreover the usage of Dart language also enhances the performance of the applications.
Beautiful UI: Flutter provides a rich set of customizable widgets. It helps to develop visually appealing applications. We can easily make complex UIs with smooth animations. It allows to develop user friendly interfaces.
Hot Reload: The most favourite feature of Flutter is hot reload. With hot reload we can see the effects of the changes in the code instantly. So we do not have need to restart the application. This significantly speeds up the development process by allowing quick iterations.
Customizability and Flexibility: Flutter gives immense flexibility and control over how the app looks and behaves. Flutter allows you to create custom designs, complex animations, and transitions.
Strong Ecosystem and Support: Flutter has a vibrant community. Google is actively supporting its growth. Flutter also provides integration with other third party services, APIs, and libraries. It makes app development easier.
Native Feel with One Codebase: When we write our app in Flutter it behaves like a native app on each platform. Flutter gives you access to platform specific functionalities, such as camera, GPS, or storage, through its rich plugin library.

Setting up the Development Environment
It is very easy but a little bit critical to setup the development environment for the flutter. So in order to start flutter development it is necessary to setup the development environment.
Step By Step Guide
Step 1. Install Flutter SDK. In order to install the flutter SDK we have to download it from Flutter.dev. Download SDK according to your operating system. For example if you are a windows user then download windows compatible SDK.
Step 2. Extract SDK Files.
- For Windows: Extract the files in the location such as
C:\src\flutter - For macOS: Use terminal to extract the files. And place the flutter folder in a suitable directory.
- For Linux: In the linux operating system extract the files using the terminal. It is same like the macOS.
Step 3. Set Flutter SDK Path. It is very necessary the set the flutter SDK path to initiate the installation. If the SDK path is not set the the installation command will not work. So do it carefully.
For macOS and Linux:
- Here you just need to add the flutter path to your shell configuration. such as
export PATH="$PATH:/path_to_flutter/flutter/bin" - After adding it to the shell run the command
source ~/.bashrc
- Then the next process is same as with the windows. Run the command
flutter doctorin the terminal and it will proceed the installation. I have shown in the windows section.
For Windows:
- Open the system properties. Then choose
Environment Variablesas shown below:
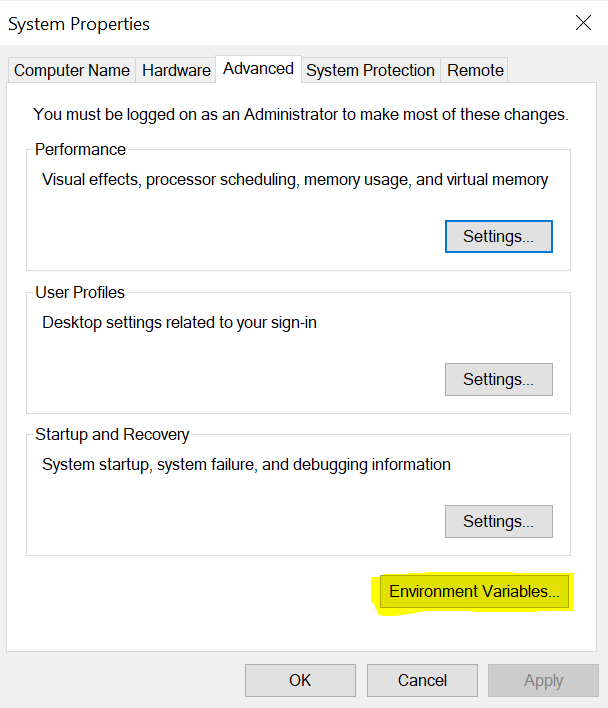
- Then you will see another pop up window. It will show all the environment variables.

Here choose to add New. And there you have to give the location of the flutter bin folder such as C:\src\flutter\bin.
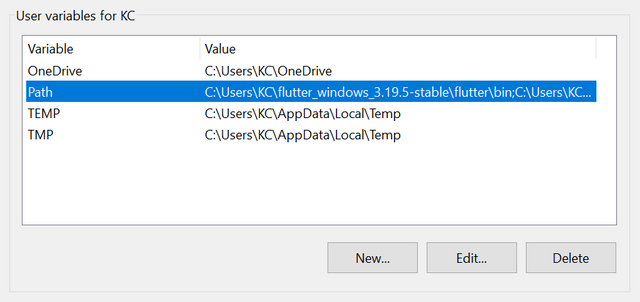
After adding flutter path now it is accessible. And now we can command it for its installation and to check its further requirements in the command prompt.

Here we have to give the command flutter doctor to check the required dependencies for its operational working.
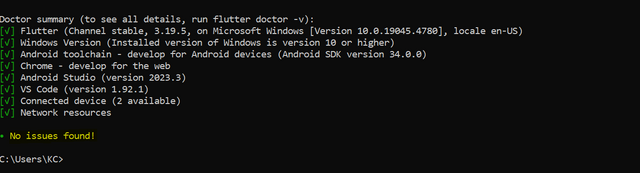
Flutter doctor has collected the data. It can take a while or more depending upon the speed of your system. So my flutter installation has completed and there is no any issue now I can continue using flutter in my system.
Step 4. Install an IDE
Now we need an integrated development environment to run flutter. Flutter supports different IDEs but the most commonly used are:
- VS Code
- Android Studio
Both the IDEs are simple and easy to use and they both come with strong support by the company. If you are going to use VS Code then follow the below guideline:
- Download and Install VS Code.
- Then go to the extensions section and install Flutter and Dart extensions.

- Now you will be able to create dart files to start your coding.
I will proceed here with the Android Studio as I will use this IDE to teach you flutter mobile application development. So in order to install Android studio and flutter in it follow the below guidelines:
- Download and Install Android Studio.
- During the installation download the Android SDK completely.
- After installation go to
Plugins. - Install Flutter and Dart plugins.

Set Up Emulators for Testing
We can use emulators for android and similarly simulators for iOS. These are the virtual devices which can be used for the testing of the applications.
Setting Up Android Emulator
- Open Android Studio.
- Go to Tools → AVD Manager (Android Virtual Device Manager).
- Click on Create Virtual Device.
- Choose a hardware device, like Pixel 4.
- Select a system image (like Android API Level 30 or higher).
- Configure the emulator settings and click Finish.
- Launch the emulator by clicking the Play button in AVD Manager.
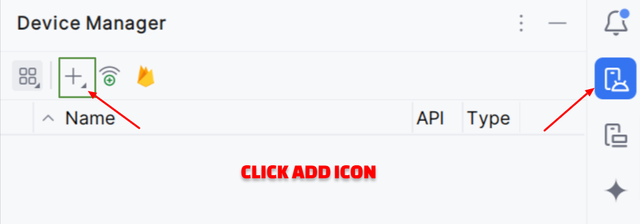
After clicking the add button two options will appear there such as:
- Create Virtual Device
- Connect Remote Device
Select the first option. It will redirect to a new window in the form of a pop up.
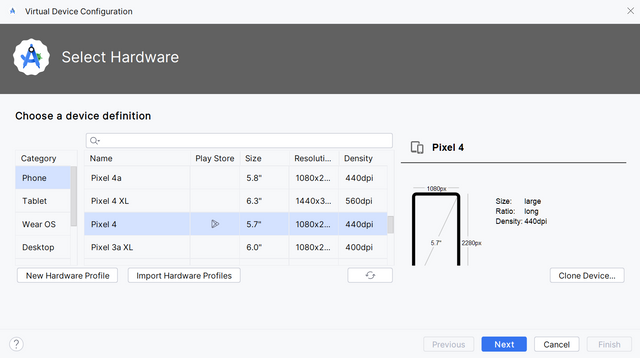
Here you can see the list of all the available virtual devices in the android studio. We can choose virtual device of any type.
iOS Simulator (macOS Only)
If you are developing on macOS you can use the iOS simulator to test iOS apps. In order to setup the simulator the guidelines are given below:
- Open Xcode and go to Preferences
- Select components to install simulators for various iOS devices.
After installation, you can run an iOS simulator from Xcode's Devices and Simulators section.
Note: Virtual device can increase the load of the system so always choose wisely. Choose a suitable device according to the specifications of your system.
Moreover you can run the applications in the live browser such as Chrome, Edge, Safari, etc.
Overview of Dart programming language. What is dart pad?
Dart is a programming language. It is the language which is used to develop applications in the flutter framework. It is an object oriented programming language. This language was designed by Google for the fast execution of the applications. It is very easy language. It is similar like the Javascript, Java, and C#. If you are are familiar with any other programming language then you start learning this language in just a minute.
Basic features of dart programming language are given below:
Object Oriented Programming Language: Everything used in the dart is an object. Even the numbers as well as the functions are also object.
Strongly Typed: Dart supports both static and dynamic typing. So it allows flexibility.
Asynchronous Programming: Dart has built in support for asynchronous operations. It uses
Future, async,andawait.Cross Platform: Dart can be used to build apps for mobile, web, and desktop with flutter.
DartPad is an online code editor. It is provided by Google. It was specially designed for compiling Dart code. It works online in the browser. So there is no need to setup a separate development environment to use dart pad. You can access dartpad here dartpad.dev.
Introduction to Flutter widgets.
The typical meaning of the widget is a small gadget. In flutter widgets are the building blocks of user interface of the flutter applications. Everything in flutter is a widget. Either it is a text, button, image, row or column it is a widget. There are different widgets in flutter.
Basic types of widgets are given below:
- Visible Widgets
- Invisible Widgets
- State Widgets
Visible Widgets: These are those widgets whose output is visible on the screen. These widgets are used to make the user interface of the apps. For example: Text, Image, Button, and Icons, etc.
Invisible Widgets: These widgets does not appear directly on the screen. But these widgets act like the controlling widgets. They control the layout and control how the other widgets will behave on the screen. For example: Column, Row, Center, Scaffold, Stack, Padding, Margin, etc.
State Widgets: These are the widgets which determine the state of the screen within the application. They are of two types:
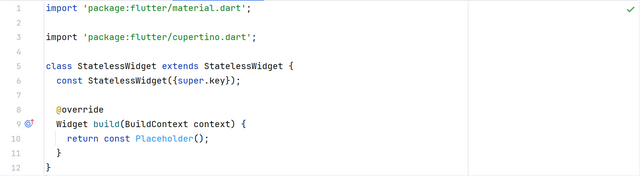
- Stateless Widget: These are the widgets which do not change over time. They remain static and they do not change the state of the screen.
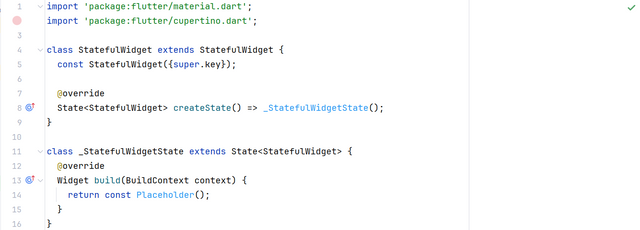
- Stateful Widgets: These widgets can change their state in real time. There state is mutable and when state of the widget changes it can update the user screen screen as well.

There is always the need to import the libraries to start development. If we are going to develop Android applications then add Material Library to run applications on the Android devices.

Similarly there is the need to import library for the iOS development and to use the iOS widgets and features.
How to connect physical device to Android Studio for the live testing of application?
In the above section I have discussed virtual device and how we can connect virtual device to flutter testing for the direct testing of the applications. But there is a problem with the virtual device setup. Virtual devices can slow the speed of the system. As everyone does not have high quality systems for the development. So on those devices virtual devices cannot run smoothly. In order to fix this problem we can attach an external or physical device to the android studio for the testing of the applications.
Here is how you can connect a physical device with your system.
- First of all you have a mobile for example an android mobile phone.
- Then turn on the developer mode.
- After that turn on the USB debugging.
- Now connect your smart phone with a data cable.
- Android studio will automatically detect the physical device.
Now the physical device has been connected and it can be used for the installation of the applications and testing purpose.
Homework Assignments
Introduction to Flutter and Setting Up the Environment. Write a short paragraph about what Flutter is, its benefits, and why it is used for mobile app development. Include how it differs from other frameworks. Install Flutter SDK, set up an IDE (e.g., Visual Studio Code or Android Studio), and configure an emulator or physical device for testing.
Access DartPad and perform the following:
Write a function that prints numbers from 1 to 100. For multiples of 3, print "Steem" for multiples of 5, print "TRX" and for multiples of both, print "Steemit.com".
Create a Dart function that calculates and returns the factorial of a given number. Test the function with different inputs.
Connect a physical device to the computer and enable developer mode and USB debugging. Configure Android Studio to recognize the connected device and run a Flutter app on it. Run a basic Flutter app on the physical device and verify its functionality.
Project:
Sign Up and Log In Screen: Create a basic Sign Up and Log In Screen interface.
Contest Guidelines
Post can be written in any community or in your own blog.
Post must be #steemexclusive.
Use the following title: SEC S20W1 - A Comprehensive Guide to Flutter Mobile Application Development
Participants must be verified and active users on the platform.
Post must be more than 350 words.
The images used must be the author's own or free of copyright. (Don't forget to include the source.)
The participation schedule is between Monday, September 9 , 2024 at 00:00 UTC to Sunday, September 15, 2024 at 23:59 UTC.
The publication can be in any language.
Plagiarism and use of AI is strictly prohibited.
Participants should appropriately follow club status such as #club5050 or #club75 or #club100 but it will not be counted in your grading.
Use the tags #flutterdev-s20w1 , #country (example - #Pakistan, #Nigeria), #steemexclusive in your first 4 tags.
Use the #burnsteem25 tag only if you have set the 25% payee to @null.
Post the link to your entry in the comments section of this contest post. (Must)
Invite at least 3 friends to participate in this contest.
Try to leave valuable feedback on other people's entries.
Share your post on any social media (e.g. Twitter, Facebook , Instagram) and drop the link as a comment on your post.
Rewards
SC01 would be checking on the entire 16 participating teaching teams and challengers and upvoting outstanding content. Upvote is not guaranteed for all articles. Kindly take note.
At the end of the week, I would nominate the top 5 users who had performed well in the contest and would be eligible for votes from SC01/SC02.
Important Notice: The nomination of the top 5 users is solely based on the quality of the post. So focus on the quality and creativity of the post. Also ensure your quality engagement. Number of comments is no longer a factor to be considered.
Flutter Mobile Application Dev Team (mohammadfaisal)

Hello @mohammadfaisal, great introduction to Flutter, I would like to join this challenge but I have a question before. Are all the contest guidelines mandatory? I am asking because I saw this "Share your post on Twitter and drop the link as a comment on your post."
I am not using Twitter, it is not popular in my country, or at least not among my friends and I didn't need one yet. I had one bot account at one point where I ran a bot to join Counter strike giveaways but that was my only interaction with Twitter.
Don't worry dear fellow you can share your post on other social medias like Facebook, Instagram where your other friends can see it and also invite them to join this opportunity to learn it.
X Promotion: https://x.com/stylishtiger3/status/1832696956335906937
Thank you, friend!


I'm @steem.history, who is steem witness.
Thank you for witnessvoting for me.
please click it!
(Go to https://steemit.com/~witnesses and type fbslo at the bottom of the page)
The weight is reduced because of the lack of Voting Power. If you vote for me as a witness, you can get my little vote.
Post must be more than 350 words. (350 to 500 words)
You meant it cannnot be longer than 500 words? Can 500 words be enough for this kind of assignment?
Don't worry you can go beyond this limit untill all the tasks and assignments are not completed in an efficient way.
I don’t have any android device, what should I do with last task?
You can go with your device. If you have iOS then you can do this task using your iOS device. The main thing is to connect a physical device. You can connect any.
If you can do the first task then you can do the last task as well.
Best wishes.
Thanks really interesting! I was looking to learn to create mobile apps! This is perfect for me
You are welcome 🤗 looking forward to see your participation.
My entry
https://steemit.com/burnsteem25/@kouba01/sec-s20w1-a-comprehensive-guide-to-flutter-mobile-application-development
https://steemit.com/flutterdev-s20w1/@alejos7ven/sec-s20w1-a-comprehensive-guide-to-flutter-mobile-application-development-or-my-first-mobile-app
My Entry: https://steemit.com/flutterdev-s20w1/@akmalshakir/sec-s20w1-a-comprehensive-guide-to-flutter-mobile-application-development
https://steemit.com/hive-145157/@sergeyk/sec-s20w1-a-comprehensive-guide-to-flutter-mobile-application-development