SEC 20w2 | Trazado del patrón base de la blusa para damas
Hemos llegado a la segunda semana de este mini curso de seis semanas sobre "patronaje".
We have reached the second week of this six-week mini-course on "pattern making".
Portada creada en Canva
Repasemos la clase # 1:
Cómo pudiste descubrir en la clase # 1 de ésta instrucción, para trazar la blusa con tallas industriales o de fábrica se necesitan 5 medidas:
- Ancho de la espalda
- Contorno del busto
- Largo de talle delantero
- Largo de talle trasero
- Contorno de cintura
Para trazar con tallas personales, es decir, a la medida son 7 medidas:
- Ancho de la espalda
- Contorno del busto
- Largo de talle delantero
- Largo de talle trasero
- Alto del busto
- Separación de busto
- Contorno de cintura
Let's review lesson #1:
As you could discover in class #1 of this instruction, to trace the blouse with industrial or factory sizes you need 5 measurements:
- Back width
- Bust circumference
- Front waist length
- Back waist length
- Waist circumference
For personal sizing, i.e. made to measure, there are 7 measurements:
- Back width
- Bust circumference
- Front waist length
- Back waist length
- Bust height
- Bust spread
- Waist circumference
Aprendamos sobre las Submedidas
Ten en cuanta, que aunque nos referimos a las medidas en centímetros (cm) puedes hacer una conversación a pulgadas(in) ó (") Cuando una pulgada es igual a 2,54 cm. ¿Cómo hago para cambiar el valor de la medida en pulgadas a cm? Lo puedes lograr con una regla de tres. Ejemplo:
Tomo el contorno del busto en cm (talla 10) que son :92 cm
Entonces:
2,54 cm es igual a 1 "
92 cm serían. ? =
Se representa:
1 " x 92 cm ÷ 2,54 cm = 36,2 "
¿Con cuál te resulta trabajar? Tú decides, pero asegúrate de seguir el paso a paso de ésta lección.
... Ahora
Cuando decimos submedidas, nos referimos a las divisiones que le hacemos a la medida original, para trazar patrón. Es necesario fraccionar, así será más sencillo el trazado. Por ejemplo una medida original se fracciona en:
- 1/2
- 1/4
- 1/6
- 1/10
¿Ésto qué significa?
Significa dividir, fraccionar para trabajar con ellas. Veamos a cuáles medidas aplica, para trazar el patrón de la blusa:
| Descripción | 1/2 | 1/4 | 1/6 | 1/10 |
|---|---|---|---|---|
| Ancho de espalda | ✓ | - | ✓ | - |
| Contorno del busto | - | ✓ | - | - |
| Contorno de cintura | - | ✓ | - | - |
Let's learn about submeasurements
Keep in mind, that although we refer to measurements in centimetres (cm) you can make a conversation to inches(in) or ("). When one inch is equal to 2.54 cm. How do I change the value of the measurement from inches to cm? You can do it with a rule of three. Example:
I take the bust circumference in cm (size 10) which is :92 cm.
Then:
2.54 cm equals 1 "
92 cm would be. ? =
It is represented:
1 " x 92 cm ÷ 2.54 cm = 36.2 ".
Which one do you find it easier to work with? You decide, but be sure to follow the step-by-step in this lesson.
... Now
When we say submeasurements, we mean the divisions we make to the original measurement, to draw a pattern. It is necessary to fractionate, so it will be easier to trace the pattern. For example, an original measure is divided into:
- 1/2
- 1/4
- 1/6
- 1/10
What does this mean?
It means dividing, fractioning to work with them. Let's see to which measurements it applies, to draw the pattern of the blouse:
| Description | 1/2 | 1/4 | 1/6 | 1/10 |
|---|---|---|---|---|
| Back width | ✓ | - | ✓ | - |
| Bust circumference | - | ✓ | - | - |
| Waist circumference | - | ✓ | - | - |
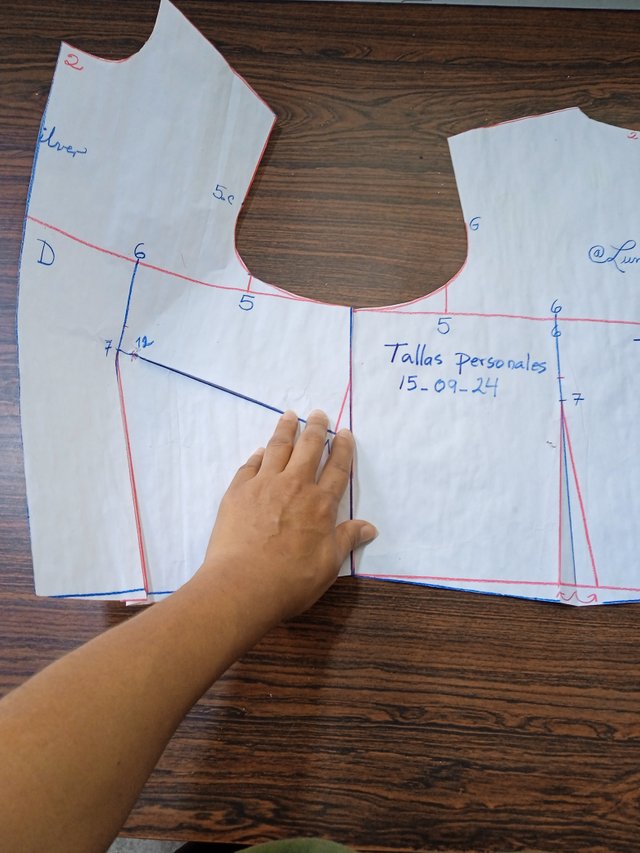
Tracemos el patrón base de la blusa para damas
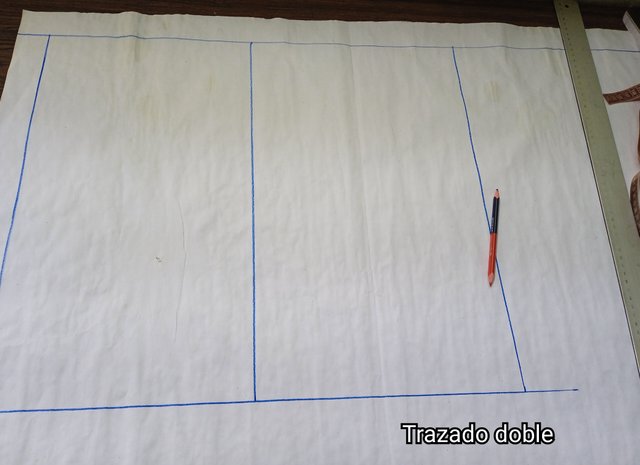
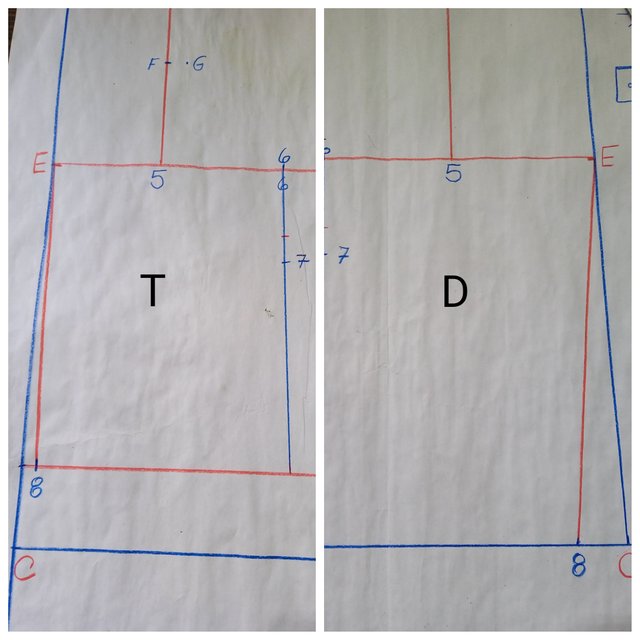
Lo primero que vamos a realizar es un rectángulo donde vamos a incluir los dos cuadros para trazar ambos patrones, es decir la parte trasera y la parte delantera.
Éstos recuadros tienen como medidas 1/4 del contorno del busto por el largo del talle correspondiente.
En el patrón trasero se traza un rectángulo de la 1/4 del contorno de busto por el talle trasero y en el recuadro delantero se hace con la 1/4 del contorno del busto + 2 cm.
Let's draw the base pattern of the ladies' blouse.
The first thing we are going to make is a rectangle where we are going to include the two squares to trace both patterns, that is to say, the back and the front.
These squares have as measures 1/4 of the bust contour by the length of the corresponding waist.
In the back pattern, draw a rectangle of 1/4 of the bust measurement for the back waist and in the front pattern, draw a rectangle of 1/4 of the bust measurement + 2 cm.
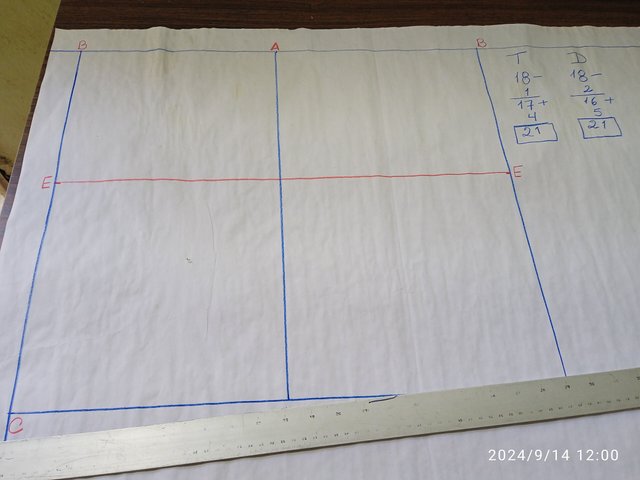
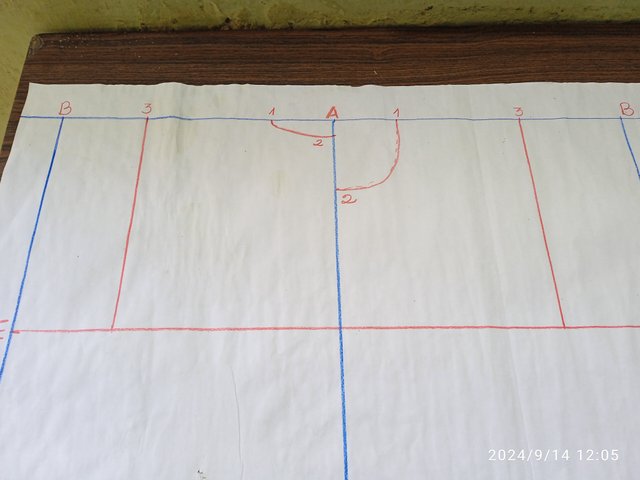
Una vez que hemos hecho los dos recuadros con las medidas pasamos a marcar en cada esquina de los recuadros las letras A B C D.
El recuadro tiene tres líneas principales:
- línea del escote en la parte superior
- línea del busto en la parte intermedia
- línea de cintura en la parte inferior
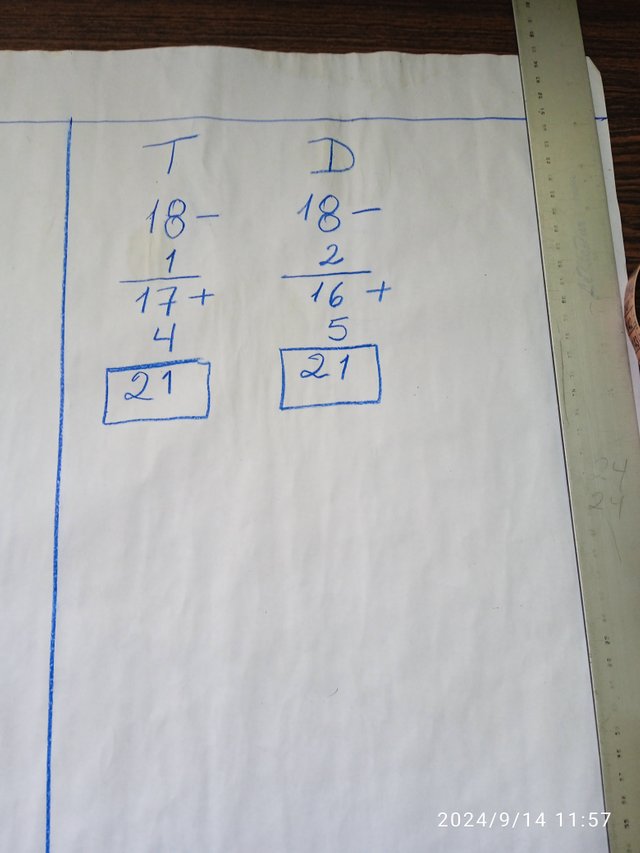
Para marcar la línea intermedia vamos a buscar 1/2 del ancho de espalda, del lado de la parte trasera se le resta 1cm y luego se suman 4 cm. Para la parte delantera se le restan 2 cm y se suman 5 cm. En ambos casos va a dar el mismo resultado.
Once we have made the two boxes with the measurements we move on to mark the letters A B C D in each corner of the boxes.
The box has three main lines:
- neckline at the top
- the bust line in the middle part of the box
- waist line at the bottom
To mark the middle line we will look for 1/2 of the back width, subtract 1cm from the back side and then add 4 cm. For the front side subtract 2 cm and add 5 cm. In both cases it will give the same result.
Entonces, desde B - C, en ambos lados medimos y trazamos la línea E.
Then, from B - C, on both sides we measure and draw the line E.
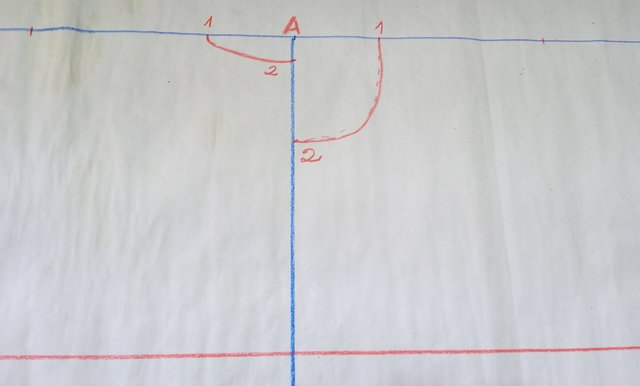
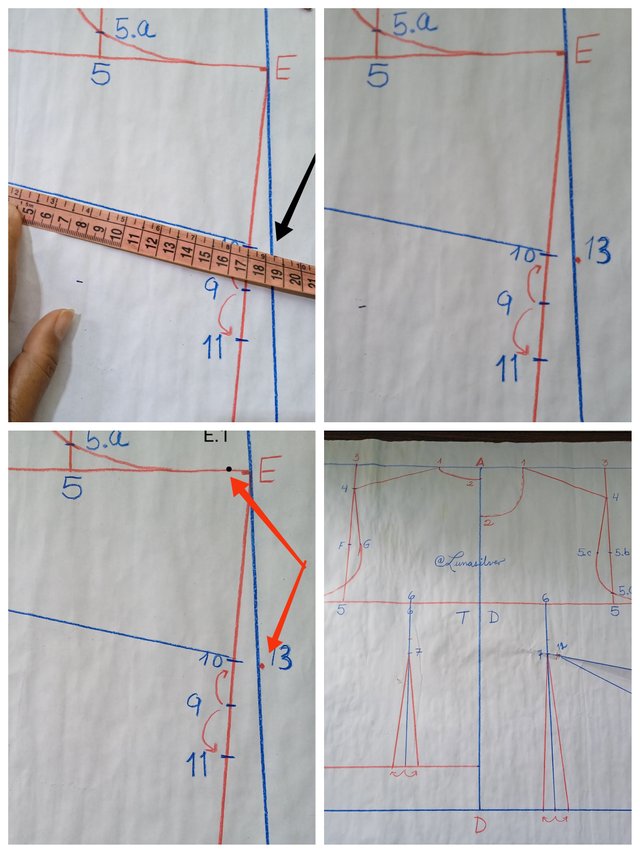
Punto 1. Desde A, hacia cada lado medimos 1/6 del ancho de espalda.
Punto 2. Desde A, hacia D. Bajamos 2 cm en la parte trasera y en la delantera, 1/6 de ancho de espalda + 2 cm. Unimos con una curva.
Point 1. From A, towards each side, measure 1/6 of the back width.
Point 2. From A, towards D. We go down 2 cm in the back and in the front, 1/6 of the width of the back + 2 cm. Join with a curve.
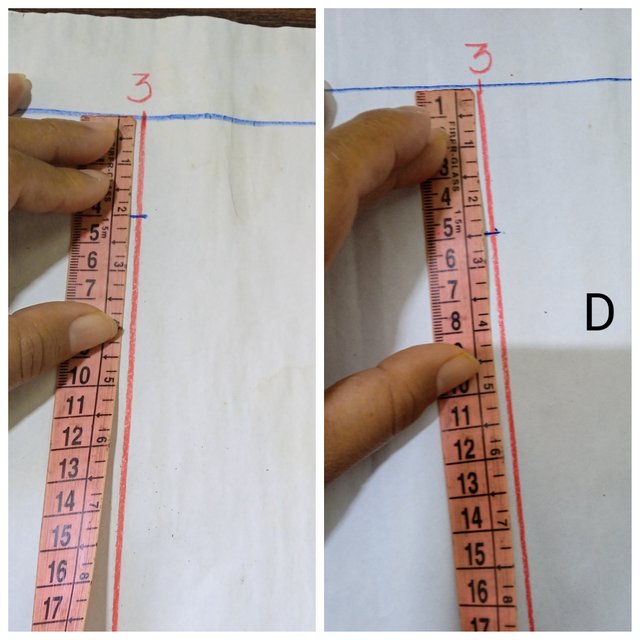
Punto 3. 1/2 del ancho de espalda y se traslada a la línea intermedia (E).
Stitch 3. 1/2 of the back width and moves to the intermediate line (E).
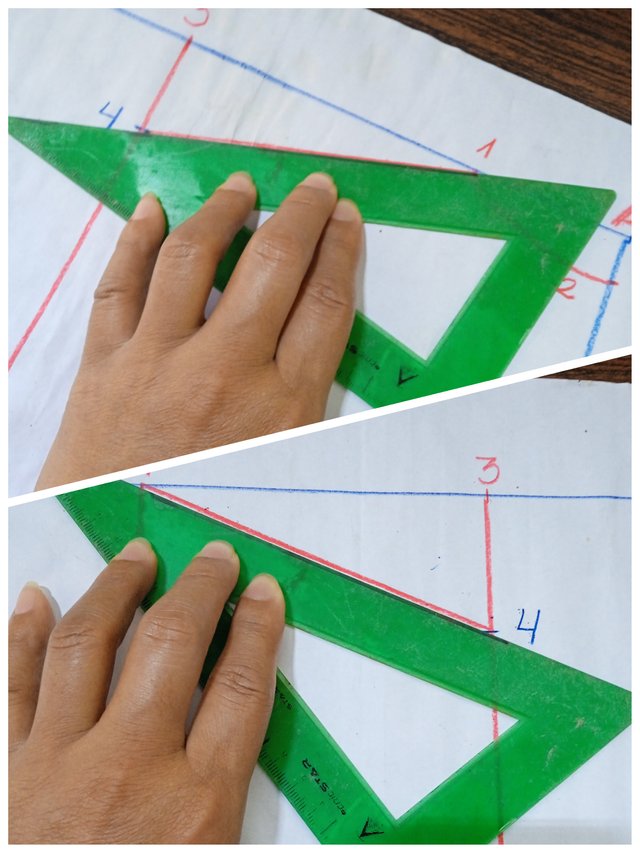
Punto 4. Desde punto 3, se bajan 4 cm en la parte trasera y 5 cm en la parte delantera. Se une con punto 1 con línea recta.
From stitch 3, go down 4 cm at the back and 5 cm at the front. Join stitch 1 with a straight line.
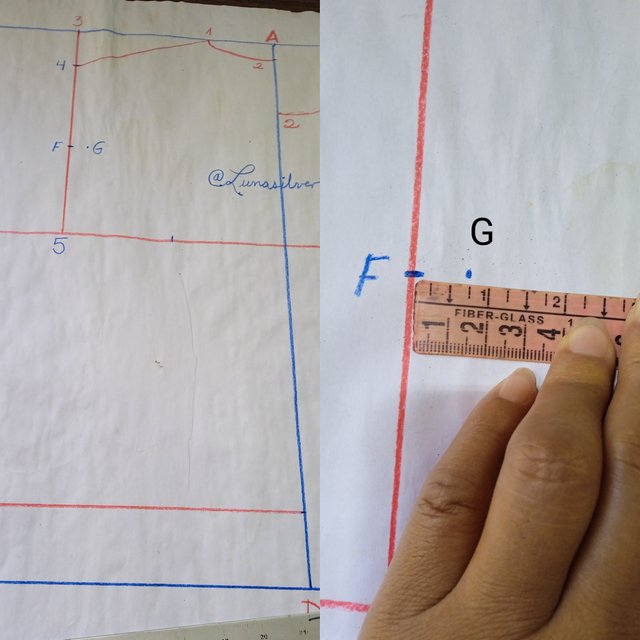
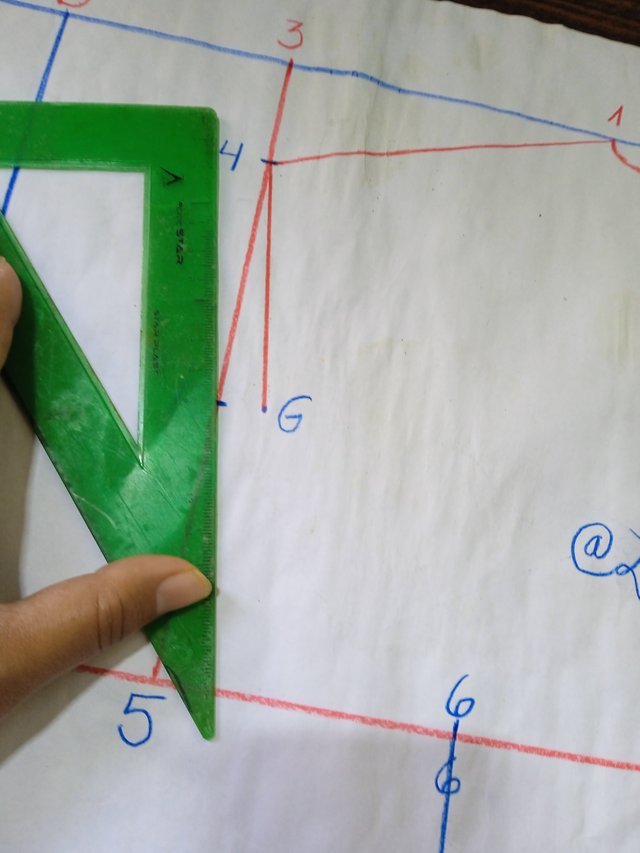
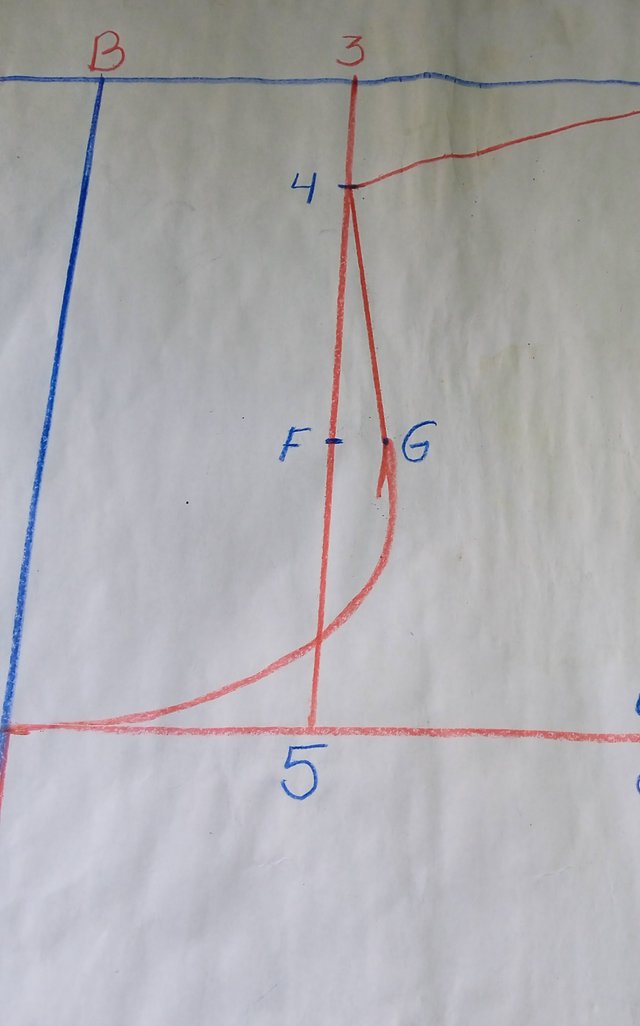
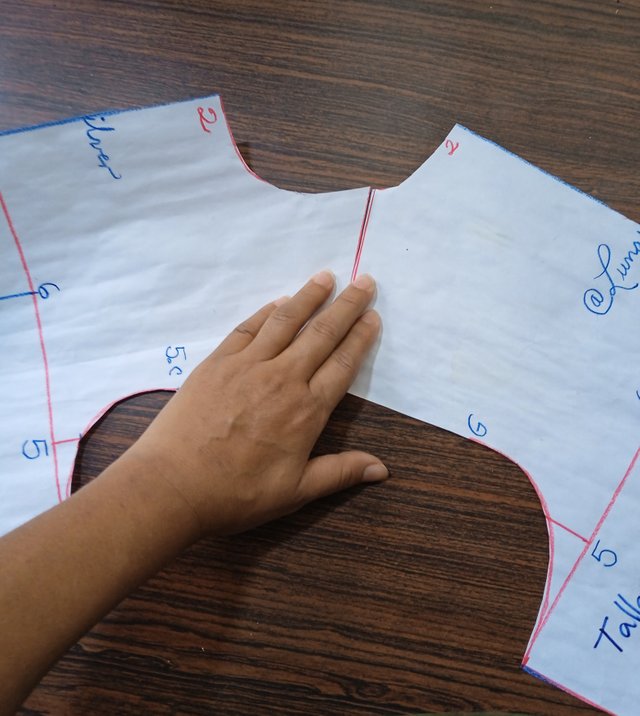
Punto 5. Será donde se encuentra la línea prologada de 3 en línea E. En el patrón trasero, buscamos la mitad de los puntos 5-4, para marcar punto F. Y desde este introducir 1,5 cm para marcar punto G. Unir 4 con G y G con E, en curva para tener la sisa.
Point 5. It will be where the prologue line of 3 in line E is located. On the back pattern, find the middle of stitches 5-4, to mark point F. And from this point, introduce 1.5 cm to mark point G. Join 4 with G and G with E, in a curve to make the armhole.
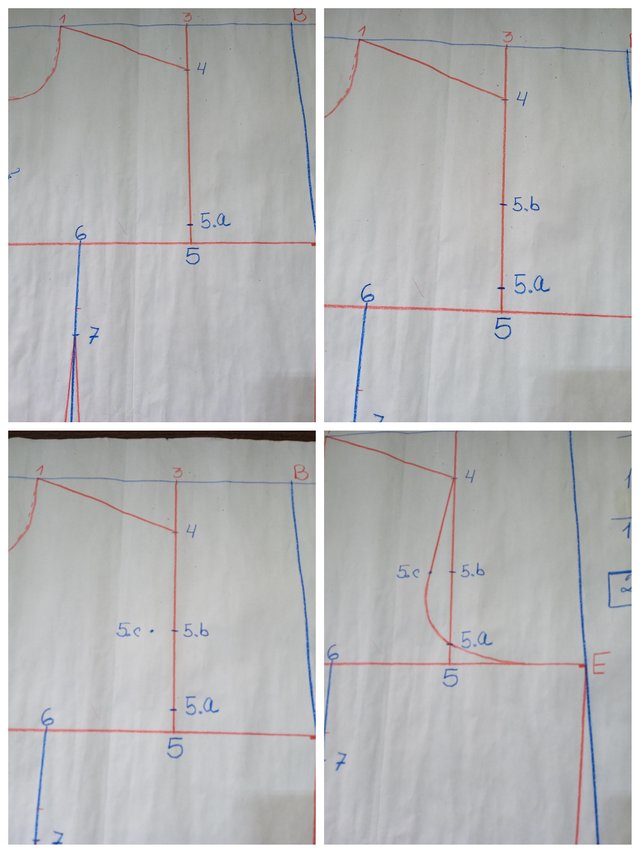
En el patrón delantero desde 5 hacia 4, subo 1,5 cm.(Punto 5.a)Desde allí vuelvo a subir 6 cm (Punto 5.b) y luego introducir 2 cm (Punto 5.c). Unir 4 con 5.c, linea recta y desde allí unir con E, pasando por 5.a, en curva. Descansando suavemente sobre línea E.
In the front pattern from 5 to 4, go up 1.5 cm (stitch 5.a). From there go back up 6 cm (stitch 5.b) and then enter 2 cm (stitch 5.c). Join 4 with 5.c, straight line and from there join with E, passing through 5.a, in a curve. Resting gently on line E.
Punto 6. Busco la mitad de la línea entre los puntos 5-E (central) y lo traslado a la línea de la cintura
I find the middle of the line between points 5-E (centre) and transfer it to the waist line.
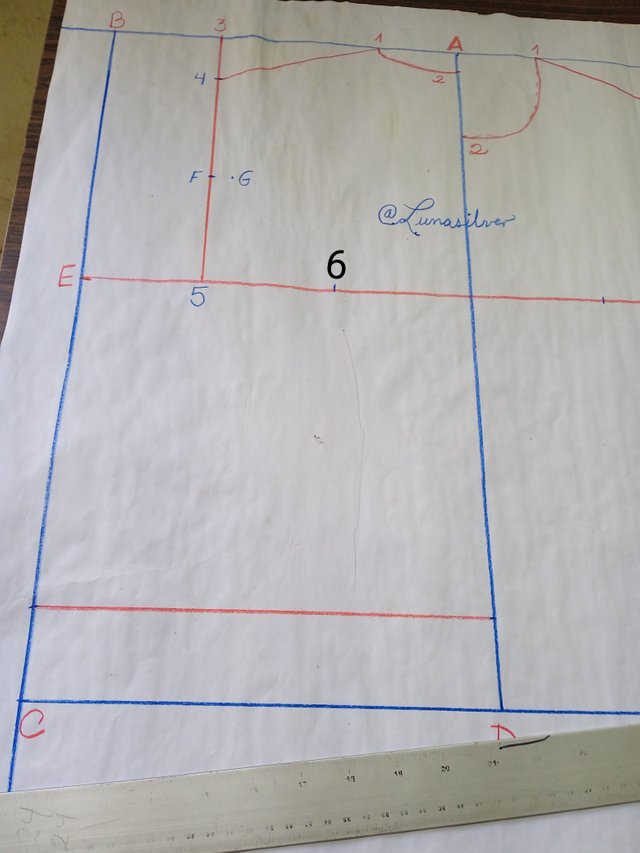
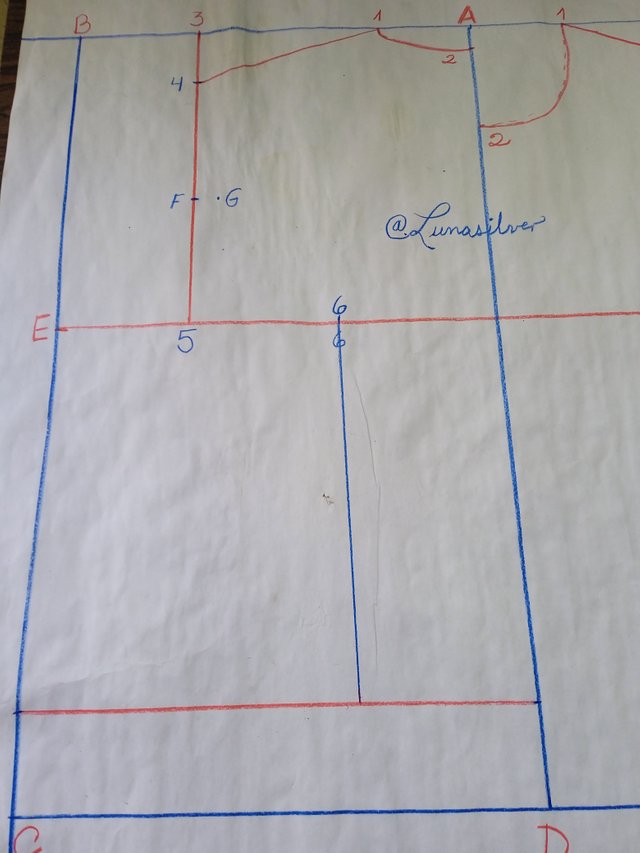
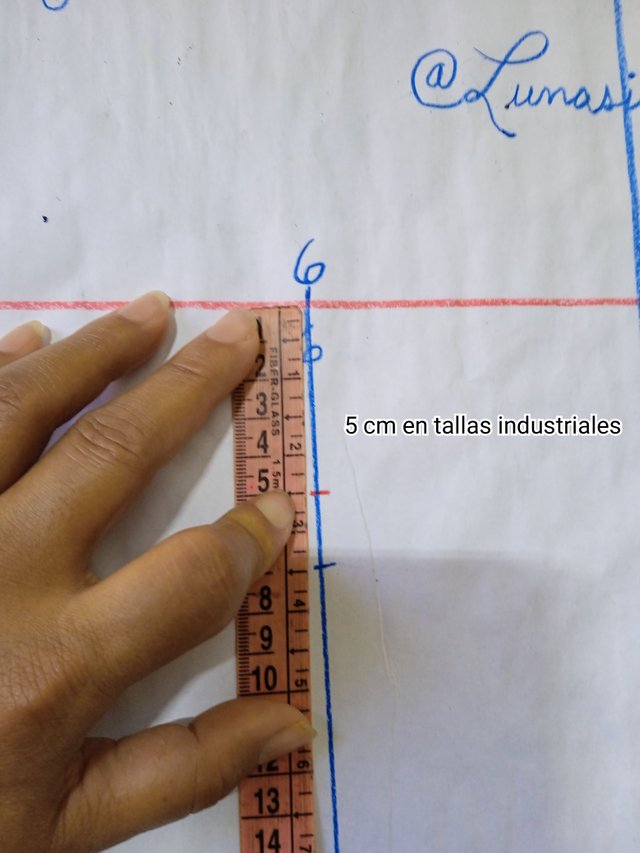
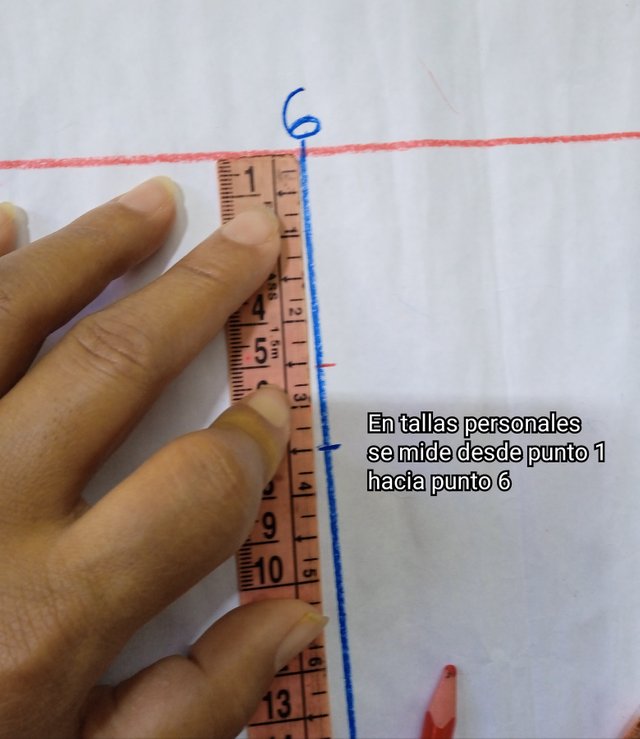
Punto 7. Desde 6, se bajan 5 cm. Pero, si es una medida personal, se mide desde linea de escote, el alto del busto.
Point 7. From 6, go down 5 cm. But, if it is a personal measurement, measure from the neckline, the height of the bust.
Punto 8. Desde D hacia C, en ambos lados, se mide 1/4 de contorno de cintura + 3 cm. Se une con línea E, para tener el costado.
From D to C, on both sides, measure 1/4 of waist circumference + 3 cm. Join with line E, to have the side.
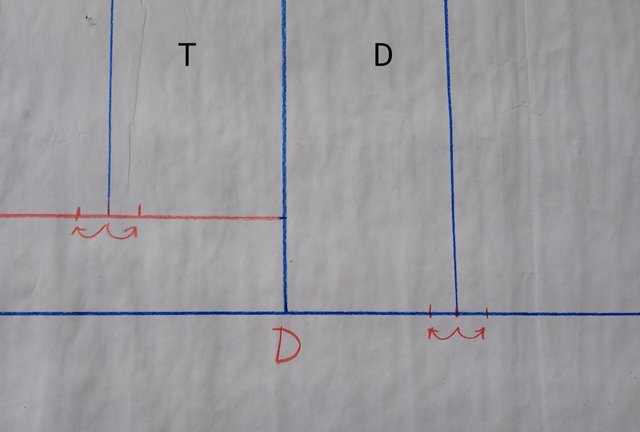
Desde 6, en la línea de la cintura se marca 1,5 cm a cada lado de este punto. Luego se une con dos líneas rectas con punto 7. Allí tendremos la pinza de la cintura
From 6, mark 1.5 cm on each side of this point on the waist line. Then join two straight lines with stitch 7. There we will have the waistband pincer.
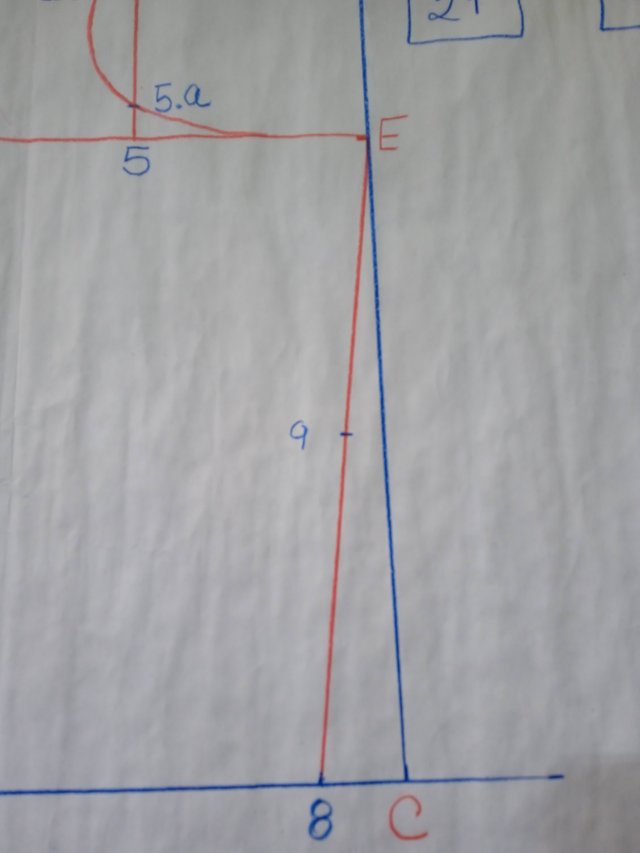
La pinza del costado
Punto 9. Se busca la mitad de la línea entre los puntos 8 y línea E.
The side clip
Point 9. The middle of the line between point 8 and line E is sought.
Cómo viste al principio, el largo del talle trasero y el largo del talle delantero son diferentes. Entonces, al largo de talle Delantero se le resta el largo del talle trasero.
As you saw at the beginning, the length of the back waist and the length of the front waist are different. So, the length of the front waist is reduced by the length of the back waist.
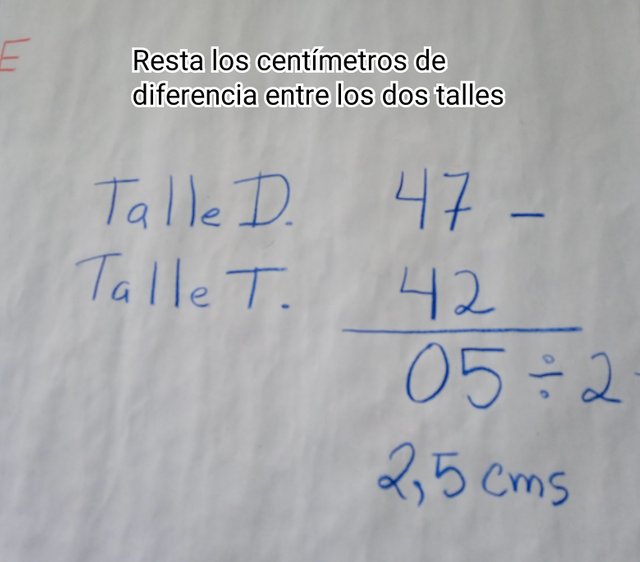
Esos centímetros de diferencia se dividen entre dos y se marcan a cada lado del punto 9. Para tener los puntos 10 y 11. Luego une los puntos 7 y 10, con una recta.
Punto 12. Desde 7 hacía 10, baja 1,5 cm.
These centimetres of difference are divided by two and marked on each side of point 9. To have the points 10 and 11.
Point 12. From 7 to 10, go down 1.5 cm.
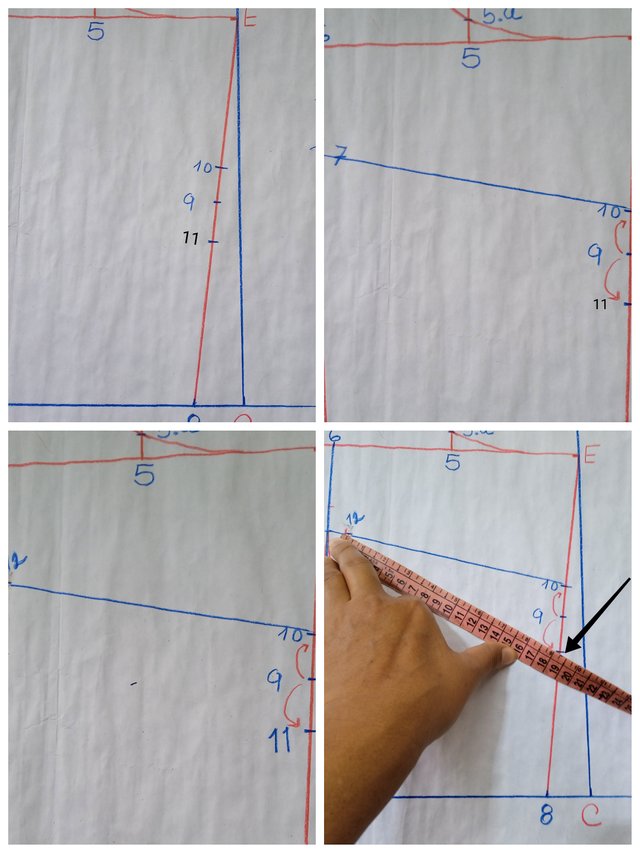
Medimos la línea entre 12 y 11. Luego medimos 12 y 10, te darás cuenta que la línea 12-11 es más larga que la línea 12-10. Así que ese centrimetro demás se le suma a la línea 12-10. Ésta va a sobresalir. Esa misma cantidad se le resta en la línea E. Y marcamos E.1.
We measure the line between 12 and 11. Then we measure 12 and 10, you will notice that the line 12-11 is longer than the line 12-10. So that extra centimetre is added to line 12-10. It's going to stick out. That same amount is subtracted from line E. And we mark E.1.
Cerramos la pinza, y rectificamos el costado. Lo mismo se hace con las pinzas de la cintura en ambos recuadros.
Close the darts, and straighten the side. The same is done with the waist darts on both sides.
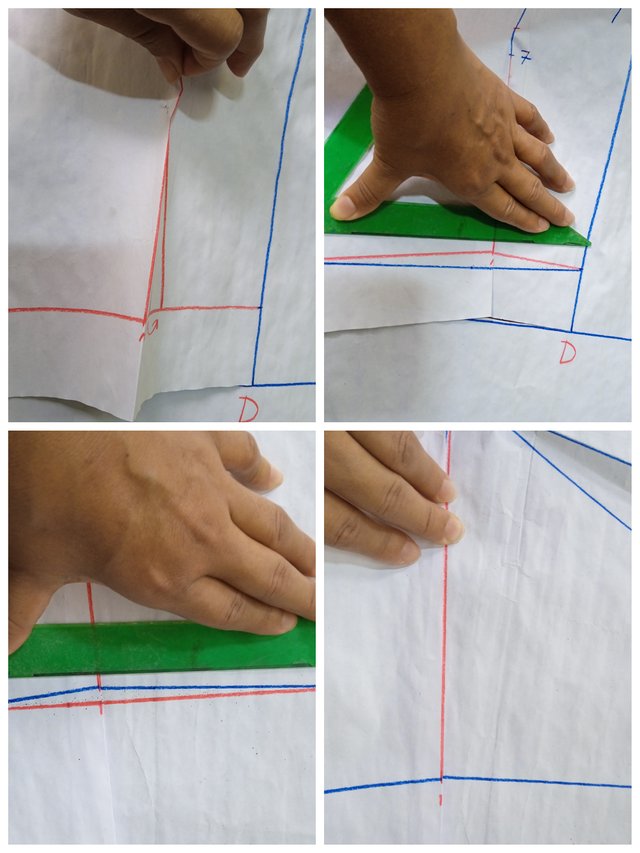
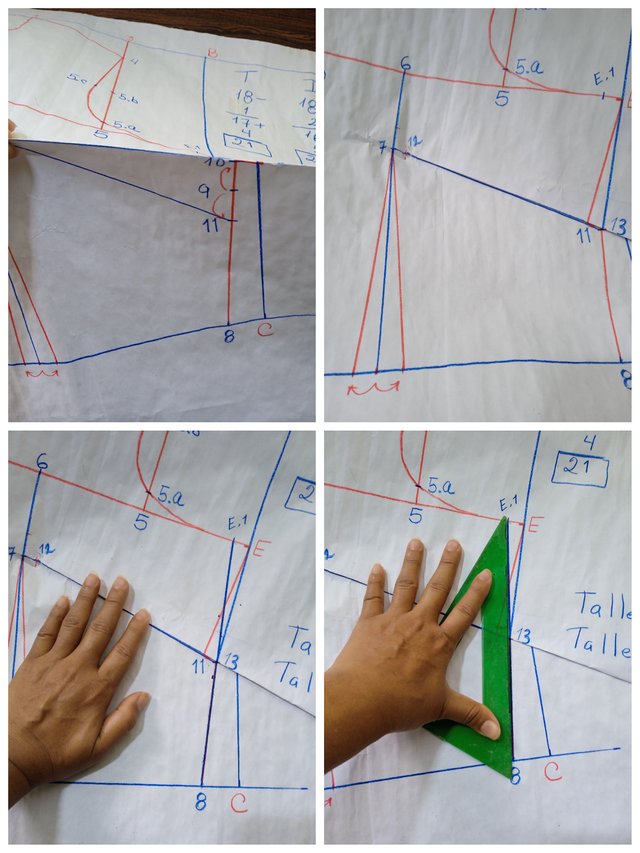
Cuando terminamos el patrón, verificamos los costados y los hombros, para saber si coinciden.
When we finish the pattern, we check the sides and shoulders to see if they match.
Recuerda antes de publicar cumplir con las siguientes reglas:
Pública desde tu propio blog.
Usa éstas 4 etiquetas en primer lugar:
#patronaje-s20w2
#learnwithsteem
#welovelearning
#happylearning
Complementa con:
#sewing
#venezuela (coloca tu país)
#burnsteem25 (sólo si apoyas a @null con el 25% )
Deja el enlace de tu entrada en la caja de comentarios de esta clase # 2
Evita el plagio y las IAs, no contribuyente a las respuestas originales.
- Si me nombras, @lunasilver, en tu publicación me llegará una notificación para evaluar tu práctica más rápido 👍.
Remember to comply with the following rules before posting:
Post from your own blog.
Use these 4 tags first:
#patronaje-s20w2
#learnwithsteem
#welovelearning
#happylearning
Complement with:
#sewing
#venezuela (enter your country)
#burnsteem25 (only if you support @null with 25% )
Leave the link to your post in the comment box of this class #2.
Avoid plagiarism and IAs, don't contribute to the original answers.
- If you name me, @lunasilver, in your post I'll get a notification to evaluate your practice faster 👍.
¿Cómo demostrar que aprendiste los puntos de ésta clase?
- Coloca el valor de las siguientes medidas para trazar el patrón básico de la blusa para damas talla 10 (esta talla es una talla industrial) entonces, sólo tiene 5 medidas.
|Descripción | cm/in|Valor|
|---|---|---|
|1.Ancho de espalda| ? |?|
|2.Contorno o circunferencia del busto| ? |?|
|3.Talle Delantero| ? |?|
|4.Talle Trasero| ?|?|
|5.Contorno o circunferencia de la cintura| ? |?|
(2 puntos)
2.Muestra el paso a paso de tu trazado apoya con imágenes propias. (6 puntos)
3.Dibuja el modelo de la blusa que te gustaría diseñar y cuéntame cómo te fue con el trazado. ¿Tienes alguna duda? (2 puntos)
Este reto entra en vigencia el:
lunes 16 de septiembre de 2024 hasta el domingo 23 septiembre de 2024.
Bienvenidos a esta segunda semana del curso de patronaje, en esta extraordinaria temporada 20.
¿Ya escogiste el modelo de tu blusa?
How do you show that you have learned the stitches in this class?
- Put the value of the following measurements to draw the basic pattern of the blouse for ladies size 10 (this size is an industrial size) so, it has only 5 measurements.
|Description | cm/in|Value|
|---|---|---|
|1.Back width| ?
|Bust circumference| ?
||3.Front Size| ?
|Rear waistline| ?
|Waist circumference or waist circumference| ?
(2 points)
2.Show the step by step of your tracing supported by your own images (6 points).
3.Draw the pattern of the blouse you would like to design and tell me how you did with the tracing. Do you have any questions? (2 points)
This challenge comes into effect on:
Monday 16 September 2024 until Sunday 23 September 2024.
Welcome to the second week of the patternmaking course, in this extraordinary 20th season.
Have you already chosen your blouse pattern?

Hola amiga @lunasilver que bien estas explicaciones para esta segunda clase.
Has explicado cada detalle muy bien. Mantendré atención cuidadosa.
Espero preparar mi tarea pronto.
Éxito y bendiciones!!!
Eso es excelente 👍
Te espero.
@lunasilver - you need to correct the spelling of the required tag in your post.
It should be patronaje-s20w2 not patronage-s20w2.
This will cause entries to be missed.
@bossj23 @federicojavier - please add the correct tag to your posts...
https://steemit.com/patronage-s20w2/@bossj23/sec-20w2-layout-of-the-base-pattern-of-the-blouse-for-women
https://steemit.com/hive-190211/@federicojavier/sec-20w2-or-trazado-del-patron-base-de-la-blusa-para-damas
Disculpa.
Ya hice la corrección. Voy a estar más alerta para la próxima traducción del texto.
Ya realicé las verificaciones de las publicaciones de los participantes.
Tengo una pregunta ❓❓
Cuando los participantes no cumplen las reglas, manifiesta en la publicación de la clase, que puedo hacer ❓
Incluso, muchos no realizan la práctica cómo se pide, muchos deciden colocar la forma en que ellos saben. No el que les enseñé. Entonces, me confunden... Este reto era para yo enseñar o para qué me enseñen a mí?
Para qué colocar asignaciones si la mayoría quiere publicar lo que les parece?
Por ejemplo, está semana invité a realizar la participación desde su propio blog, pero los participantes hicieron caso omiso, sólo el amigo @bossj23 y @blessedlife cumplieron con ese requisito.
I'll just tip in a few words while waiting for the person you asked the question to give answers. As a student in a class, lecturers usually give assignments sometimes based on what they've taught or something different for the class to make researches.
The lecturer has the right to specify that he wants the assignments to be based on his pattern of teaching or solving if it's a mathematical problem
Most students do research on different ways to solve a problem easily without following the teacher's example or may want to impress the teacher by being outstanding. In such a case, the teacher having a wide range of knowledge on how problems can be solved from different angles, should evaluate the assignments of students from different approaches as there no one way to solve something. In as much as the questions uses an accurate step with good result or answer, the lecturer has the right to pass the students not necessarily based on his own steps unless specified.
In conclusion, I think there should be a specification that we should work based on your format. My little contribution. I mean no harm.
Gracias amigo. Ésta sugerencia me ayuda con lo que se ha presentado.
Estoy nueva en éste tipo de instrucción. Normalmente, en clases ( porque también estudió) los profesores nos dan instrucción sobre un asunto. Yo me apego a su enseñanza, porque decidí aprender de ellos. Entonces realizo el ejercicio según lo que indica el profesor, no mi interpretación. Steemit es una gran plataforma, y justo ahora nos invitan a realizar publicaciones desde nuestros blog. Entonces, si tengo algo para enseñar, diseño ni programa de clase y me postulo para convertirme en retador individual.
Por ejemplo, soy una persona que amo cocinar, así que decidí realizar el curso de gastronomía. Y he realizado las tareas como lo pide la instructora. Aunque yo lo sé hacer de otra forma. Sigo las directrices que establece la profesora. Porque estoy consiente que vine a aprender.
Pero...
Gracias por tu comentario amigo. Son muy valiosos.
Yeah. You're right. Using something different even though it may lead to the same result may be challenging to assess as the teacher may have to do researches as to if this kind of method exist, especially for the fact that we are from different countries. Let's hear other suggestions sha.
Quizás sea por mi formalidad, pero si estoy en un curso y la/el docente da unas instrucciones, trato de seguirlas al pie de la letra para aprender lo que intenta enseñarme, si busco hacerlo de otra forma es como que no estuviera en el curso. Puedo buscar otras fuentes para ayudarme, pero no hacer algo completamente distinto a la asignación, mucho más en este experimento que hacemos vía internet.
Las personas que tengan un conocimiento previo pueden mencionarlo, pero igualmente intentar aprender un nuevo método. A algunos usuarios se les hace complicado por el tema del idioma o la cultura, pero más allá de eso deberían mostrar interés en hacerlo como se ha indicado en el taller y creo que nuestros compañeros de otras latitudes así lo han hecho.
Los que hablamos el mismo idioma no tenemos esa dificultad y debemos actuar acorde a lo enseñado.
Respecto a la instrucción de publicar en el blog, por fortuna hace poco por fin aprendí a hacerlo, en verdad antes no daba con la manera de hacerlo, pero la instrucción estaba muy clara allí, el asunto es que muchos incurren en esa omisión por no leer con atención.
De cualquier manera, creo que ese detalle quedaría claro para las próximas clases en el caso de quienes no publicaron en su blog.
0.00 SBD,
3.81 STEEM,
3.81 SP,
0.00 TRX
Thank you!
A eso me refiero amiga. Una de las prácticas que admiro de este espacio llamado Steemit es que se respetan las reglas.
Creo que el problema radica en que hay que salir del paradigma. Esta temporada no es solo competencia, es aprendizaje. Es poder usar en el mundo real lo que aprendemos.
Felicitaciones amiga, porque aunque sabes costura y tienes tus métodos has demostrado ser una participante ejemplar.
Un abrazo 😘
P.d.: Felicitaciones por haber publicado desde tu blog 👍
Jejeje, soy experimental y conozco algunas cosas, profe, ahora estoy ganando un conocimiento con más base con los patrones y eso te lo agradezco a ti.
0.00 SBD,
0.03 STEEM,
0.03 SP,
0.00 TRX
Respected mam,
Your way of teaching is indeed super good and much detailed and of course new. We have learned it according to our country teachers so you know I am trying to participate from past 6 Days but couldn't because when I keenly read your instructions definitely its bit difficult for me to following it well. Still I spent two hours more to focus on your class. So I also need help what to do would I have to following purely your class or can used my previous knowing.
Thank you mam
Amiga eres bienvenida, ya otros han hecho su participación.
Entonces, yo también estoy aprendiendo.
Te espero
Gracias por la sugerencia
This is corrected Sir. The spelling looks almost the same that one could easily overlook. Thanks for the correction. The tag in question is corrected
Congratulations!
Your post has been upvoted by @steemladies.
The community where the Steemian ladies can be free to express themselves, be creative, learn from each other, and give support to their fellow lady Steemians.
Manually curated by liasteem for Steem For Ladies
Para mí es un placer compartir con las damas de la plataforma.
Quiero agradecer a todas esas damas que hacen vida en Steem for ladies. Me hicieron feliz con su apoyo en esta semana 1.
Seguiré esperando su participación.
Un abrazo inmenso 🤗
Hola amiga a pesar de inconvenientes traje mi tarea:
https://steemit.com/patronaje-s20w2/@ternuritajessi/sec-20w2-or-trazado-del-patron-base-de-la-blusa-para-damas
Gracias por el apoyo. Bendiciones!!!
Qué bueno trazar ambos patrones a la vez (trasero y delantero), ya estaremos adelantando un buen trecho, claro está que debemos estar muy atentas a todos los pasos e instrucciones dadas para estar más cerca de esa blusa talla 10.
Éxitos, hay más steemians uniéndose a esta iniciativa y eso me alegra mucho.
Me alegró que hicieras tu participación. Para esta clase me atreví publicar también en inglés. Porque la mayoría de los participantes fueron del otro lado del planeta. Cómo le prometí a la amiga @rumanaafroz, he estado estudiando sus medidas nativas, y yo también aprendí. Mi post en inglés está dedicado a cada uno de mis estudiantes en habla extranjera. Gracias por motivarme a mejorar.
Gracias también a tí amiga. Es satisfactorio tener buena compañía en este viaje maravilloso.
Espero tu participación.
Un abrazo inmenso 🤗
Ma'am I am impressed by your sincerity. It became very easy for me because of your posting in English language.
Thank you very much ma'am.
I am very lucky to have known you in this way.
From today I concentrated myself in trying to present my experience by practicing your measurements.
A big hug and a safe life to you too.
Así sea amiga.
Bendiciones para ti 🙏🙏🙏
Saludos amigos bendiciones aquí mi participación en la segunda edición del curso de patronaje.
https://steemit.com/hive-190211/@federicojavier/sec-20w2-or-trazado-del-patron-base-de-la-blusa-para-damas
Mi publicación en X:
https://x.com/reyigarcia3/status/1836585112437236179?t=DBnfpvmQaEqid-NXd5TXWA&s=19
https://steemit.com/patronage-s20w2/@bossj23/sec-20w2-layout-of-the-base-pattern-of-the-blouse-for-women
Upvoted! Thank you for supporting witness @jswit.
Es un placer apoyar y recibir apoyo.
Saludos feliz y bendecida noche mi participación:
https://steemit.com/hive-181430/@saybel/5ztriu-sec-20w2-or-trazado-del-patron-base-de-la-blusa-para-damas
Enlace a mi participación, disculpas por no colocarlo antes, esta semana ando un poco dispersa
https://steemit.com/patronaje-s20w2/@blessedlife/sec-20w2-or-trazado-del-patron-base-de-la-blusa-para-damas